Migrating a Raspberry Pi smart home server to 64bit
Older Raspberry Pis are not powerful enough for you? Here is how I switched to a new Pi with 8GB of RAM and to the 64bit Pi OS to be able fully utilize it.
Why would you want to switch to a 64 bit OS?
I have been running my smart home server for a long time using a Pi 3 and later a Pi 4 with 2GB of RAM. When I bought the Pi 4 it was very expensive and hard to source due to Corona related supply issues. Also honestly it was good enough for my needs. As you can see here the CPU usage was usually never crossing 40% utilization but RAM was limited – causing issues sometimes (although it ran mostly stable overall).
Another limitation I ran into was several programs supporting only 64bit systems for future releases. The main one for me here was the Unifi controller software I use for my more advanced network setup. Without a 64bit OS I was stuck at an older 6.x version while the newest available ones are 8.x at the moment.
Another example is InfluxDB version 2.x. I use this DB together with Grafana and Home Assistant for beautiful dashboards. The older 1.x version works but I was definitely looking to switch to a newer version for comparison.
Finally there are also versions of the Pi 4 and 5 that ship with more than 4GB of RAM. A standard 32bit operating system can only use roughly 4GB or RAM though, the rest more or less goes to waste. So overall a switch to a 64bit OS will enable you to use more memory and run more modern versions of specific software like the Unifi controller or InfluxDB 2.
What needs to be done for the migration to Pi OS 64bit?
After a bit of research I could not find a safe, reliable and simple way of switching a running system using an older Pi OS 32bit to a newer 64bit version. Parts of it can be changed but you risk running into trouble this way anyway.
Instead I suggest a new installation. If you use a system that relies on Docker containers like my smart home server then a new installation is actually really easy to set up: save the content of your Docker volumes or synced folders on some external storage and also include the needed docker-compose yaml file as well as the .env file. Then flash the new operating system to your SD card (or better yet a new SD card to keep the old one as a backup), copy the files back and restart your containers.
In the end there was a bit more to this process in my case but the core steps still hold true and were made even easier by my switch to an external SSD as data storage for my Docker data folders. I had some other things to set up though that are not part of the Docker containers:
- installation of SSH keys and git credentials might be needed
- logging via Loki requires a separate Docker plugin
- monitoring with cadvisor requires a change to the /boot/cmdline.txt file
- more monitoring requires the installation of a bit more software
- my automatic upload of scanned documents to my Nextcloud requires a bit of setup
Overall the setup only took me around two hours where most of the time can actually be avoided with this guide. Lets get into the details.
Hardware
I had two major issues with my old Pi (beside not being able to upgrade some containers): not enough RAM and some issues with it dropping the connection to my SSD sometimes. To fix these once and for all but stay with the known Pi ecosystem I bought a couple of new components: a new Pi 4 with 8GB of RAM, a new SD card and a new SSD USB adapter.

I decided to stick with the Pi 4 instead of the 5 for now for two reasons: it is a bit cheaper and it runs way cooler and uses less energy. This saves me a bit of money long term but most importantly lets me get away without an active fan. I just use some heat spreaders on the Pi. I also got mine used for a bit less than retail price.
I also got a new SD card for the OS to be installed on. I could have kept using the old one or move the OS to the SSD as well but I like the split between data and OS and wanted to keep the old system on the old SD card as a backup in case anything went bad during the upgrade.

Finally I think somehow my old SSD USB adapter was dying. When I connected it to the new Pi it was unable to read much data from it. After a short time it would always get stuck and finally drop the connection. With the new adapter all those problems were gone and the connection was super fast again.
If you like what you read here and want to support the blog consider buying your hardware via these affiliate links:
Raspberry Pi 4 8GB
Raspberry Pi 5 8GB
Pi cooler set
16GB SD card
SSD USB adapter
Installation
Once you have all the hardware needed for the upgrade I would first recommend backups! In my case I backed up all important files, disconnected the SSD and kept the old SD card as another backup as well. Now lets get to installing the OS on the Pi. Make sure to also create a backup of your Unifi controller (should be somewhere like settings – system – backup) as you will need this later on.
Installing the OS and connecting the SSD
I used the Raspberry Pi imager and a USB SD card reader/writer on my Windows PC to install the OS. For a server like this I suggest selecting the “Raspberry Pi OS (other)” option and going with the Pi OS lite in the 64bit version of course. This will not include desktop environments for example. Those are not needed if you manage the Pi via SSH like I do.

Before you actually flash the image, when clicking on the next button, it will ask you if you want to change settings – I suggest you do. Otherwise you can also click CTRL+Shift+X to get the same menu.

I suggest changing the server name to your liking and setting a custom username and password. If you want to connect your Pi to your network via Wifi you also need to provide the credentials here. I strongly recommend a wired connection for a server though.

In the next tab you will find the important SSH settings. If you want to manage your server remotely (on the same network) you should enable this option. I strongly recommend using an SSH key for access. I described exactly how to do that here. It is a safer and more convenient method in the long run.

Finally there are some general options. I did deactivate the telemetry settings but that is up to you.
Once all these settings are configured to your liking just flash the OS onto your SSD and insert it into the Pi once done. Connect the Pi to your network, let it boot and then connect via SSH and the host name you set up earlier. Putty or MobaXterm are great SSH clients on Windows, on Mac or Linux I suggest just using the command line.
If you host your network controller and DNS server on the home server like I do then keep in mind that there might be some issues with your network while the server is done. I had to manually set up a DHCP server and then connect to my Pi.
Once connected to the new system finish the setup via sudo raspi config. I suggest expanding the file system and running all updates. Those can also be done manually via sudo apt update && sudo apt upgrade.
Because of the aforementioned network issues I also had to set a fixed IP on the server side. To do that I used sudo nmtui and changed the “Wired connection 1” settings to use a set IP. In my case 192.168.2.4 should be my home server.

Finally let’s connect the SSD with the data. Just plug it in via the USB connection (depending on the Pi model chose a faster USB port). Afterwards the new adapter/SSD should show up via lsusb or lsblk. You can follow this step. I also auto mounted the SSD on startup via fstab.
sudo mkdir /mnt/extssd/ # creating mounting point
sudo mount /dev/sda1 /mnt/extssd # mount temporarily

# mounting permanently
nano /etc/fstab
UUID=3ac19978-702b-4cdd-8aa8-75e5af8f5b73 /mnt/extssd ext4 defaults 0 0
Installing git & Docker
Now that the system is running and the SSD with the container data is connected, lets install some needed programs to run our containers.
sudo apt update & apt upgrade
sudo apt install git
curl -sSL https://get.docker.com | sh
docker version # shows OS/Arch: linux/arm64
docker compose version
I updated the system (again) here and then installed Git, which we will need later. Then I set up docker which now automatically included docker compose as well. The last two lines will just show you the installed version and basically verify everything is running as expected.
Updating & starting the containers
The next step was updating all my containers and then running the new ones. The start was quite easy: a simple git clone https://github.com/OliverHi/smarthomeserver.git will pull all my yaml files including my docker compose based containers.
Next you should check and update the .env file if needed. In my case no changes were needed as I kept the same path for mounting my external SSD. If you are planning on using Loki for log aggregation like I do, I suggest installing the Loki docker plugin. This is slightly different now than with the old 32bit OS:
docker plugin install grafana/loki-docker-driver:latest --alias loki --grant-all-permissions
// for the old 32 bitOS I used the arm-v7 version:
docker plugin install grafana/loki-docker-driver:arm-v7 --alias loki --grant-all-permissions
After running the install command you can user docker plugin ls to check the status. It should show a enabled = true status. Now we can actually get to updating some containers. In most cases no update is needed, Docker will automatically pull the image that is right for your OS. In some cases I did some manual changes though.
My main change here was the Unifi controller. I used to run the ghcr.io/linuxserver/unifi-controller:arm32v7 image using the last working old version of 6.5.55. Now I could finally switch to a new version. The linuxserver team actually also switched to an entirely new image recently so I took the chance to update that as well. I switched to lscr.io/linuxserver/unifi-network-application:8.0.26 now using an external Mongo database as well. This is my current setup:
unifi-network-application:
    image: lscr.io/linuxserver/unifi-network-application:8.0.26
    container_name: unifi-network-application
    depends_on:
      - unifi-db
    environment:
      - PUID=${PUID}
      - PGID=${PGID}
      - TZ=${TZ}
      - MONGO_HOST=unifi-db
      - MONGO_PORT=27017
      - MONGO_DBNAME=${UNIFI_MONGO_DB}
      - MONGO_USER=${UNIFI_MONGO_USER}
      - MONGO_PASS=${UNIFI_MONGO_PASSWORD}
      #- MEM_LIMIT=1024 #optional
      #- MEM_STARTUP=1024 #optional
    volumes:
      - ${DATADIR}/unifi-network-application/config:/config
    ports:
      - 8443:8443
      - 3478:3478/udp
      - 10001:10001/udp
      - 8080:8080
      - 1900:1900/udp #optional
      - 8843:8843 #optional
      - 8880:8880 #optional
      - 6789:6789 #optional
      - 5514:5514/udp #optional
    restart: unless-stopped
    logging:
      driver: loki
      options:
        loki-url: "http://localhost:3100/loki/api/v1/push"
        max-size: "100m"

  unifi-db:
    image: docker.io/mongo:4.4.18
    container_name: unifi-db
    volumes:
      - ${DATADIR}/unifi-network-application/db:/data/db
      - ./init-unifi-mongo.js:/docker-entrypoint-initdb.d/init-mongo.js:ro
    restart: unless-stopped
    logging:
      driver: loki
      options:
        loki-url: "http://localhost:3100/loki/api/v1/push"
        max-size: "100m"
Most of this should be pretty clear, I follow the same standards as with all my other containers. You will have to add another couple of entries to your .env file to store the user/password/database name for the Mongo database.
I also made sure to use Mongo 4.4.x as newer Mongo versions use some features not supported by the Raspberry Pi 4. To initialize the Mongo database I mounted a special init-mongo.js file in read only mode. That file contains some lines taken from the documentation that create some users. Make sure to use the same values for the user name/password/database name here as you set in your env file.
db.getSiblingDB("unifi").createUser({user: "unifi", pwd: "samePwAsInEnvFile", roles: [{role: "dbOwner", db: "unifi"}]});
db.getSiblingDB("unifi_stat").createUser({user: "unifi", pwd: "samePwAsInEnvFile", roles: [{role: "dbOwner", db: "unifi_stat"}]});
A small hint here: a direct update using the existing docker data mounts is not possible. You need to start the new container using a new mount (in my case ${DATADIR}/unifi-network-application/), start it, and import the backup I mentioned in the beginning.
For now I did not update any other containers but I will update the guide here once I switch a newer InfluxDB version. You can now simply use docker compose -f fileName.yml up -d to start running your containers file by file. Make sure to check logs in between to see if everything works as expected.
Fixing monitoring
In my case pretty much everything started up as expected but I did not see all the needed values in my monitoring dashboard. Most importantly the RAM usage was missing. That is a problem I already know though. Again the fix was to update the /boot/cmdline.txt file as described in that article. One reboot later monitoring of the docker containers started to work again.
I do also run some monitoring of the Pi(s) itself using the RPi Reporter MQTT2HA Daemon. The installation was mostly the same as described in my initial article but to run the daemon I needed to install some additional python packages manually. In my this helped:
sudo apt install python3-paho-mqtt pyhton3-wheel python3-sdnotify python3-unidecode python3-colorama python3-tzlocal python3-requestsAfterwards I was able to start the daemon and it showed up in my MQTT server and on my Home Assistant dashboard.
Reinstalling the automatic document upload tool
Finally I run a small script I wrote some time ago that automatically copies files uploaded from my network scanner to my Nextcloud storage. For the installation you can again follow the readme file but in this case there is no need to create a new rclone configuration file. I simply copied the old one to my SSD before disconnecting my old setup and copied it back to use it here for the new one.
The setup needs a samba share for the scanner to upload the documents though so I installed that using:
sudo apt install samba
sudo apt install rclone inotify-tools git
sudo adduser --no-create-home --disabled-password --disabled-login scanner
sudo smbpasswd -a scanner

sudo nano /etc/samba/smb.conf

// add this
[HomeAssistant config]
comment = HomeAssistant config
path = /mnt/extssd/dockerData/homeassistant/
force user = root
force group = root
writeable = yes
valid users = homeassistant

[scans]
comment = Scans folder
path = /mnt/extssd/scans/
force user = scanner
force group = scanner
writeable = yes
valid users = scanner
I add two samba shares here: one exposes the Home Assistant configuration in case I need to directly edit some files, the other one is the share used for the scanner.
This automatic upload coupled with my Paperless-ngx instance makes for an awesome document management system and allows me to get rid of most of the paper I receive.
Facts & numbers
So that’s it, the update was pretty painless overall. With this nice setup of configuration file based Docker containers and an external data storage it does not take a lot of time to recreate the full system. Overall how do I like the new setup? Is it worth the money?
First, what is definitely worth it is the new SSD USB adapter. I don’t know what happened to the old one but this fixed all the connection reliability and speed issues I had before and now the storage feels super fast again. No need to actually change the SSD itself.
Regarding the new Pi: it is definitely great to have more than 2GB of RAM but at least at the moment 8GB is overkill, I would be fine with 4GB as well. Without any additional optimization I use around 3,7GB running all my containers.

As you can see here the memory usage is pretty constant over the last two weeks with most of the memory used for the InfluxDB (for sure that can be optimized), Home Assistant and the new Unifi controller & its DB. Everything else uses much less.
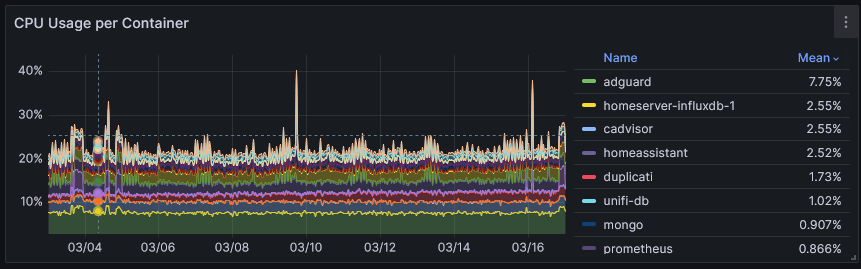
The CPU usage shows again that the Pi is actually overkill in most regards here. I don’t really run any CPU heavy applications. Most of the CPU is actually used for my Adguard DNS ad blocker which is handling a lot of requests. Other Software only needs more CPU power for short times during backups or more complicated Home Assistant automations.
So while the upgrade to the big 8GB Pi was maybe overkill I am happy to have this buffer for future containers I might want to run. I am happy I stayed with a Pi 4 and did not use the more power hungry Pi 5 though as more CPU power seems to not be needed at all.
Finally I am very happy to have the newest version of the Unifi controller, one that will still be supported for a long time (I hope). While the old version was still working well the new one looks a lot cleaner and is easier to use in some places, once you get used to where stuff can be found now.