How to SSH into your smart home server the secure way
A server like the small Raspberry Pi usually sits in a remote location and has screen or input devices connected to it. To be able to control it remotely SSH is the de-facto standard on Linux. Here is how to set it up to control your smart home server from a (Windows) PC.

A (remote) server – why do you need SSH access?
Many servers like my smart home server or other small devices like the Pi Zero controlling my Magic Mirror and the Pi running Octoprint are placed in remote locations, enclosed in some boxes or otherwise not easily reachable. All of them have no mouse, keyboard or screen connected to them. Even my full home (storage) server only has a screen as a backup.
To control such remote servers there is a great solution that allows full control via the network (even remotely via a VPN): SSH. SSH or secure shell protocol basically gives you encrypted access to a shell /terminal on the server. This way you can use the command line in the same way you would if you were sitting in front of the device.
How to connect to SSH
To connect to a server via SSH you need two things: the server needs to have a SSH server running and be reachable from your location and you need a SSH client.
How to enable SSH on a server
This depends on the operatic system. If you are running a full blown Debian/Ubuntu server installation you can usually enable SSH during the installation process. If thats not yet done you need to connect to the server locally one last time and install the SSH server like this (might change slightly depending on the OS and version.
sudo apt install openssh-server
sudo systemctl status ssh # check to see if the server is now running
sudo systemctl start ssh # only if it was not running before
sudo ufw allow ssh # if the firewall is blocking the SSH access
On Raspberry Pi OS the process is slightly different. You can right away enable SSH in the installer when you use Raspberry Pi Imager by clicking the gear icon after selecting the OS. In the new menu you can enable SSH and even provide a public key (more on that later).

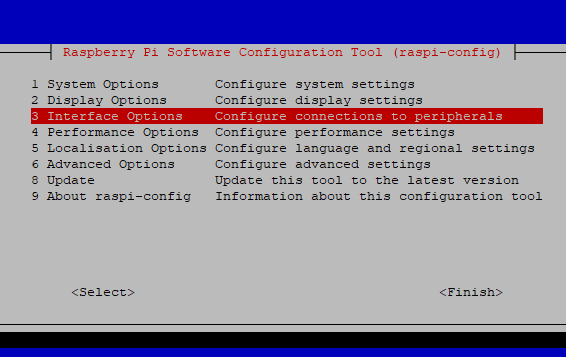
If you already set up the Pi and did not activate SSH you can use sudo raspi-config and go to “Interface Options” to enable SSH there.
The last step is to make sure that you can reach the device in your network. Connect it to LAN or Wifi and configure your router properly. This very much depends on your setup. I have a bit more complicated setup using VLANs which I explained here.
If you are not in the same network as the server a VPN is a great solution to get SSH access. Exposing SSH directly to the Internet is nearly never a good idea!
How to use a SSH client
Which client you use to connect to SSH depends on your OS. Linux and MacOS include a SSH client on the command line. Something like ssh username@ip_address should give you access. If you are using Windows or prefer a graphical interface there are many good SSH clients out there.
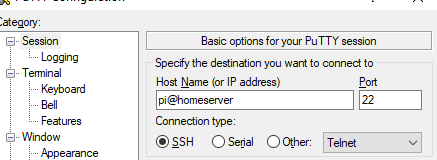
As I already shared in my smart home software post I use Putty or MobaXTerm most of the time. Using Putty is very simple: go to the session tab, enter user@ip_address (where the user@ part is optional) into the host name field, select the SSH box below it and click open. You will be asked for a password, just type it in the new terminal. Don’t worry about the password not showing up, that is a security feature, just keep typing and press enter when you are done.
You can even save the connection details for later use by using the Load/Save buttons below. Very neat! If you use MobaXTerm it will also automatically show any connections saved in Putty before.
Thats it, you should now be able to connect to your server remotely. Just be careful when changing network settings or you might lock yourself out.
Using SSH keys for easier connection
If you connect to a SSH server with default configuration you need to type in your password every time. If you use this often that can become quite annoying and is also a possible security risk if your password is not strong enough.
There is a better and more secure alternative to using passwords: use SSH keys. They are similar to very long and strong passwords but you do not have to remember them. Instead you generate one public key that you can share with others and your server so that they can identify you and a private one that you use to log in and should never share with others.
Here is how to generate SSH keys on Windows with PuttyGen, a small program distributes with Putty. Open it and click the Generate button to start generating both, the private and public, keys.

Now move the mouse randomly over the window to help it get some random input. After some time the keys will be generated and you can now provide an additional password to encrypt the key itself. This is not obligatory but is a great second line of defense. You can also provide a comment here that you can later use to recognize different keys.

Then you are done. Use the “Save public key” and “Save private key” buttons to save the two .ppk files with the keys. Again be sure to never share the private one but keep it safe and have a backup. If you lose it you might lose access to your server!
Now we need to set up the server to accept these keys instead of the password. Copy the ssh-rsa AAAB... part from the box at the top of the generator and SSH into your server. If it does not yet exist create a new file called authorized_keys in the .ssh folder and paste your public key (not the private one!) into this file. Make sure that it does not include any line breaks!
mkdir ~/.ssh # if it does not yet exist
touch ~/.ssh/authorized_keys
nano ~/.ssh/authorized_keys # no paste in the public key, CTRL+O to save

# you might also want to secure this via
sudo chmod 700 ~.ssh
sudo chmod 644 ~/.ssh/authorized_keys
sudo chown pi:pi ~/.ssh/authorized_keys # if your user is called pi
After saving this new file with the public key you should now be able to connect to this server using the keys. If its not yet working try restarting the SSH server via sudo service ssh restart or just reboot the system.
So how do you connect to a SSH server with a key via Putty? Provide the hostname/IP and username as usual in the “Session” tab and then go to “Connection – SSH – Auth – Credentials” and use the browse button to provide the ppk file with your private key.

Now you can click open to connect as usual and the terminal should show a message like Authenticating with public key “some key name”. If it still asks for your password check again if the public key was properly placed on the server like shown above.
No as a last step if you want to disable password based access at all and only use keys then open the /etc/ssh/sshd_config file and find the PasswordAuthentication line and make sure it has a no at the end. Then save the file and reboot your system.