Building a full home server- the basics
Self-hosting important software and data on your own home server has a lot of advantages but can be a daunting task to get started with. I have been running my own server for a couple of years now and will describe the choices in hardware and software here. This will be a full guide on how to set up your own small server.
Why should you build your own server?
In some cases you should not. Some very costly, specialized or hard to configure (like email) services might actually be better of with an external provider. If you only use your services very rarely or are not at all willing to dive into some of the knowledge needed for hosting this might also not be the right place for you.
Do not be scared though, hosting software on your own has never been as simple as it is today and it comes with a lot of advantages. Maybe most importantly it makes you a bit more independent. Tech giants do not have such an easy time to get your data and some problem with the cloud or with your Internet provider does not stop you from accessing your data and services (locally).
At a time where services are controlling increasingly important parts of your life (like a smart home system) this control and independence can be invaluable. In the long run it can even be more cost effective. Sure, buying hardware is an investment, but hosting Terabytes of data in the cloud will cost you a lot too – forever.
Last but not least it can be a very fun project that helps you learn a lot about technology and you are always free to try out new software. There is so much amazing open source & free software out there!
What do you want to with your server?
Before building anything it is important to ask yourself: what am I planning to do with this server? If you are looking to just host a couple of small services locally without much data the result will look very different from a full storage server.
If you just need local services I recommend in most cases to get a newer Raspberry Pi and possibly an external SSD for data. They are cheap, energy efficient and easy to set up. I have described my small smart home server and hub based on the Raspberry Pi 4 in depth in this article. Adding a SSD for small data storage is also quite easy.
During the time when Raspberry Pis were not really available many also switched to lightweight desktop clients that can be bought for cheap on Ebay. While these are indeed cheap and can be much more powerful than a Pi they also often draw a lot more power and might be noisy. Keep that in mind if you think about going that route.
If you are looking for a more powerful solution or need to store a lot of data I recommend using a different platform. Some people use a NAS or old server hardware (which can work very well) but I recommend normal customer hardware with a focus on some special characteristics.
- Make sure to have a good network connection (1Gbit/s or maybe even 10 depending on the rest of your network)
- Use energy efficient components and depending on where you want to place the server silent ones
- Get a CPU that is powerful enough while not wasting energy in idle
- Usually you do not need a graphics card
- Get enough RAM, this can be quite important for your server
- Get a mainboard and case that can hold enough HDDs & SSDs for storage and has good cooling
- Get quality storage media. I have used the WD red series a lot (just be careful to avoid the SMR versions) and have heard good things about the Seagate Ironwolf series too
- Make sure your components are cooled properly and everything is connected well enough. You will want this to be build & forget
- Get a quality power adapter!
- I would personally avoid hardware RAID controllers
If you are looking to build a home server consider buying via these affiliate links to support the blog
Western Digital Red Plus series
Seagate IronWolf Series
Raspberry Pi 4 8GB for a smaller server
The German publisher Heise has some great articles on building your own server. You can also find a lot of international articles about this. My personal learning after building several versions of the server is to always plan for what you need right now and the very near future. Do not build for something you might need in 10 years. By then there will be better hardware available. The only exception to this might be storage. It is always a good idea to have a couple of SATA ports left so you can add more storage later.
The software stack
There is a lot of software out there made for servers and every choice will depend on your preferences and use case. The following is my personal opinion after a couple of years working on this problem in my free time.
First of all lets start with what I would not use on a server: Windows. Upgrades are hard, a lot of software is not properly supported and it is expensive. Instead go with a Unix/Linux solution. There are full solutions for this like FreeNAS, OpenMediaVault or Unraid but Unraid costs money and the other solutions are also restricting what you can do. They might be a good choice for you but I ultimately decided to go the DIY route and build my own solution based on proven technology.
If you are looking for a more lightweight solution targeted specifically at a smart home I recommend you head over to my smart home server article or the associated Github repository. That system runs on a Raspberry Pi and comes with docker-compose files for Home Assistant, Grafana, MQTT and more. If you are looking for a more generic solution or a storage server then continue with this guide.
My home server is running on a minimal Ubuntu server OS (an LTS version) with SSH access for administration. I use the ZFS file system to pool the drives into one big data pool while providing functionality like caches, snapshots, RAID and simple backups. In this pool I created several file systems for different uses cases with some of them made available via the network for other clients to use. On the server runs a Docker daemon and I use several docker-compose files to host a set of services like OpenHab, Grafana, Bitwarden/Vaultwarden and Nextcloud. A reverse proxy (Traefik at the moment) makes it possible to reach select services from anywhere on the web.
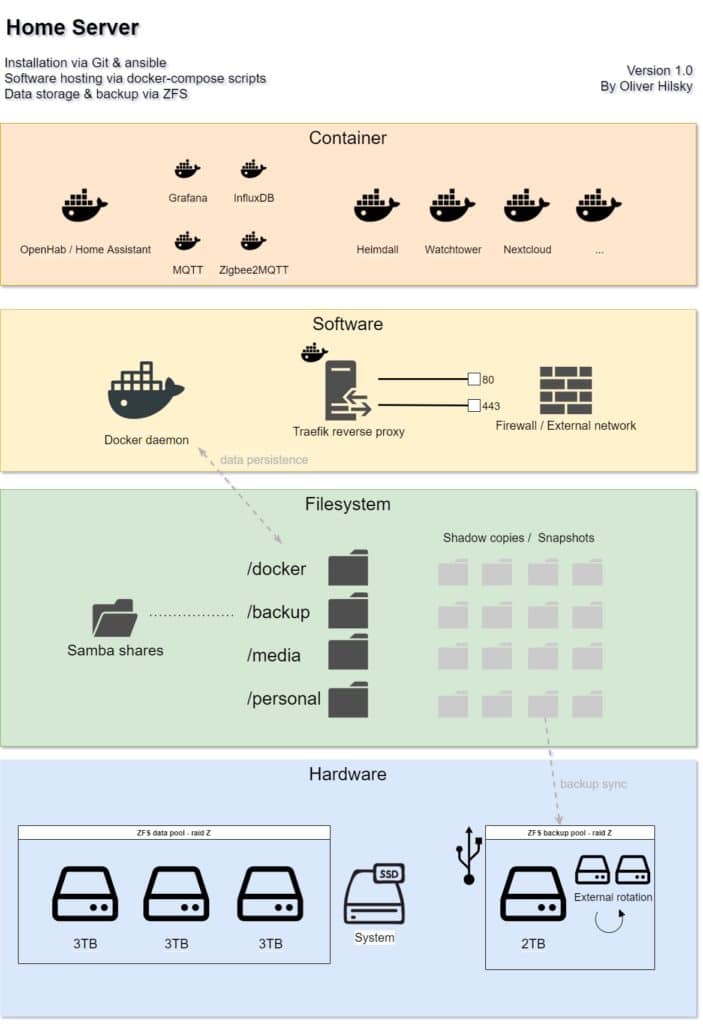
External backups are done via additional drives connected via USB and regularly rotated. A couple of scripts and an uptime monitor are regularly checking if the everything is still running properly and sending alarms otherwise. The installation is mostly automated and can be re-done on new hardware quickly (if the data is still available of course).
How to set up the server – automated installation
Before actually setting up the server I decided to automate this process. This makes it easier, faster, less error prone and also acts as a kind of documentation. Having a base platform that can reliably be set up quickly and easily is a great advantage. This way everything else, data and the actual services, can be configured independently form this system. If I every want to switch to something else it should be relatively easy.
For the automation I chose Ansible. Ansible is a software that allows you to write so called playbooks: short scripts that define what steps should be done to set up your server. These playbooks can then be invoked with a simple command and will automate all the manual steps needed for the setup process. I have learned Ansible myself while setting up the server so I am sure the playbooks could be better but I will share them, as well as everything else needed for the server setup, via GitHub in the following parts of this series.
I ran these scripts in a VM a couple of times before the actual installation to make sure everything works as intended. Since then I have added a couple of new features though and reworked parts of the existing ones. The actual installation on the server was quite simple.
First you need to install your favorite Linux OS. I chose Ubuntu Server LTS and installed it via a USB stick. The system is installed on a SSD for faster startup times. After the installation I only configured the network (I recommend a static IP), enabled SSH and moved the server to its final physical position. From now on no screen/keyboard/mouse is needed, it can be managed via the network (unless something goes wrong).
The next steps are simple too: download the scripts you need, install Ansible and run the playbooks.
sudo apt install git ansible
git clone https://github.com/OliverHi/zfs-homeserver.git
cd zfs-homeserver/ansible
ansible-playbook setup_playbook.yml -K
This will run a playbook called setup_playbook.yml that will set up the server. Of course you can use any Ansible playbook here but mine is quite simple and looks like this.
---
  - name: "Setting up the home server"
    hosts: localhost
    connection: local

    # become root user, which is needed for most tasks
    become: yes
    become_user: root

    vars_files:
        - vars/main_vars.yml

    tasks:
    - name: Install the needed packages
      apt:
        name:
        - samba
        - software-properties-common
        #- linux-headers
        - dkms
        - zfsutils-linux
        - samba-vfs-modules
        - zfs-auto-snapshot
        state: latest
        cache_valid_time: 3600

    - import_tasks: tasks/setupZFStask.yml
    - import_tasks: tasks/setupUsersTask.yml
    - import_tasks: tasks/setupFoldersTask.yml
    - import_tasks: tasks/setupSambaTask.yml
    - import_tasks: tasks/setupDocker.yml
    # and more tasks if needed
Basically it is working on the local server, running as root and using variables I have defined in a separate main_vars.yml file. It will start by installing a couple of packages that I need for my setup and then run through a set of tasks that I wrote for the different parts of the software stack. It will set up the ZFS file system, create users and folders, set up Docker and some more. You can always customize those to your liking.
In the following posts of this series I will explain how I set up the file system, users, samba shares as well as Docker and the Traefik reverse proxy. In each part I will also add the needed Ansible files to automatically install them. All the code will be available on my GitHub account.
The next post about setting up ZFS and a backup system can be found here.