Building a full home server – ZFS filesystem & simple backups
ZFS is a super robust file system made for servers with great features like snapshots and build in checks for data security and integrity – with no special hardware needed. In this guide I will describe how to use it for a home server with integrated RAID functionality, snapshots of your data and full backups. Once you understand some of the core concepts the setup is quite easy.
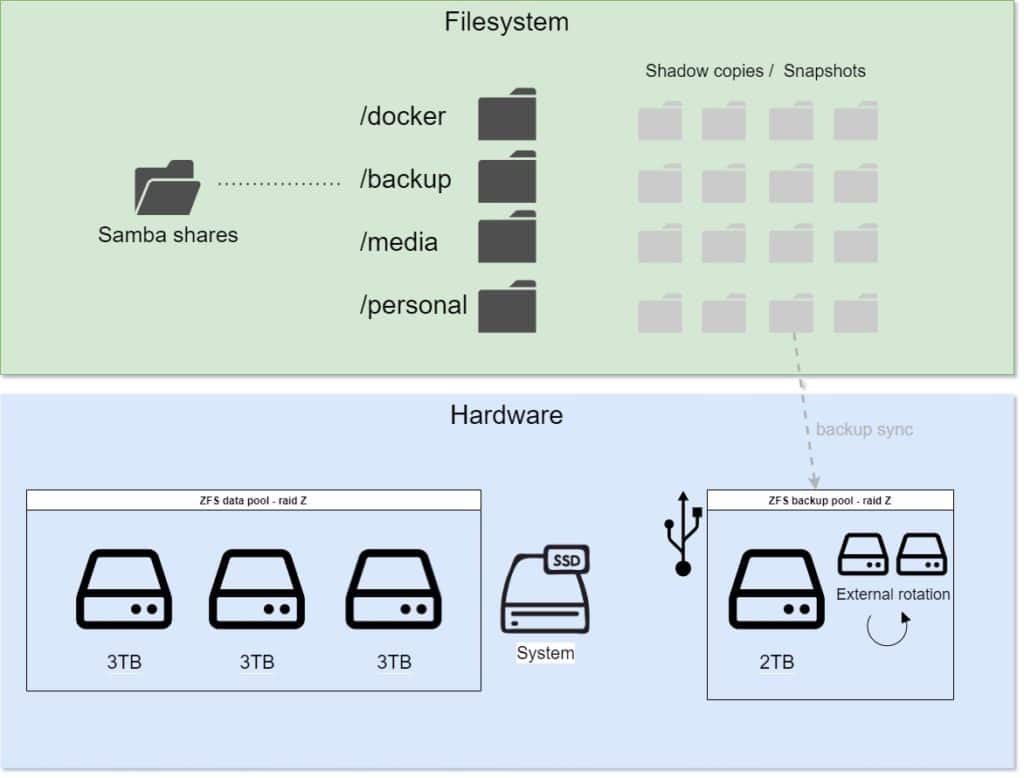
In part one of this guide I described the general setup of my full home server. On the first level we need a file system to provide storage and backups. This is how I set up mine, including Ansible scipts to do it automatically.
ZFS – the basics
The Zettabyte File System ZFS is actually a bit more than a conventional file system. It is a full storage solution ranging from the management of the physical disks, to RAID functionality, to partitioning and the creation of snapshots. It is made in way that makes it very hard to loose data with checksums and a copy-on-write approach. It is a great system for a home server with many many useful features. The version I use is developed by openZFS and available for most of the major Linux distributions.
ZFS works on two levels. First you create a pool (or Zpool). This pool can consist of one or multiple disks or even files on a disk and combines them into one based on the settings you provide. On this level you can define features like RAID or mirroring, caches and data deduplication. Once this is set up you do not really need to touch this anymore unless you want to extend your setup of need to swap a disk.
On top of a pool you can then create one or several new file systems where you can again control some settings like the quota of available disk space. Finally on top of all of this ZFS implements snapshots: old version of you files that you can always go back to. More on this later.
Setting up the main storage pool & file systems
After the hardware is ready and you have installed your favorite operating system (I used Ubuntu Server) you are ready to set up a storage pool containing the disks you have available. This is where you should think about what those should be for a second. I personally used 3 hard disks at 3 Terrabytes each in a RAID Z (more or less equal to RAID 5) configuration with an added SSD as a read cache. This gives me 6 TB of usable space.
I would suggest to start by figuring our how you storage space you need and secure it has to be. Raid is no backup but it can safe you a lot of time when one disk dies. No RAID at all means you can just buy the capacity you need but you will have to restore everything from backup if any disks die. The other end of the spectrum would be mirroring, where you need two (or three/four/…) times the actual data capacity but you can ignore a single disk failure.
I chose to go with an inbetween solution. RAID Z can use two out of three disks and is safe against one disk failure. Be warned though that the the increased write rates when you rebuild the RAID after a failure might lead too more disks failing. I chose to live with this risk as there is also an external backup.
Next you need to find out which disk is mounted where. sudo lshw -class disk -short can be very helpful in this regard as well as sudo fdisk -l I would avoid using the /dev/sda like identifiers as those might change. Instead go with the ID or UUID of the disk. Those can be found by using ls -l /dev/disk/by-id or /dev/disk/by-uuid.
For the IDs you will see something like this ata-SAMSUNG_SSD_830_Series_S0WJNEAC301096 -> ../../sdf. So /sdf belongs to /dev/disk/by-id/ata-SAMSUNG_SSD_830_Series_S0WJNEAC301096 which is the ID. This identifier will not change. With these IDs we can start creating the pool by using these commands.
// install needed packages
apt install zfsutils-linux zfs-auto-snapshot

// create zPool
zpool create -o ashift=12 dataPool raidz {{zfs.DISK1}} {{zfs.DISK2}} {{zfs.DISK3}} cache {{zfs.CACHEDISK}}

// create a file system in the pool
zfs create -o mountpoint=/dataPool/personal dataPool/personal

// enable snapshots for this file system
zfs set com.sun:auto-snapshot:monthly=true dataPool/personal
zfs set com.sun:auto-snapshot:weekly=true dataPool/personal
zfs set com.sun:auto-snapshot:daily=true dataPool/personal
zfs set com.sun:auto-snapshot:hourly=true dataPool/personal
zfs set com.sun:auto-snapshot:frequent=true dataPool/personal

// TODO create more filesystems
This will install the needed packages via the APT package manager and then create a pool. The pool is called dataPool (use any name you like) and uses RAID Z. You can also use other settings like mirroring (mirror) or other RAID types (raidy2/raidz3) and any (nested) combinations of those. If you are running these commands directly from the console you need to replace the disks like {{zfs.DISK1}} with their ID.
Afterwards I am creating a new file system on this pool called personal and mounting it as /dataPool/personal. Finally I am setting some ZFS attributes which will be used with zfs-auto-snapshot to regularly create snapshots of this filesystem. More on this in detail later.
Of course you do not have to run all of these commands manually if you use Ansible. Here is the Ansible taks I use for this part of the setup. Before you run it go to the main_vars.yml file and update the ZFS related variables to your liking. Of course you can also adapt the filesystems that are created and there different snapshot settings.
---
- name: Install zfs and auto-snapshot
  apt:
    name:
    - zfsutils-linux
    - zfs-auto-snapshot
    state: latest
    cache_valid_time: 36000

# Gather space usage about all imported ZFS pools
- zpool_facts: properties='free,size'

- debug: msg='ZFS pool {{ item.name }} exists {{ item.name == '{{zfs.poolName}}' }} and has {{ item.free }} free space out of {{ item.size }}.'
  with_items: '{{ ansible_zfs_pools }}'

- name: Create zsh pool '{{zfs.poolName}}' with 3 disks and cache
  shell: 'zpool create -o ashift=12 {{zfs.poolName}} raidz {{zfs.DISK1}} {{zfs.DISK2}} {{zfs.DISK3}} cache {{zfs.CACHEDISK}}'
  when: 'not (ansible_zfs_pools|length > 0 and ansible_zfs_pools[0].name == "{{zfs.poolName}}")'

- name: Create file system for personal files
  zfs:
    name: '{{zfs.poolName}}/personal'
    state: present

- name: Create file system for media files
  zfs:
    name: '{{zfs.poolName}}/media'
    state: present

- name: Create file system for backups
  zfs:
    name: '{{zfs.poolName}}/backup'
    state: present

- name: Create file system for docker data
  zfs:
    name: '{{zfs.poolName}}/docker'
    state: present


- name: Enable auto snapshots for {{zfs.poolName}}
  shell: zfs set com.sun:auto-snapshot=true {{zfs.poolName}}

- name: Enable all snapshots for personal files
  shell: |
    zfs set com.sun:auto-snapshot:monthly=true {{zfs.poolName}}/personal
    zfs set com.sun:auto-snapshot:weekly=true {{zfs.poolName}}/personal
    zfs set com.sun:auto-snapshot:daily=true {{zfs.poolName}}/personal
    zfs set com.sun:auto-snapshot:hourly=true {{zfs.poolName}}/personal
    zfs set com.sun:auto-snapshot:frequent=true {{zfs.poolName}}/personal

- name: Enable all snapshots for media files
  shell: |
    zfs set com.sun:auto-snapshot:monthly=true {{zfs.poolName}}/media
    zfs set com.sun:auto-snapshot:weekly=true {{zfs.poolName}}/media
    zfs set com.sun:auto-snapshot:daily=true {{zfs.poolName}}/media
    zfs set com.sun:auto-snapshot:hourly=true {{zfs.poolName}}/media
    zfs set com.sun:auto-snapshot:frequent=true {{zfs.poolName}}/media

- name: Enable monthly snapshots for backup files
  shell: |
    zfs set com.sun:auto-snapshot:monthly=true {{zfs.poolName}}/backup
    zfs set com.sun:auto-snapshot:weekly=false {{zfs.poolName}}/backup
    zfs set com.sun:auto-snapshot:daily=false {{zfs.poolName}}/backup
    zfs set com.sun:auto-snapshot:hourly=false {{zfs.poolName}}/backup
    zfs set com.sun:auto-snapshot:frequent=false {{zfs.poolName}}/backup

- name: Enable weekly snapshots for docker files
  shell: |
    zfs set com.sun:auto-snapshot:monthly=true {{zfs.poolName}}/docker
    zfs set com.sun:auto-snapshot:weekly=true {{zfs.poolName}}/docker
    zfs set com.sun:auto-snapshot:daily=false {{zfs.poolName}}/docker
    zfs set com.sun:auto-snapshot:hourly=false {{zfs.poolName}}/docker
    zfs set com.sun:auto-snapshot:frequent=false {{zfs.poolName}}/docker
You can find the full file on GitHub.
Checking if the ZFS pool is up and ready
After you ran this Ansible scripts or manually created the pool you can check if it all worked by using the status command and should see something like this (missing the cache disk here).
$ zpool status

  pool: dataPool
 state: ONLINE
  scan: scrub repaired 0B in 0 days 06:00:05 with 0 errors on Sun Aug  8 06:24:09 2021
config:

        NAME                                          STATE     READ WRITE CKSUM
        dataPool                                      ONLINE       0     0     0
          raidz1-0                                    ONLINE       0     0     0
            ata-WDC_WD40EFAX-68JH4N0_WD-WX21DC91C9UZ  ONLINE       0     0     0
            ata-WDC_WD40EFAX-68JH4N0_WD-WX42D209252E  ONLINE       0     0     0
            ata-WDC_WD40EFAX-68JH4N0_WD-WX32D203U63Z  ONLINE       0     0     0
You can also check if the filesystems have been created via ls or tree. It should look like this.
tree -L 1 /dataPool/
/dataPool/
├── backup
├── docker
├── media
└── personal
Finally zfs list will show you the file systems in the pool too and if you run zfs list -rtall you should also see your snapshots. Depending on how long you waited you should already see some of them that look like dataPool/personal@zfs-auto-snap_frequent-2021-09-11-1615.
After you run it the Ansible playbook for the server setup your output should look something like this.

ZFS snapshots
As I already said above, a RAID is not enough to keep your data safe. It can still fail and it will not protect against someone just deleting or overwriting data. Fortunately ZFS come with a great solution for these kind of problems: snapshots.
A RAID is no backup!
A snapshot is the state of the filesystem at a certain point in time. Telling ZFS to take a new snapshot means that it will remember the current state and start only writing differences to that state afterwards. Without going into too much technical detail here this works great with ZFS as it is a very cheap operation that needs nearly no time or additional storage space.
You can always create a new snapshot of any of your file systems via zfs snapshot dataPool/media@nameOfTheSnapshot. You can view all the snapshots via zfs list as described above. You can use the snapshots to see the file system at that point in time by going to ls /dataPool/media/.zfs/snapshot/nameOfTheSnapshot (read only) or for rolling everything back to that state via zfs rollback -r dataPool/media@nameOfTheSnapshot. Careful, you will loose all data created after that snapshot!
Creating snapshots all the time is very tedious though and I bet you would forget it at exactly the time you need it. Fortunately there is a tool for that called zfs-auto-snapshot. You only need to install it and it will start creating snapshots for all your pools and filesystems according to their ZFS attributes. Check the script above to see how we set those. It can manage monthly, weekly, daily, hourly and frequent snapshots for you.
Using these snapshots you will always have a simple way of going back to older versions of your files should you ever make unwanted changes.
ZFS send, receive and syncoid for simple ZFS backups
Now snapshots are a simple way to make a backup but they are stored in the same place as the existing data. To be safe another offsite storage is needed. In my case I decided to get a set of USB harddrives for this that can be rotated. Fortunately the backup process of snapshots can be pretty easy. Just create another pool on the backup drive and use the zfs send and zfs receive commands to transfer the snapshots.
In practice this was a bit more complicated as I need to manage the changing snapshots as they are rolled over (a set of weekly snapshots becomes one monthly and so on) and do this process either only with new snapshots or with all of them (if I connect another drive). It also results in a lot of snapshots on the backup as the old frequent/hourly/… versions there are not rolled over.
To fix these problems I wrote a small script that uses two other programs: syncoid for easy syncing of the snapshots and zfs-prune-snapshots to cleanup snapshots in the backup in a safe way. To start these backups you need to do a couple of steps I decided not to automate as you only need to do them once.
// install zfs-prune-snapshots
wget https://raw.githubusercontent.com/bahamas10/zfs-prune-snapshots/master/zfs-prune-snapshots
chmod u+x zfs-prune-snapshots
cp zfs-prune-snapshots /usr/local/bin/zfs-prune-snapshots

// install syncoid by following https://github.com/jimsalterjrs/sanoid/blob/master/INSTALL.md#debianubuntu

// prepare the backup data pool on your external HDD
// 1. find the id of the HDD. Be sure this is the right one, otherwise you will lose data!
// create the pool
zpool create -o ashift=12 backupPool1 /dev/disk/by-id/someIdOfYourDisk

// create the file system on the backup pool
zfs create backupPool1/backups

// disable snapshots of this backup pool, we will only store the snapshots from the other pools here
zfs set com.sun:auto-snapshot=false backupPool1/backups
Now you have another pool that you can use for backups. To start those backups I use the following script (GitHub). I am sure it can be done better but it works for me.
#!/bin/bash

# Pool with the data that needs a backup
MASTERPOOL="dataPool"

# Backup-Pools
BACKUPPOOLS=("backupPool" "backupPool2" "backupPool3" "backupPool4")

# zfs file systems to backup
BACKUPFILESYSTEMS=("docker" "personal" "backup" "media")

# paths needed
LOGFILE="/var/log/backup.log"
SYNCOID="/usr/sbin/syncoid"
PRUNE="/usr/local/bin/zfs-prune-snapshots"

# -------------- program, don't change ---------------

for BACKUPPOOL in ${BACKUPPOOLS[@]}
do
        isOnline=$(/sbin/zpool status $BACKUPPOOL | grep -i 'state: ONLINE' | wc -l)

        if [ $isOnline -ge 1 ]
                then
                        echo "$(date) - $BACKUPPOOL is online. Starting backup" >> $LOGFILE

                        # sync snapshots to backup pool
                        for BACKUPSYS in ${BACKUPFILESYSTEMS[@]}
                        do
                                echo "$(date) - Starting backup of $MASTERPOOL/$BACKUPSYS to $BACKUPPOOL" >> $LOGFILE
                                $SYNCOID $MASTERPOOL/$BACKUPSYS $BACKUPPOOL/backups/$BACKUPSYS --no-sync-snap >> $LOGFILE 2>&1
                                echo "$(date) - Backup of $MASTERPOOL/$BACKUPSYS to $BACKUPPOOL is done" >> $LOGFILE
                        done

                        # cleanup
                        echo "$(date) - Starting cleanup of backup pool $BACKUPPOOL"
                        $PRUNE -p 'zfs-auto-snap_frequent' 1h $BACKUPPOOL >> $LOGFILE 2>&1
                        $PRUNE -p 'zfs-auto-snap_hourly' 2d $BACKUPPOOL >> $LOGFILE 2>&1
                        $PRUNE -p 'zfs-auto-snap_daily' 2M $BACKUPPOOL >> $LOGFILE 2>&1
                        $PRUNE -p 'zfs-auto-snap_weekly' 3M $BACKUPPOOL >> $LOGFILE 2>&1
                        $PRUNE -p 'zfs-auto-monthly' 16w $BACKUPPOOL >> $LOGFILE 2>&1
                        # yearly kept forever
                else
                        echo "$(date) - $BACKUPPOOL is not online. Trying to import it" >> $LOGFILE
                        zpool import $BACKUPPOOL
        fi
done
echo "$(date) - script run done" >> $LOGFILE
The idea of this script is that you provide the pool you want to back up (MASTERPOOL), the filesystems on the pool (BACKUPFILESYSTEMS) and a set of pools (BACKUPPOOLS), the different external HDDs, that those will be backed up to. The script first goes through the list of backup pools and checks if one of them is online (I only every have one connected at a time). If it is not online it tries to import the pool, which you need to do after reconnecting the external HDD.
If an online backup pool is found it will go over all the filesystems on the master pool and use syncoid to sync the existing snapshots to the backup pool as /backupPool1/backups/docker for example. I used --no-sync-snap to only sync the existing snapshots and stop it from creating temporary additional snapshots.
After the backup sync is done the script will use the prune program to clean up old snapshots on the backup pool. The current setup will clean up all monthly snapshots older than 16 weeks, all weekly older than 3 months, all daily older than 2 months, all hourly older than 2 days, all frequent ones older than 1 hour and keep all yearly backup snapshots forever.
All the progress and possible errors will written to a log file. You can find it in the path defined at the start of the script. To run this script, just download it from GitHub or copy it from here to a backup.sh file. Make it executable by running chmod u+x backup.sh and then just run it via ./backup.sh. The first run might take quite some time if you have many snapshots, following runs will be much faster though.
Automate everything with crontab
Now this script automates the backup process but who automates the script? I still do not want to run the script regularly. Fortunately the system has a build-in solution for this called crontab. You can use that to run any task in a regular interval. I used this to run my backup script every 30 minutes.
// open crontab via sudo user
sudo crontab -e

// copy this to run the script regularly. It needs to be in this path to be found
# copy backups and clean up
0,30 * * * * bash /usr/local/bin/backup.sh

// save via strg+o if you are using nano and close afterwards via strg+x
The frequency is controlled by the string with the * at the start. If you want to change it just search for a crontab generator and generate your own schedule.
Success
That’s it for now! We have a running system with a lot of pretty safe storage. All the data has regular snapshots and is backed up to external disks as well. If you want an even better solution consider also pushing the data in an encrypted format to some web service for a third copy. I might write a future article about this.
The setup is simple if you use Ansible. You will only need a couple of minutes for the manual part of setting up the backup process. Afterwards you only need to switch out the external HDDs from time to time and check the backup logs. Let me know if you are running into any problems with this setup or are missing anything.
In the next blog post(s) I will describe how I automatically check if I am missing any backups and how I created users and made the files available via the network to other computers.