How to build your own powerful smart home server and hub
Tired of running a dozen different hub and Apps for your smart home devices? Here is how to build your own custom smart home server that is a universal hub and so much more. With a Raspberry Pi, Docker and open source smart home software and without spending much money.
Why you should build your own smart home server/hub
If you are like me then you like to play with a lot of smart home technology and IoT devices. Being stuck with one brand is boring, expensive and very limiting. So instead you start combining different ecosystems and suddenly you have a Hue bridge, a Tradfri gateway, maybe also smart things and much more. Your smart home folder on your smartphone gets bigger and bigger…
I personally hate this. Currently the smart home market is very fragmented, with few systems playing well together. Well unless you count the smart speakers/assistants but those have different problems (foremost the privacy issues).
If you have some basic IT knowledge there is a much much better way: building your own smart home server. It can interface with most smart home systems, gives you full control over all devices in one App via open source smart home controllers and can run pretty much any software you like.
Sounds complicated? Not really. I will guide you through the process in this article.
What hardware do you need for your own smart home server/hub
Building your own server should be as cheap and easy as possible. After-all it is supposed to be better than all those hubs! At the same time it should be really flexible and expandable. All of this can be done by using a Raspberry Pi. This open source mini computer is pretty cheap and very well supported by most software out there.
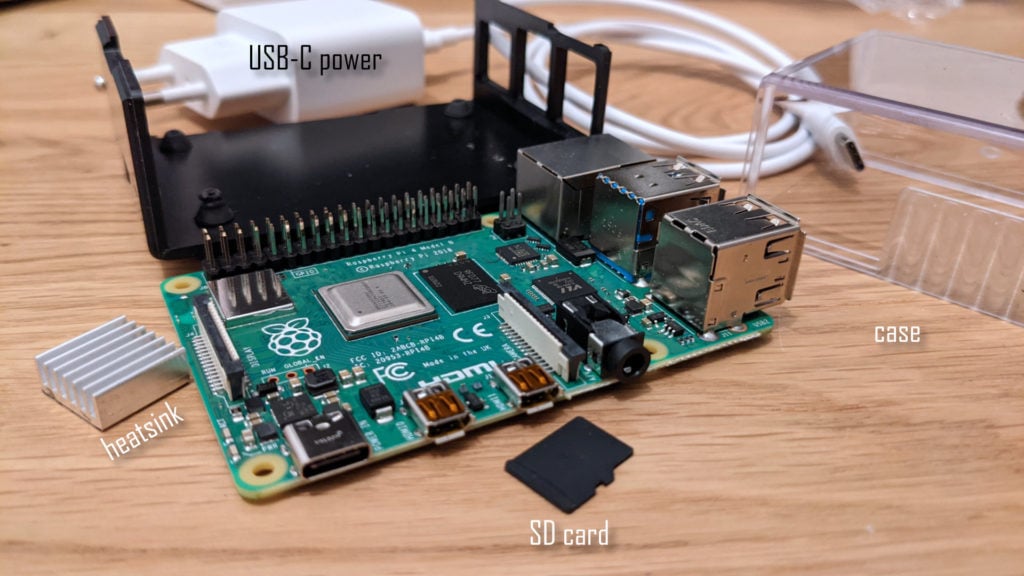
Here is the hardware I am using:
- A Raspberry Pi, preferably the Pi 4 with 2 or 4 GB of RAM
- A USB (C for the Pi 4, Micro USB for the older ones) power supply with around 3.0A
- A microSD card, 16+GB from a reliable manufacturer, should be fast: class 10/UHS-1
- Optional: a case (with cooling) for the Pi or at least heatsinks
- Optional: if you don’t have one yet buy a SD card reader/writer
- Optional: Network access. Either a LAN cable or if you are not using a newer Pi a seperate Wifi USB dongle.
- Alternatively you can get a kit including everything you need
If you are interested in buying a Raspberry Pi consider doing it via my affiliate links above. It does not change prices for you and allows me to pay for the servers 😉
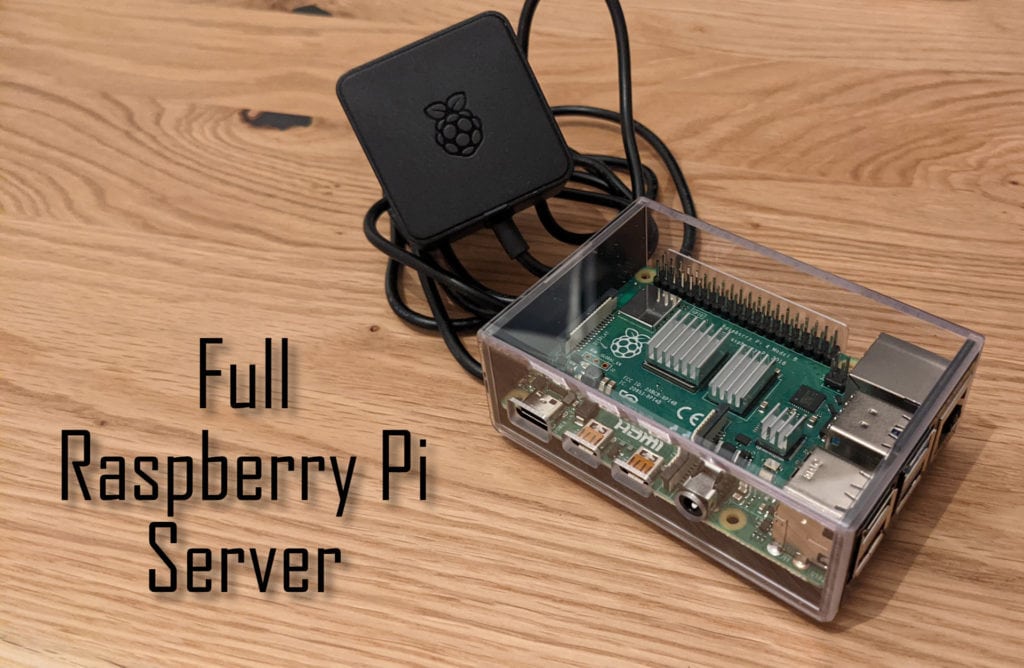
Building the server is really simple. I took the heatsinks, peeled of the tape below and stuck them to the 3 chips producing the most heat (see picture). Afterwards everything can be put into the case. This will help keep the dust out.
Now your server needs to become a hub able to talk to all of your smart home devices. It already includes Wifi/Ethernet and Bluetooth so those devices can be reached. Most other common ones use Zigbee (like Hue and Tradfri). For those cases you can get a small and cheap Zigbee to USB stick. I use the popular CC2531, other also use the Conbee II. If you plan to also use Zwave devices then have a look at the Aeotec Z-stick, a USB to Zwave converter.
If you are interested in buying the CC2531 Zigbee USB stick (preflashed or with a debugger) or the Conbee II consider doing it via my affiliate links. It does not change prices for you and allows me to pay for the servers 😉
Important! If you are buying a CC2531 stick for Zigbee2MQTT (more on this later or in my in-depth blog post) you need a custom firmware on the stick. You can either buy one with that software preflashed (e.g. via the link above) or get a CC debugger device to flash it yourself.
If you are looking to store more data or you do not trust the SD card then consider adding a SSD via USB to your Raspberry Pi. It is easy to do and will give you a lot more (reliable) storage space. There are even ways to move the full operating system there if needed.
How to set up your smart home server
Now lets set up the software on the smart home server. This will be done in three steps:
- first we need an operating system
- then we will install a powerful container manager called Docker (with docker-compose) to manage all of our software
- then we will set up containers with the software we need and connect them
Installing the OS
Getting an operating system onto your Raspberry Pi is pretty easy. You just need to download an image. I am using Raspberry Pi OS lite (it is a smart home server after-all, we do not need a graphical user interface). This was formerly known as Raspbian and is the recommended system.
Just connect the SD card to your PC (get a USB micro SD reader if you need it) and flash the image onto the SD card. I am using a simple program called etcher for this.

If you are planning on connecting to the Pi via SSH afterwards (which I am) you need to also manually put an empty file called ssh (without any extension) into the boot partition after flashing. If you are planning to connect via Wifi (I prefer LAN here) then you need to also follow these steps.
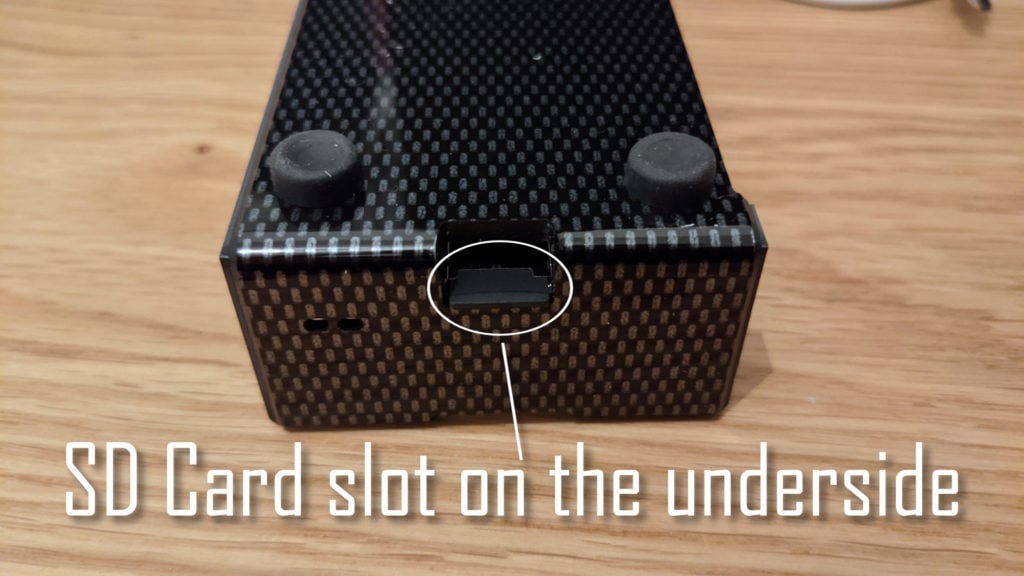
Now remove the SD card and insert it into the slot on the underside of the Pi. Then just connect the Pi to a powerful enough USB-C power adapter and plug in a LAN cable. Now you are ready to go.
Installing the needed software
Use the command line (Linux/Mac) or a program like Putty (windows) to connect to the Pi via SSH. You can log in as pi with the password raspberry.
Now you should first run a couple of commands to get everything ready.
sudo raspi-config
// use the menu that opens to change your password, update the hostname of the Pi, resize the file system and setup everything else in the way you like it

// now lets update all the software
sudo apt update
sudo apt upgrade

// needed later to clone the repository
sudo apt install git
This might take a while. Afterwards we can start installing Docker and docker-compose. Docker is a software that allows you to run & manage containerized software. This means the software will come as an image, including all dependencies and settings needed. This is usually provided by the developer and can be easily download from Docker hub or anywhere on the Internet.
Docker makes installing software really easy and allows you to separate the software from the actual data you need. It is also platform independent so if you later decide to move to a bigger/different smart home server that will be really easy. docker-compose is a software on top of Docker which allows you to define a list of containers and their (inter)dependencies in a simple yaml file. I will provide my docker compose files later in the article so you can simple use them to start quickly.
So lets install Docker
// install docker & docker-compose
curl -sSL https://get.docker.com | sh

// allow our default pi user to use docker by adding it to the docker group
sudo usermod -aG docker pi

// check if it worked
docker version

// now we need pip3 to install docker-compose
sudo apt-get install libffi-dev libssl-dev
sudo apt install python3-dev
sudo apt-get install -y python3 python3-pip

sudo pip3 install docker-compose
Now you are ready. I personally also added two more things: first I created a new folder called dockerData in the root of the Pi. You can use sudo mkdir /dockerData for this.This will be used to store all data for the Docker containers. This is what we need to back up later.
Then I also added a samba share for some of this data so that I can access it from the network. Here is one example for the HomeAssistant folder.
// install samba first
sudo apt-get install samba samba-common-bin

// then update its configuration
sudo nano /etc/samba/smb.conf

 // add this
[HomeAssistant config]
comment = HomeAssistant config
path = /dockerData/homeassistant/
force user = root
force group = root
writeable = yes
valid users = homeassistant

 // then check with
testparm

 // now create the user
sudo adduser homeassistant
sudo smbpasswd -a homeassistant // and give it a new password
sudo service smbd restart
Afterwards you can access the share by using the IP address/name of the Pi and the homeassistant user and its password via your file browser. If you use Windows just type \\ip.of.your.pi into the top bar and then enter the user and password.
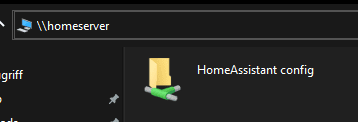
This will just make the storage and files available via the network, we will run the actual (Home Assistant) software in the next step(s).
Setting up our containers
All the files (in their update version!) used here can be also found in my GitHub repository.
Now we are going to set up some software using Docker and containers. If you have not used that before it might be a good time to read some basic tutorials. I will try to mention everything needed here though.
Now lets start running some software on the new server. First you need to create a .env file in which you will define some values you are going to use later. An .env file is just a text file with values that can be reused in different containers. Simply create such a file with touch .env and edit it for example with nano .env.
DATADIR=/dockerData
TZ=Europe/Berlin
PUID=1000
PGID=1000
PH_WEBPASSWORD=supersecurepassword123
The datadir is where Docker container data is going to be saved and should be an existing folder. I am using the folder created above. Then you need to also set your timezone and user IDs, those can be found by typing id yourcurrentuser. I also added a password for the Pi-Hole software.
Generally useful software
Next copy this to a yaml file called hosting.yml in the same directory.
version: "3"
 services:
   heimdall:
     image: linuxserver/heimdall
     container_name: heimdall
     restart: unless-stopped
     environment:
       - PUID=${PUID}
       - PGID=${PGID}
       - TZ=${TZ}
     volumes:
       - ${DATADIR}/heimdall:/config
     ports:
       - 9080:80
       - 9443:443
 pihole:
     container_name: pihole
     image: pihole/pihole:latest
     restart: unless-stopped
     ports:
       - "53:53/tcp"
       - "53:53/udp"
       - "67:67/udp"
       - "6080:80/tcp"
       - "6443:443/tcp"
     environment:
       TZ: ${TZ}
       WEBPASSWORD: ${PH_WEBPASSWORD}
     volumes:
        - '${DATADIR}/pihole/etc-pihole/:/etc/pihole/'
        - '${DATADIR}/pihole/etc-dnsmasq.d/:/etc/dnsmasq.d/'
     cap_add:
       - NET_ADMIN
     dns:
       - 127.0.0.1
       - 46.182.19.48
     restart: unless-stopped
 unifi-controller:
     image: ghcr.io/linuxserver/unifi-controller:armhf-latest
     container_name: unifi-controller
     restart: unless-stopped
     environment:
       - PUID=${PUID}
       - PGID=${PGID}
       - MEM_LIMIT=512M #optional
     volumes:
       - ${DATADIR}/unifi-controller:/config
     ports:
       - 3478:3478/udp
       - 10001:10001/udp
       - 8080:8080
       - 8443:8443
       - 1900:1900/udp
       - 8843:8843
       - 8880:8880
       - 6789:6789
       - 5514:5514
This will run three containers with Heimdall, a great dashboard software, PiHole, an ad blocker for your whole network and the Unifi controller if you are using Unifi devices in your network.


I won’t go into much details here but these programs are all pretty handy. If you think you do not need one of them just delete the whole part of the file (e.g. everything behind pihole: until the unifi part starts).
One of the cool things about Docker is its flexibility. In this can I mapped all the data you need safe to folders on your local system. '${DATADIR}/pihole/etc-pihole/:/etc/pihole/' will link the /etc/pihole folder inside the container to a folder on your local drive at /dockerData/pihole/etc-pihole/ (if you are using the same base path as I am). You can also map ports. For example Heimdall listens to port 80 but by using - 9080:80 we can map that to port 9080 on the server. That way we can run multiple service that all use the same ports by just mapping them to different ones.
Now we can start those containers.
// start the containers defined above and keep them running
docker-compose -f ./hosting.yml up -d

// now open your browser at
//  serverip:9080 -> to see your dashboard
//  serverip:6080 -> to see your PiHole instance
//  serverip:8080 -> to see your unifi controller

// If anything doesn't work run this to see logs (or see the end of this article)
docker-compose -f ./hosting.yml logs -f
// and exit by pressing ctrl+c

// if you want to stop the containers run
docker-compose -f ./hosting.yml down
Smarthome software
Now lets actually get to installing the needed smart home software to control all of your devices. We are going to install a MQTT broker called Mosquitto and Zigbee2MQTT to control a lot of Zigbee devices. I also added Zigbee2MqttAssistant for a better overview.
Then there is going to be TasmoAdmin to get a nice overview over all your devices running Wifi devices running Tasmota. I also added InfluxDB and Grafana to build awesome dashboards with your data.
Finally we need a software to tie all these devices and protocols together. I can really recommend OpenHab or the other open source software I am using at the moment: HomeAssistant. Here is the full yaml file you need to also copy as smarthome.yml.
version: "3"
 services:
   mosquitto:
     image: "eclipse-mosquitto:1.6"
     restart: unless-stopped
     volumes:
       - "${DATADIR}/mosquitto/config:/mosquitto/config"
       - "${DATADIR}/mosquitto/data:/mosquitto/data"
       - "${DATADIR}/mosquitto/log:/mosquitto/log"
     ports:
       - 1883:1883
 grafana:
     image: "grafana/grafana:latest"
     restart: unless-stopped
     user: "$PUID:$PGID" // alternatively you can try "0" for root if you run into problems here
     depends_on:
       influxdb:
         condition: service_healthy
     volumes:
       - "${DATADIR}/grafana/data:/var/lib/grafana"
     ports:
       - 3000:3000
 influxdb:
     image: "influxdb:1.8"
     restart: unless-stopped
     volumes:
       - "${DATADIR}/influxdb/data:/var/lib/influxdb"
     healthcheck:
       test: ["CMD", "curl", "-sI", "http://127.0.0.1:8086/ping"]
       interval: 30s
       timeout: 1s
       retries: 24
 tasmoadmin:
     image: "raymondmm/tasmoadmin"
     restart: unless-stopped
     volumes:
       - "${DATADIR}/tasmoadmin:/data"
     ports:
       - 3080:80
 zigbee2mqtt:
     image: koenkk/zigbee2mqtt
     depends_on:
       mosquitto:
         condition: service_started
     restart: unless-stopped
     volumes:
       - ${DATADIR}/zigbee2mqtt/data:/app/data
       - /run/udev:/run/udev:ro
     devices:
       - /dev/ttyACM0:/dev/ttyACM0
     environment:
       - TZ=${TZ}
 zigbee2mqttAssistant:
     image: carldebilly/zigbee2mqttassistant
     restart: unless-stopped
     depends_on:
       zigbee2mqtt:
         condition: service_started
     environment:
       - Z2MA_SETTINGS__MQTTSERVER=mosquitto
       - TZ=${TZ}
     ports:
       - 8880:80
 homeassistant:
     container_name: homeassistant
     restart: unless-stopped
     image: homeassistant/raspberrypi4-homeassistant
     #devices:
     #  - /dev/ttyUSB0:/dev/ttyUSB0
     #  - /dev/ttyUSB1:/dev/ttyUSB1
     #  - /dev/ttyACM0:/dev/ttyACM0
     volumes:
       - ${DATADIR}/homeassistant/config:/config
       - /etc/localtime:/etc/localtime:ro
       - /dev/serial/by-id/:/dev/serial/by-id/
     # alternative needed for auto discovery, bluetooth,…
     #network_mode: host
     #privileged: true
     depends_on:
       influxdb:
         condition: service_healthy
       mosquitto:
         condition: service_started
     ports:
       - 8123:8123
     environment:
       - PUID=${PUID}
       - PGID=${PGID}
       - TZ=${TZ}
This assumes that you have a Zigbee to USB stick connected to /dev/ttyACM0. Otherwise you need to update one line in the Zigbee2MQTT part. You will also need to provide a config file for mosquitto in the ${DATADIR}/mosquitto/config folder. I am using this one.
pid_file /var/run/mosquitto.pid

persistence true
persistence_location /mosquitto/data/

log_dest file /mosquitto/log/mosquitto.log

port 1883
listener 9001
protocol websockets
Running docker-compose -f smarthome.yml up -d will give you access to a lot of services.
| Service | Port | Setup |
|---|---|---|
| Mosquitto | 1883 | You need to copy the config file above. Can be accessed with a MQTT client like MQTT explorer |
| InfluxDB | only internally available from other containers | – |
| Grafana | 3000 | Setup can be done according to my Grafana dashboard guide |
| TasmoAdmin | 3080 | just let it scan your network for devices |
| Zigbee2MQTT | – | Setup can be done according to my Zigbee2MQTT guide |
| Zigbee2MQTTAssistant | 8880 | – |
| HomeAssistant | 8123 | More on this in future articles. Just go to the webpage and follow the setup wizard |
That’s it! You now have access to a lot of awesome smart home software and the setup is quite easy. The Pi will run forever (only problem I ever had was a bad SD card after some time, so make backups!), without consuming too much energy. If you want more software just add another container.


If you are looking for help to configure all of this software check out the other articles on this blog. You can built so much awesome automations, command your smart vacuum robot, build smart light systems or get notified when water leaks. All with your own smart home server without the cloud.
Automatic updates for all your services
PS In a new post I described how I updated this setup by adding another container called watchtower. This container will monitor all your running services and update them whenever new versions are available. This means fully automated updates for all your docker containers! Of course you can exclude some services if you wish. I excluded HomeAssistant to avoid possible breaking changes. As always you can find the updated files in the GitHub repository.
Aggregated logs
PPS In another new post I also added loki as another service to my hosting.yml. It will collect the logs from the other containers and enable you to view them all at the same time through a nice Grafana interface. You can even include them in your dashboard.
To use that just follow the instructions in that post. In short to get it running just use the files from my GitHub repository and install the Loki drivers in Docker via
docker plugin install grafana/loki-docker-driver:latest --alias loki --grant-all-permissions
// or if you are running this on a Raspberry Pi
docker plugin install grafana/loki-docker-driver:arm-v7 --alias loki --grant-all-permissions

