Handy Tips & Tricks for Zigbee2MQTT
Zigbee2MQTT is an awesome software to add support for all kinds of devices to your smart home controller. Setting up Zigbee2MQTT is pretty easy as I described in my earlier post but there are still a lot of questions I see about Zigbee2MQTT. In this article I will try to answer these questions and give some tips about things I learned while using the software for more than a year now. Here are some things I wish I had know when I started.
Where are the logs?
Zigbee2MQTT creates several log files by default. They can be found in /opt/zigbee2mqtt/data/log. This directory will contain folders with different dates which each contain a log.txt file. Each time you restart Zigbee2MQTT it will create a new log/folder with the current date. If you need to check what the software is doing just tail -f /opt/zigbee2mqtt/data/log/newestDate/log.txt and replace the newestDate part.

How to debug
Suppose you added a light to your system via Zigbee2MQTT and suddenly it stops working. First make sure that your smart home controller does not show any errors (e.g. check in the OpenHab logs). If that is working as expected check your MQTT messages for example by using MQTT explorer. If you still don’t see anything unusual check the logs of Zigbee2MQTT. If that also doesn’t you can make Zigbee2MQTT return a map of your network to help figure out which devices to check/restart.
Creating a map of your Zigbee network
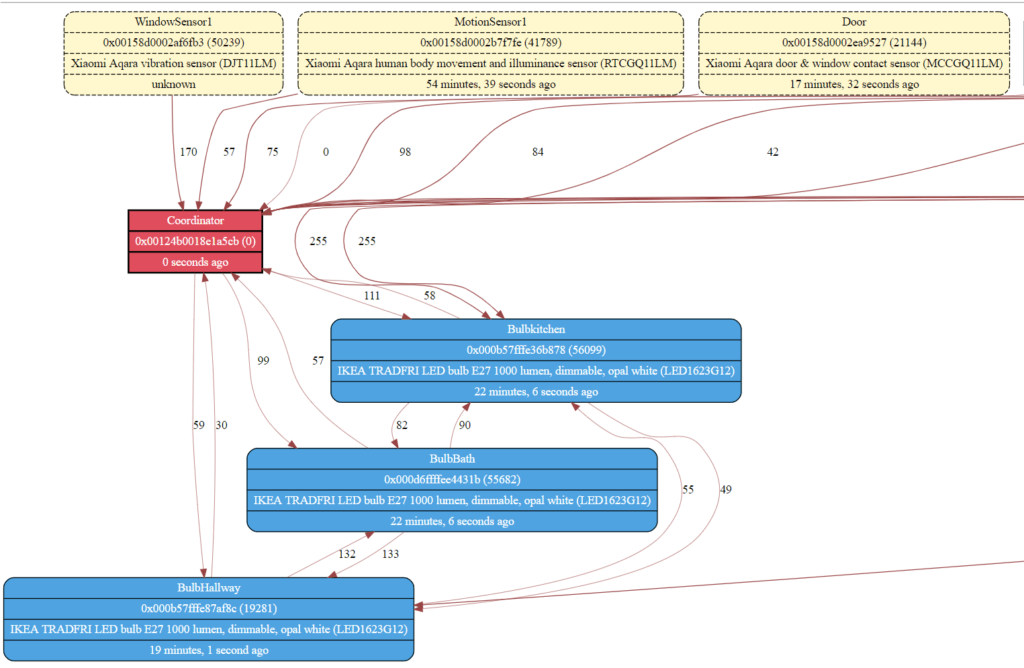
Zigbee2MQTT allows creating a map of your network. Just send “raw”, “graphviz” or “plantuml” to this MQTT topic: zigbee2mqtt/bridge/networkmap. If you are using an older version of the software only graphvic might work. Now you have to wait some time while your network is being scanned. This will put some stress on the network so expect some delay when using it during that time.
A couple of seconds later you will see some data pop up under the zigbee2mqtt/bridge/networkmap/[raw|graphviz|plantuml] topic, depending on which value you send earlier. For example the graphviz answer will contain a long string which have to copy and paste into box on http://www.webgraphviz.com. You will get a nicely colored map of your Zigbee network. It includes details about all your devices and shows the connections and connection quality (higher is better).

If you are looking for an easier way you can also use Zigbee2MQTT-Assistant. More on that in my guide here and down below.
Webgui for HomeAssistant
If you are running HomeAssistant with your Zigbee2MQTT setup you can install this awesome looking software called Zigbee2MQTTAsisstant. It gives you a web based interface to allow new devices to join, show all your devices in the network, draw the network map and much more.
Although this system has HomeAssistant in its name it can be run independently as a Docker container, working with any Zigbee2MQTT installation. I explained how to install and use Zigbee2MQTTAssistant in another article.
How to disable the LED
The CC2531 usb stick used to interface with the Zigbee devices is great but it has a pretty powerful status LED that will be turned on all the time. This can be very annoying if the Rasperry Pi with USB stick is somewhere where you prefer total darkness at night (bedroom, home cinema, …). Fortunately there is an easy fix for this: disable the LED by adding this to your config file.
serial:
  port: /dev/ttyACM0
  disable_led: true // the important part
How to change the friendly device name
Each newly paired device will show up in the Zigbee2MQTT logs and configuration as a random hexadecimal (I assume it is some kind of ID) string. This might be good for identification but it is certainly very hard for humans to read. Fortunately there is a simple way to change this by adding a so called friendly name for the device in the configuration file.
devices:
  '0x000b57fffe87af8c':
    friendly_name: BulbHallway
    retain: false
The friendly name can be pretty much any string but I suggest picking something you can remember. For this change to take effect you need to restart Zigbee2MQTT. Afterwards this name will show up in the logs and can be used to reference this device in OpenHab for example (as it will be used as a MQTT topic).
Make the network secure/unique
There are a couple of things that can be done to make your Zigbee network a little bit more secure. First one is disabling pairing once you added all your device. This can either be done via a setting in the config file (permit_join: true on first level) or via sending a MQTT with true/false to zigbee2mqtt/bridge/config/permit_join.
You can also change the encryption key used in your network (to not use the default one). This is best done when starting because every device that has been paired before needs to be repaired now. There is a nice setting to generate a random key at startup by using this config.
advanced:
  network_key: GENERATE
  pan_id: 0x1a62 // optional, change
  ext_pan_id: [0xDD, 0xDD, 0xDD, 0xDD, 0xDD, 0xDD, 0xDD, 0xDD] // optional, change
  channel: 11 // optional, change
You might also change the pan id and ext pan id of your network (this is similar to the SSID of a Wifi network) as well as changing the channel Zigbee is using. Be careful when doing this though as Zigbee shares frequencies with Wifi, so be sure to not create problems there.
More information can also be found in the official documentation.
Which devices are supported?
There is a huge list of supported devices. I have personally used the system with Tradfri light bulbs as well as Aqara sensors (here, here and here) and recommend all of them.
How can I update Zigbee2MQTT?
Updating Zigbee2MQTT is quite easy. Basically you just have to stop Zigbee2MQTT, use git to pull the newest version and restart it. From the official documentation here are the steps needed to update Zigbee2MQTT:
# Stop Zigbee2MQTT and go to directory
sudo systemctl stop zigbee2mqtt
cd /opt/zigbee2mqtt

# Backup configuration
cp -R data data-backup

# Update
git checkout HEAD -- npm-shrinkwrap.json
git pull
npm ci

# Restore configuration
cp -R data-backup/* data
rm -rf data-backup

# Start Zigbee2MQTT
sudo systemctl start zigbee2mqtt
While updating can always bring improvements to your system I personally would not update a working Zigbee2MQTT instance (if it is properly secured already) too often. You know… never change a running system.
Can I run Zigbee2MQTT in Docker?
Sure. Here is the docker image. You can even easily combine it with Mosquitto as a MQTT broker and your actual smart home system in on docker-compose file. If you are looking for an easy setup or at least a place to get started checkout my GitHub repository with an example configuration.
More to come
I wrote this partly as a help to others, partly as a documentation for myself. If I figure out anything new I will add it here. If you run into a problem with Zigbee2MQTT or figure out some nice feature just send me an email and I will update this list. If you are looking for more Zigbee(2MQTT) projects checkout my post about
- water leak sensors as a warning system
- wireless smart switches anywhere
- awesome DIY smart wardrobe lights
- wireless motion sensors
and many more in the blog section.


