Affordable DIY smart wardrobe lights for less than 40€
A simple way to add some awesomeness to your wardrobe is to add lighting. Smart wardrobe lights look great and help find things more quickly. I build a cheap do-it-yourself solution which has some great effects not found in off the shelf solutions. All of this is done for around 25€ with readily available components. This is how to do it.
Smart Wardrobe lighting
I have this nice wardrobe with sliding doors. The manufacturer offered build-in lights but I ignored that at the time I bought it. Although I never really missed it I do like to build things… so I started planning my own version. Of course it needs some extra, better than the default. So I decided to build some smart wardrobe lights which can not only change colors (RGB) but also animate on and off… automatically and fully integrated into my smart home.
The components
To make some awesome lighting for the closet we need a couple of things: some lights of course, something controlling the lights and a sensor to tell us when the door(s) open.
For the lights I chose to use LED strips for even lighting. Of course they had to be RGB but because of the animation I could not use standard analog RGB lights. Instead I used WS2812B digital LED strips which allow individual control of each LED. To make it look elegant and unobtrusive I also bought an aluminum LED channel with a plastic diffuser. Then I mounted one on each side of the closet.
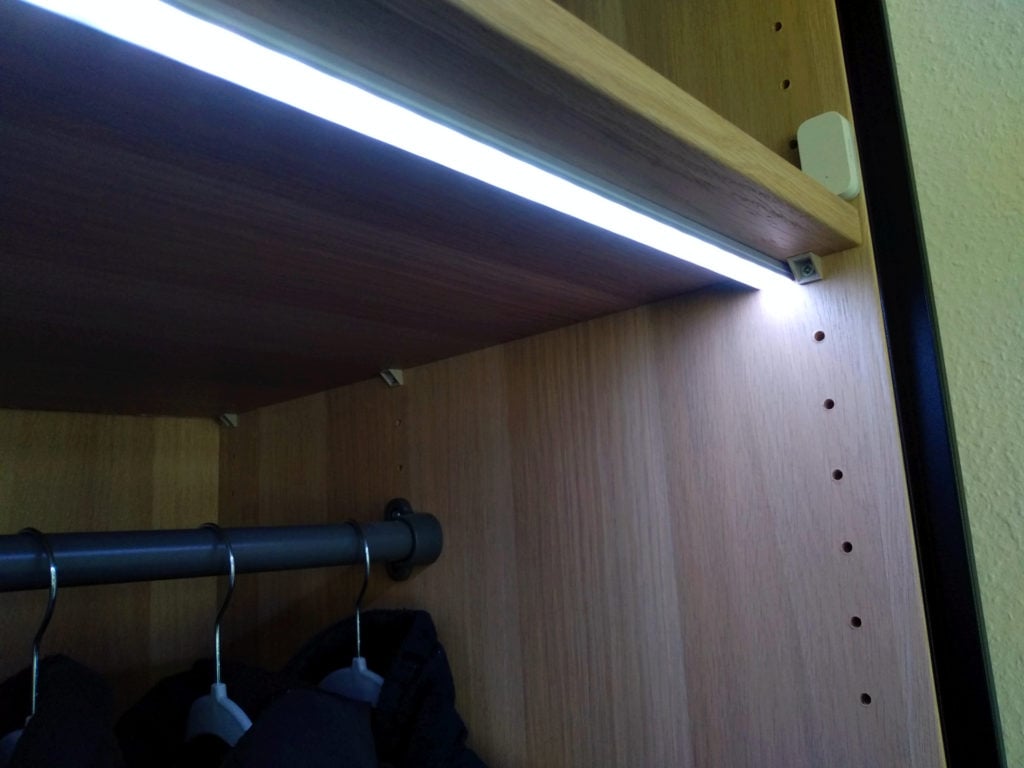
The next step was adding a control unit for each LED strip. There are many possibilities here but I chose the wemos D1 mini, an nice and cheap board with an ESP8266 chip providing Wifi access. These small boards can be flashed with the WLED software to control all kinds of LEDs including the ones I am using. The board is also quite small and yet powerful enough to directly power this small amount of LEDs (about 60 per side).
Each D1 mini is powered by a 5V/1A micro USB power supply. Those are quite small in terms of power supplies and readily available. I routed the wires to the top of the closet and (through a small hole I drilled) on top of it where both power supplies are plugged into an extension cord. To make it look nicer and provide some cover both D1 mini boards are in small 3d printed cases. Once again it is very handy to have a 3d printer 😉
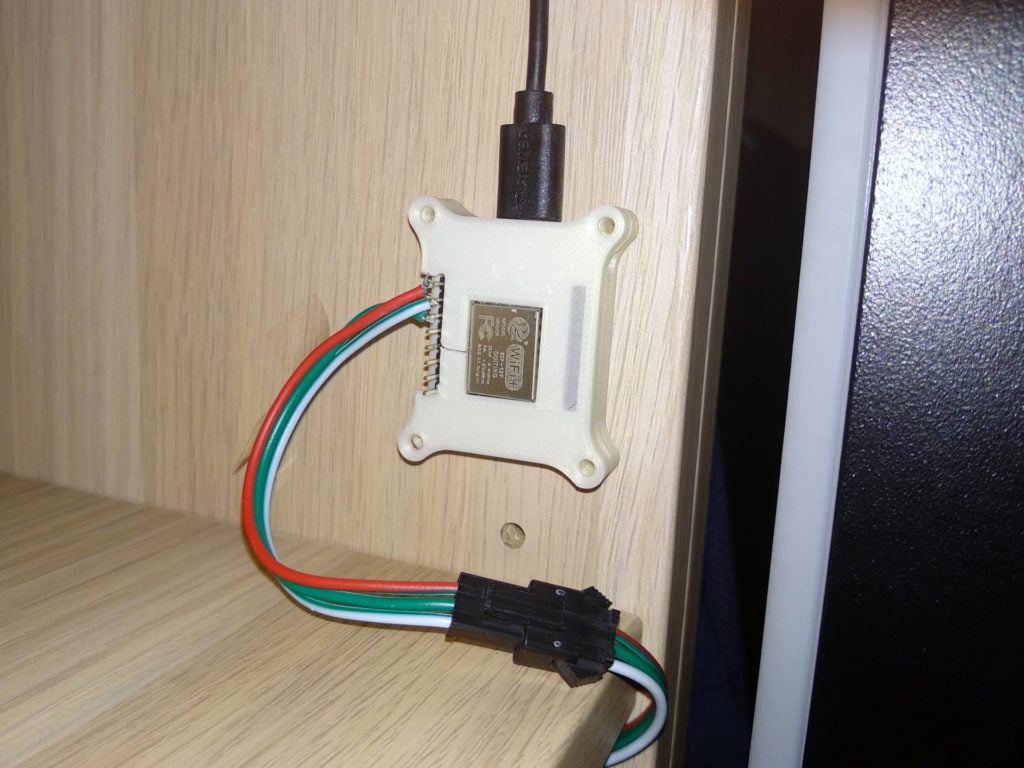
I used these cases because they are as small as they get and can be reopened once assembled. They work great although I had to slightly modify them for the connection pins to fit including the soldering.
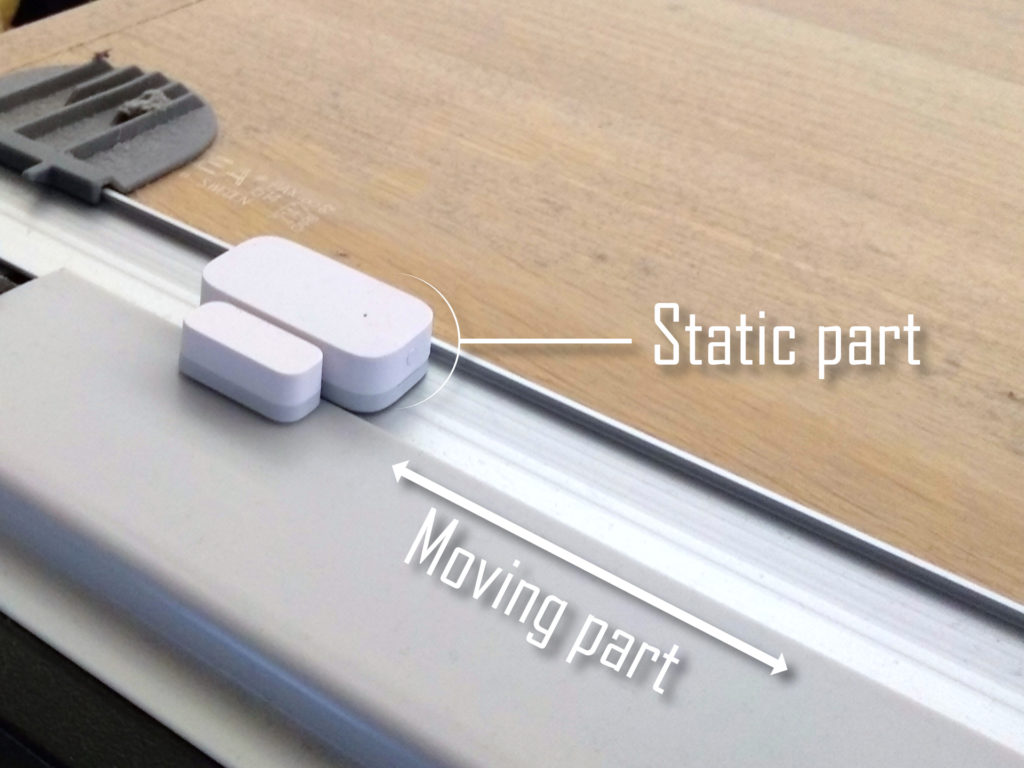
Last but not least I needed sensors to discover if the doors are open or closed. Here I decided to use sensors I already know are working well with my setup: Aqara door sensors. They are cheap, small and work well with my existing Zigbee setup. I put one on top of the closet right on the sliding door mechanism and the other one on the inside of one of the doors. Both of them are hidden unless you are really looking for them and work well and pretty much instantly.
If you are thinking about building some smart wardrobe lights too consider buying the hardware via my affiliate link(s). It won’t cost you more and pays for my server costs.
WS2811 LED Strip
Wemos D1 Mini controller
Micro USB Power supply
Aluminum Channel for LEDS
Aqara Door Sensor
Installing WLED
To control the lights with the ESP8266 chip software is needed. I had written some simple control software in the past but I recently discovered a much more sophisticated ready-to-go solution called WLED. It is a library for ESP8266 and ESP32 chips which enables detailed control over analog and digital LED (strips) including animations. It also offers different ways of controlling it remotely which include a web interface, HTTP calls and MQTT support.
The installation is quite simple: just download the latest release.bin file and flash it to your board. In my case I had to use the “version_ESP8266_1M_ota.bin” version and used the Tasmotizer software from my Tasmota article to flash it onto the ESP8266.
Afterwards take a Wifi enabled device, like a smartphone, and connect to the Wled-AP Wifi network. The default password, if needed, should be “wled1234”. In the web interface click on config and select Wifi setup. Provide the name of your own Wifi (SSID) and the password and click “Save & Connect”.

Now go to LED preferences and enter the amount of LEDs in your LED strip, 56 in my case. I would also recommend to enable “Enable automatic brightness limiter” to make sure your ESP can handle the current. You might also need to enable “Reverse LED order” on the bottom of the page if the animations are running in the wrong direction.

Lastly go to sync interfaces and enable MQTT. Provide the name of your broker (in my case the Raspberry Pi that is also running OpenHab) and save. Now you should be ready to go. Test everything but selecting a color and an effect from the main screen. Repeat all steps with the second D1 mini.
Integrating everything with OpenHab
Now that we can control everything we need to integrate all devices with OpenHab. The Aqara door sensors are integrated the same way I integrated all Aqara devices: via Zigbee and Zigbee2MQTT. Once paired with Zigbee2MQTT the Thing definitions are really simple:
Thing topic CabinetContactR "Schranktür rechts" @ "Wohnzimmer" {
        Channels:
            Type contact   :   door                "Tür"                    [ stateTopic="zigbee2mqtt/Switch1Cabinet", transformationPattern="JS:js/getZigbeeContact.js"]
            Type number    :   battery             "Batterie"               [ stateTopic="zigbee2mqtt/Switch1Cabinet", transformationPattern="JSONPATH:$.battery"]
            Type number    :   voltage             "Spannung"               [ stateTopic="zigbee2mqtt/Switch1Cabinet", transformationPattern="JSONPATH:$.voltage"]
            Type number    :   link                "Link Qualität"          [ stateTopic="zigbee2mqtt/Switch1Cabinet", transformationPattern="JSONPATH:$.linkquality"]
    }

    Thing topic CabinetContactL "Schranktür links" @ "Wohnzimmer" {
        Channels:
            Type contact   :   door                "Tür"                    [ stateTopic="zigbee2mqtt/Switch2Cabinet", transformationPattern="JS:js/getZigbeeContact.js"]
            Type number    :   battery             "Batterie"               [ stateTopic="zigbee2mqtt/Switch2Cabinet", transformationPattern="JSONPATH:$.battery"]
            Type number    :   voltage             "Spannung"               [ stateTopic="zigbee2mqtt/Switch2Cabinet", transformationPattern="JSONPATH:$.voltage"]
            Type number    :   link                "Link Qualität"          [ stateTopic="zigbee2mqtt/Switch2Cabinet", transformationPattern="JSONPATH:$.linkquality"]
    }
As always those Things will be connected to some items. As usual I am using groups here. The “grSensor” group makes sure that the sensor state is tracked and saved to a database and the “grBattery” group tracks the battery state and automatically connects those devices to my battery level warning system.
Contact cabinetR_state              "Schranktür rechts: [MAP(de.map):%s]"  <door>   (grSensor)      { channel="mqtt:topic:mosquitto:CabinetContactR:door" }
Number cabinetR_state_battery       "Batteriestand [%d%%]"                          (grBattery)     { channel="mqtt:topic:mosquitto:CabinetContactR:battery" }
Number cabinetR_state_voltage       "Spannung [%d mV]"                                              { channel="mqtt:topic:mosquitto:CabinetContactR:voltage" }
Number cabinetR_state_link          "Link Qualität"                                                 { channel="mqtt:topic:mosquitto:CabinetContactR:link" }

Contact cabinetL_state              "Schranktür links: [MAP(de.map):%s]"  <door>    (grSensor)      { channel="mqtt:topic:mosquitto:CabinetContactL:door" }
Number cabinetL_state_battery       "Batteriestand [%d%%]"                          (grBattery)     { channel="mqtt:topic:mosquitto:CabinetContactL:battery" }
Number cabinetL_state_voltage       "Spannung [%d mV]"                                              { channel="mqtt:topic:mosquitto:CabinetContactL:voltage" }
Number cabinetL_state_link          "Link Qualität"                                                 { channel="mqtt:topic:mosquitto:CabinetContactL:link" }
The WLED ESP8266’s can also be controlled via MQTT. They do have an HTTP based control interface, but as I am using MQTT for pretty much everything else I decided to stick with it. There is an annoucement that the topic structure for MQTT control is going to change in the future but this is what is working for me right now.
Thing topic WledSchrankR "Schrank rechts" @ "Wohnzimmer" {
        Channels:
            Type switch    :   power               "Licht"              [ stateTopic="wled/schrank1/g", commandTopic="wled/schrank1", transformationPattern="MAP:WLED.map", on="ON", off="OFF" ]
    }

    Thing topic WledSchrankL "Schrank links" @ "Wohnzimmer" {
        Channels:
            Type switch    :   power               "Licht"              [ stateTopic="wled/schrank2/g", commandTopic="wled/schrank2", transformationPattern="MAP:WLED.map", on="ON", off="OFF" ]
    }

// WLED.map in a .map file
=Unknown
0=OFF
1=ON
2=ON
...
254=ON
255=ON
Again those Things can be linked to items to control them from OpenHab. I also added a group to be able to turn both lights on or off together.
Group grSchrank "Schrankbeleuchtung [(%d)]" <light> (grLightWZ)

Switch WLED_schrankR             "Schrank rechts [%s]"     <light> (grSchrank) { channel="mqtt:topic:mosquitto:WledSchrankR:power" }
Switch WLED_schrankL             "Schrank links [%s]"      <light> (grSchrank) { channel="mqtt:topic:mosquitto:WledSchrankL:power" }
Now we have full control over all needed devices. Usually manual control won’t be needed but I added this part to my sitemap if I ever need to override any settings.
Frame label="Schrank" {
   Switch item=WLED_schrankR
   Switch item=WLED_schrankL
   Text item=cabinetL_state
   Text item=cabinetR_state
}
Tying it all together
Now manually having to switch on/off the light in your closet would be cumbersome and annoying. Automatic lights on the other hand are awesome and we do set up those door sensors for a reason after all… So lets make some smart wardrobe lights.
I build a simple rule turns the lights on when the door opens and turns it back off again when it closes. Simple automation, awesome effect.
rule "Switch lights on/off when the right cabinet door opens/closes"
when
	Item cabinetR_state received update
then
    logDebug("Rule", "Cabinet light updating. Contact 1 is {}", cabinetR_state.state)

    if (cabinetR_state.state == OPEN) {
        WLED_schrankR.sendCommand(ON)
    }

    if (cabinetR_state.state == CLOSED) {
        WLED_schrankR.sendCommand(OFF)
    }
end

rule "Switch lights on/off when the left cabinet door opens/closes"
when
	Item cabinetL_state received update
then
    logDebug("Rule", "Cabinet light updating. Contact 1 is {}", cabinetL_state.state)

    if (cabinetL_state.state == OPEN) {
        WLED_schrankL.sendCommand(ON)
    }

    if (cabinetL_state.state == CLOSED) {
        WLED_schrankL.sendCommand(OFF)
    }
end
It is also possible to change the color of the light or the effect that is running. This looks great and is tied to the door opening. To really take full advantage of the digital LED strip my long-term goal is to turn on each single LED on the strip one by one “following” the opening door though.
There is a similar effect called “Wipe” already implemented in WLED but unfortunately it runs continually, not just once. Right now I am experimenting with user mods, small programs which can modifiy WLED’s behavior to achieve what I am looking for. I will post an update once I really reach that smart wardrobe light stage.
This project gets even better in the next part where I add custom animations.
Update: I recently switched to Home Assistant and I have been integrating that same hardware there. The blueprint feature of Home Assistant makes it even easier. Just use the blueprint I created to quickly set up the needed automation. The devices are connected via ZHA this time but of course Zigbee2MQTT will also work.


