Power over power – cheap smart devices under your full control with Tasmota
Are you looking for a cheap solution to control any wall powered device in your (smart) home? Or an LED strip? Or a lamp? Oh and you want total control over the device and all of that for cheap? That is actually quite possible and I will show you how to get those cheap smart devices with Tasmota.
Sonoff – smart devices for cheap
When I started building my own smart home I was on the search for cheap smart devices, mainly plugs and relays. There are a lot of solutions on the market from IKEA to Hue to KNX devices, you can get those almost everywhere. The problem? The price! If you pay 30€+ for each device you will have to sell your home first to make it smart ;-).
While searching the Internet I found the Sonoff devices though and they look pretty cool. They offer:
- 1 channel relays (Sonoff Basic R2) which can be build into lamps for example
- 2 channel relays (Sonoff Dual R2) which can control 2 devices or something like a motor
- multi channel relays ( 4CHR2/PROR2) for even more devices
- Switches that can measure the energy consumption (POWR2 for around 13€)
- A wall plug (S20 for around 10€)
- Wall switches
- A 433Mhz RF Bridge
- and many more devices
If you are interested in buying a Sonoff device for your smart home consider doing it via my affiliate links above. It does not change prices for you and allows me to pay for the servers 😉
So basically everything one could need for really reasonable prices.
The catch – cloud control
So great devices for cheap. Where is the catch? I am glad you asked! I found 3 so far. First they are shipped from China so depending on where you live they might take some time to reach you. This can be fixed by just paying more money and ordering from local sellers (because those devices are quite popular now I found many resellers in Europe and Germany).
The second problem is a more concerning one though: control and data privacy. These devices need to connect to your WiFi and can then be controlled via an App called eWeLink. From what I heard it works quite well but this is really not compatible with my smart home lessons. Devices should be independent from any external services if at all possible and controlled only by your smart home. Fortunately there is a solution for that too.
And the last problem? It seems to be unclear if you are actually allowed (meaning your insurance and/or landlord agrees) to use these devices, at least in Germany. It appears like Sonoff has CE certifications at least for some of their devices but be warned if you consider using these devices. I have used many of them for quite some time now though and never had any problems.
Tasmota to the rescue
Apparently Theo Arends had the same concerns with Sonoff devices as I do because he started the awesome Tasmota project on GitHub. Tasmota is an alternative firmware for ESP8266 devices. That is the chip with Wifi capabilities used inside the Sonoff devices. It is also used in many other cheap devices (like the H801 LED controller I am also using) which can also be flashed with Tasmota. The full list can be found here.
Ok awesome, but what does this new firmware do? Why do I need it? Because changing the firmware decouples us from the Chinese cloud. Instead we can now fully control these devices from our local network. If you still want access from everywhere you only need to find a way to your own control software (e.g. via VPN). Also as a bonus this firmware can do much more with some of those devices than the preinstalled software can.
How to flash Tasmota
The process of getting this new firmware onto our devices is called flashing. It takes a moment and some hardware but it is ultimately not very hard and gives you these sweet cheap and reliable devices. I will describe this process with the Sonoff Dual R2 but it works similarly with other devices.
A warning before we start: during the whole process make sure that the Sonoff is NOT connected to mains power!
First you need some hardware: the device you want to flash Tasmota on, a serial to USB converter with 3.3V, a screwdriver and some tools to open your device and either some pin headers and a solder iron or some spring loaded contacts. The serial converter can be bought for just a couple Euros online and is usually called something like “FTDI USB to TTL serial serieller Converter 3.3V“. It is used to connect modern computers to the old serial interface still used by these microcontrollers. If you have an Arduino at home you can also use that as a serial converter.

Now to the software. There is a pretty new program that makes flashing Tasmota super easy. It is called Tasmotizer and can also be found on GitHub. Just follow the instructions on the readme. If you are using Windows you can just download the newest .exe file. Once you are ready just open the software and select your serial converter from the list of devices in the “Select port” part. For me it was mostly COM3 or COM4. Then in the “Select image” tab click “Release x.x.x” and select tasmota.bin. This will flash the newest safe version of the standard Tasmota. You could also choose a version in your own language by using tasmota-DE.bin for example.
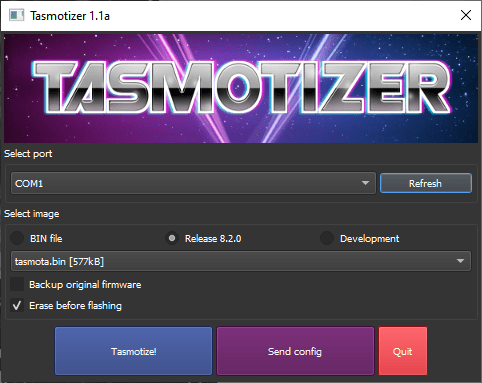
We are nearly ready to start now. I suggest to also check the “Erase before flashing” box to have a clean slate. If you are unsure you can also hit “Backup original firmware” to be able to go back to the initial state of the device.
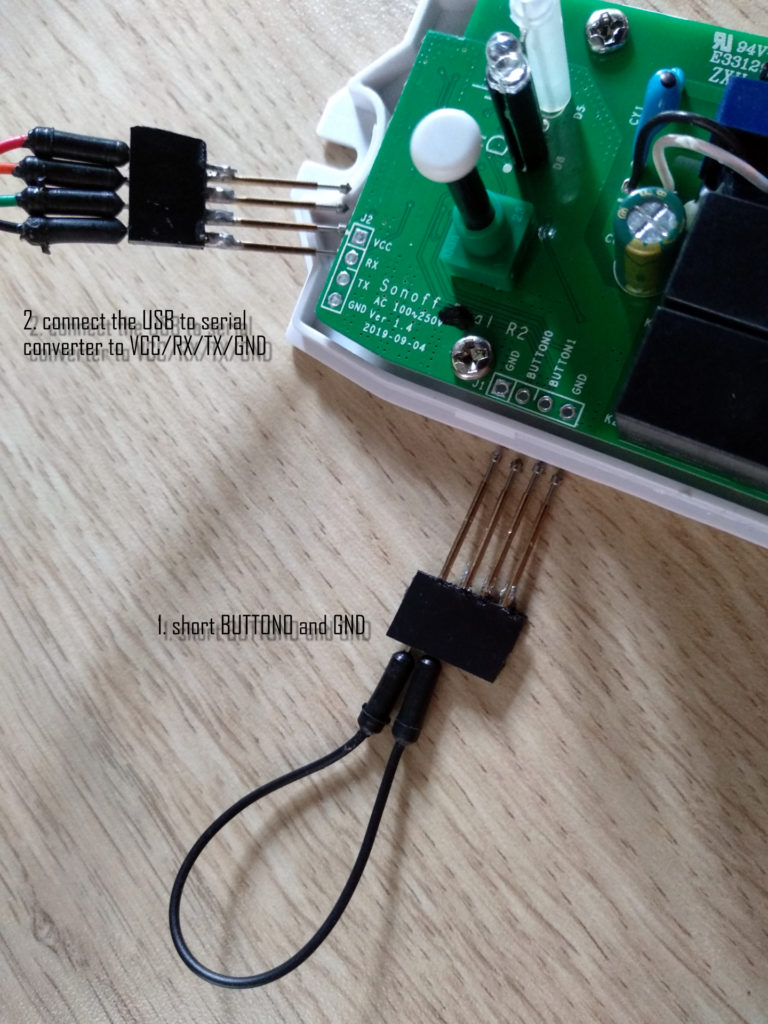
Now we need to prepare the Sonoff for flashing. The process is mostly the same with just slight differences per device type. With most of them, like with the Dual R2, you need some flat tool to pry open the case at the bottom and a screwdriver to remove some screws. In this case check the image: remove the one visible screw first, remove the small cover and then pry open the box.

Now we need to connect the programmer (USB to serial converter) to the small microcontroller on the Sonoff board. On the Sonoff board there should be some connections usually labeled VCC/RX/TX/GND. Either solder some pins in there or use spring loaded connectors (pogo pins – affiliate link). I build those for myself to save some time when flashing multiple devices. Now connect them the following way (see table below). Sometimes RX and TX pins need to be switched. That can’t damage anything so if in doubt just try. But make sure GND and VCC are connected correctly.
| Serial converter | Sonoff |
|---|---|
| VCC (3.3V!!) | VCC |
| GND | GND |
| RX | RX |
| TX | TX |
Now the software is ready and the hardware prepared. Lets go!
First you need to tell the Sonoff device to go into programming mode. That is done with most devices by pushing (and holding) the one button. The Dual R2 is… lets call it special… though. Here you need to bridge the BUTTON0 and GND pins. This can be done with any conducting material. I chose to just use another set of springloaded pins.
Once the button is pressed connect the VCC/GND/RX/TX headers to the Sonoff. Wait for a second and then stop pressing the button. Now you can start the flashing process by clicking the blue “Tasmotize!” button. The process will take a moment.
Once it is done you can click the “Send config” button to preprogram a configuration for the Sonoff (this can also be done manually later). Check the Wifi box and enter your Wifis name (SSID) and password. You could also provide a second one with recovery Wifi. Also check the Module box and select the kind of device you are using. In my case the Sonoff Dual R2.
I will explain the MQTT settings later, but if you know them, add them here too. Once you are done just click save and it will be uploaded. That’s it, you are ready to use the device!
How to control the tasmotized Sonoff
Now you have your controllable Sonoff device. Thank you for reading this, bye bye.
Wait, you want to know more? How to actually use it? Ohhhh, ok!
You can control your Sonoff devices in several ways. The most important ones being HTTP calls and MQTT. The details depend on which of those you chose and which control software for your smart home (lightning) you are using. I am using OpenHab 2 with MQTT, so I will explain how to do that.
But first let me quickly explain what MQTT is. MQTT means Message Queuing Telemetry Transport and is a lightweight publish-subscribe system designed for IoT applications. Huh? MQTT is a messaging system designed for low power devices with less than optimal connections in between and can “push” messages to devices. It is also very flexible and quite widespread, making it a great choice for home automation purposes. It only needs one server (called broker) that usually runs on the machine you run you smart home controller on.
I have installed the Mosquitto MQTT Broker on my Raspberry Pi which is also running OpenHab. In my things files for OpenHab I have added this bridge configuration, which tells Openhab about the broker.
// if your network is open to anyone else it might be a good idea to enable security and user/password features
Bridge mqtt:broker:mosquitto [host="localhost", port=1883, secure=false, clientID="openHAB2"] {
    // ... MQTT Things
}
Now we can go back to our newly added Sonoff device and configure it. Find the IP address of the new device (e.g. in your router) and open http://xxx.xxx.xxx.xxx (with that address). A main menu will open now, which allows you to switch the device on/off or change colors/brightness/… depending on the device type. There is also a button for configurations which you should press.

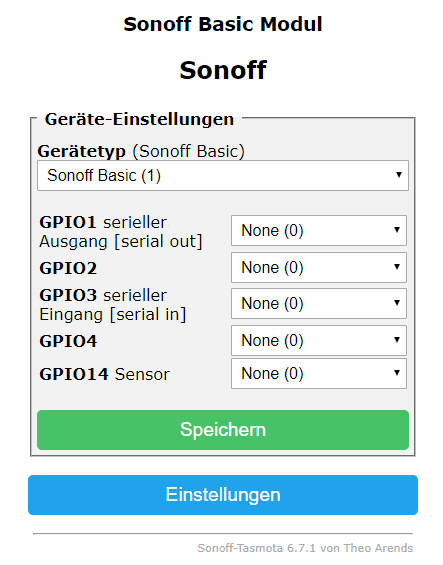
Now you will see a new menu with multiple configuration options. The first important one is device configurations (the first one). It allows you to change the device type. In my case I would select Sonoff Dual R2 (but the screenshot is from a Sonoff basic).
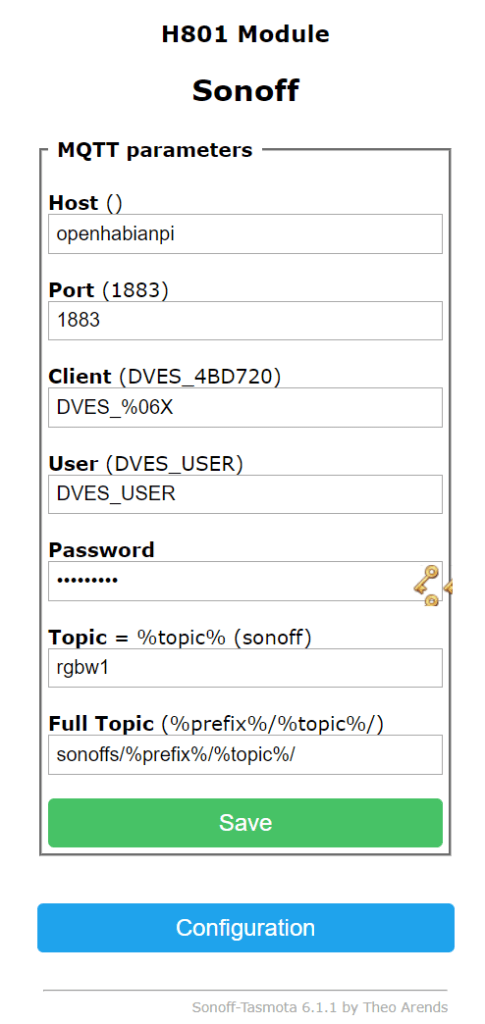
Now go back and select the MQTT settings to connect the Sonoff module to our MQTT broker. For “Host” enter the name or IP address of your broker. In my case it is called openhabianpi. The port can usually stay at 1883 if you have not changed it while installing the broker. Client/user/password I don’t care about in my setup, as I have disabled security for MQTT. For topic choose a name you can identify the device with. The screenshot is from an H801 RGBW LED controller, so I chose rgbw1. For “Full Topic” I prefer to add a “sonoffs/” to separate my Sonoff/Tasmota messages from everything else.
MQTT uses hierarchical topic for messages. That means you can send a message to the topic “/hello/world” and another one to “/hello/smarthomejourney”. A listener can now chose to receive messages to specific topic like “/hello/world” (will receive only the first topic) or broader ones like “/hello/#” (will receive both). That means by adding “sonoffs” to the topic above we could listen to all messages from all sonoffs and ignore everything else.
Tasmota uses that topic to send status messages and to receive commands. Both can be connected to OpenHab by defining a thing in the bridge like this.
Bridge mqtt:broker:mosquitto [host="localhost", port=1883, secure=false, clientID="openHAB2"] {

    // sonoff items
    Thing topic sonoffLamp "Leselampe" @ "Wohnzimmer" {
         Channels:
             Type switch    :   power               "Power"         [ stateTopic="sonoffs/tele/sonoff-steckdose-1/POWER", commandTopic="sonoffs/cmnd/sonoff-steckdose-1/POWER"]
             Type string    :   reachable           "Erreichbar"    [ stateTopic="sonoffs/tele/sonoff-steckdose-1/LWT" ]
             Type number    :   rssi                "WiFi Signal"   [ stateTopic="sonoffs/tele/sonoff-steckdose-1/STATE", transformationPattern="JSONPATH:$.Wifi.RSSI" ]
    }
}
This is using the new 2.5 MQTT binding for Openhab. We are defining a thing called “sonoffLamp” here which we can use later. This is a simple Sonoff S20 smart plug. We can control it by adding a switch channel, which we call “power” and assigning MQTT topics for state updates and commands to it.
State topics look like this: “sonoffs/tele/sonoff-steckdose-1/POWER”. “sonoffs” is the prefix added above. “/tele” is used by Tasmota for state updates. “sonoff-steckdose-1” is my german name for the device (the one from the “Topic” in the settings above). “POWER” is again defined by Tasmota and allows us to power the plug on and off.
We also receive data which indicates if the device is currently reachable and data about the Wifi signal strength. As all of this data is sent as JSON we also need a transformation for the Wifi signal value to transform the incoming value to something Openhab can interpret as a number. This is done by installing the jsonpath binding.
Now we have a Thing in OpenHab representing the hardware of the Sonoff device. Lets create an Item and put it on a sitemap to actually control it.
Switch Sonoff2 				    "Leselampe [MAP(de.map):%s]" <light>     (grLight)   ["Lighting"] 	{ channel="mqtt:topic:mosquitto:sonoffLamp:power" }
Switch Sonoff2_Reachable 	    "Leselampe ist: [MAP(reachable.map):%s]" <network> 				    { channel="mqtt:topic:mosquitto:sonoffLamp:reachable" }
Number Sonoff2_Signal 	        "Leselampe Sendestärke: [%s]" <qualityofservice>                    { channel="mqtt:topic:mosquitto:sonoffLamp:rssi" }
Here we create items for the 3 channels from the Thing. They are linked by the “channel”. Such a channel is build from “mqtt:topic:bridgename:thingname:channelname”. I am also using maps here to translate some states to German and <light> for and icon, (grLight) for a group for the item and [“Lighting”] for Alexa integration. Those are advanced details though, not necessarily needed.
Now you can control these items any way you like. For example via an Alexa integration or rules. The simplest way for testing though is to add it to a sitemap and control it via the frontend of Openhab. That can be done like this:
sitemap main label="Overview" {
    Frame label="Rooms" {
        Text label="Bedroom" icon="bedroom" {

            Frame label="Reading light" {
                Switch item=Sonoff2
                Text item=Sonoff2_Reachable
                Text item=Sonoff2_Signal
            }
         }
    }
// ...
}
What can we do now?
Congratulations! You are now able to control pretty much everything in your household that is connected to mains power. Reliable, local and for cheap! Start flashing devices with Tasmota and have fun.
If you are planning to flash more devices maybe consider building the same spring powered headers I am using for flashing. Once you have set up a bunch of devices consider the lessons from my smart home journey and start to automate as much as possible! Synchronizing your lights with your alarm might be something you don’t even know you are missing.
If you want to keep your devices up to date read here how to upgrade Tasmota. If you are looking for more “magic” than here is a super simple way of adding voice control to any Tasmota device.