Govee H6076 – the struggle to integrate a great light with Home Assistant
The Govee H6076 are a great addition to my light setup offering amazing accent light. Unfortunately the integration with Home Assistant turned out to be complicated than expected. Here is what I like (and dislike) about these lights and how to control them from Home Assistant.
On accent lights
Each great light setup should consist of (at least) three different kinds of lights. The basis is usually provided by bigger overhead lights like this one. They provide a bright source of somewhat evenly distributed light for the whole room. In a second step you can add spot lights highlighting special areas. That could be a light over a table, a literal spotlight pointed at a painting or just a self build artwork like my waveform lamp where the lamp basically highlights itself.

Some of those lights already border on the last category: accent lights that are usually placed around the room on the wall to light up darker corners, integrate with other furniture and in general make the room nicer and brighter – in short more livable. They are usually indirect lights and in the past in an old apartment I built a simple version myself using LED strips and cable ducts.
The Govee H6076
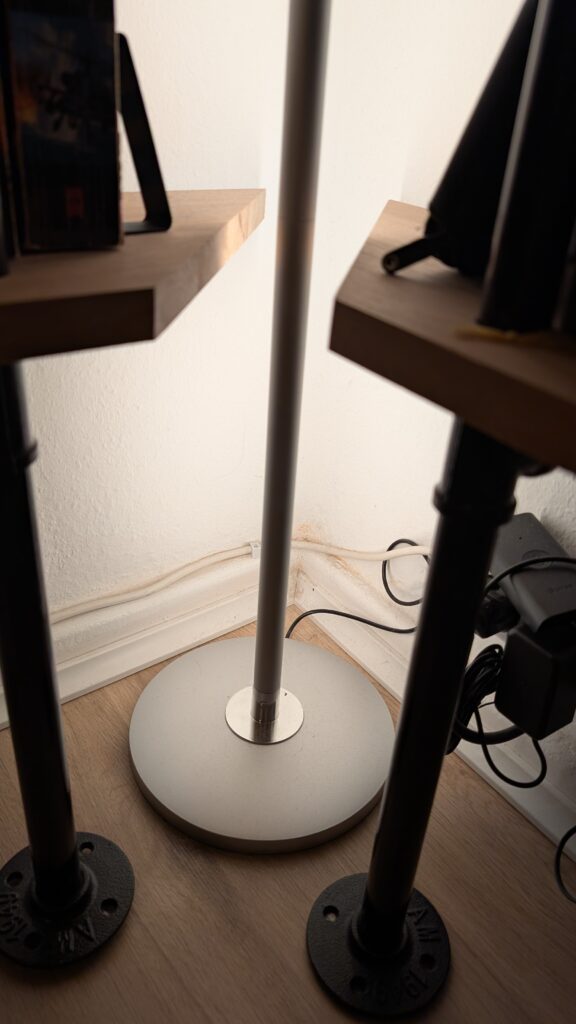
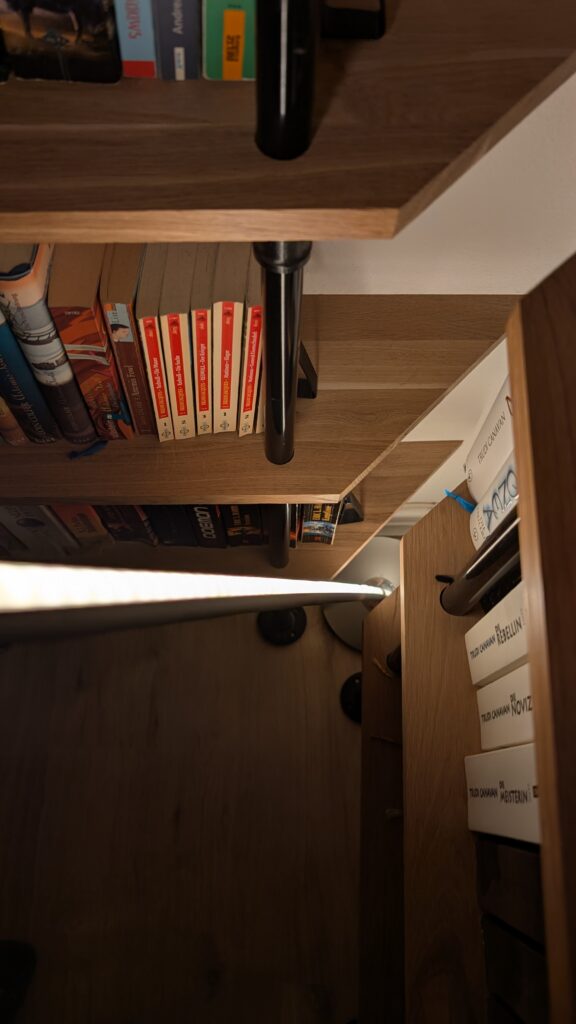
Govee is one of many producers of (smart) lights and they seems to offer a huge variety of them. For Christmas someone who really knows how to make a smart home enthusiast happy gifted me one of their lights. It is a standing light intended to be placed in a corner for indirect light. Ever since I built my bookshelf I was planning to put some light in that corner, so this was the perfect place for it.
Need a shiny new light? Consider buying it via my affiliate link to keep the blog running
Govee H6076 amazon
The Govee H6076 light is delivered in a surprisingly small box and needs to be assembled first. Fortunately the assembly is mostly quite simple and straight forward. You simply connect a couple pieces of tubing with some small screws. They can be a bit fiddly and due to the kind of connection you will always seem small seams but overall it looks quite good.

The only part of the assembly that was a bit more tricky, and where the manual was not really helpful, was adding the LED strip. It comes wrapped in a very nicely flexible plastic housing and needs to be pressed into a matching groove in the pipes. Unfortunately it is ever so slightly too long. You really need to make sure to start in the center and keep pressing both ends outwards with a bit of force to fit it in. In my case it even slightly pushed to top cap upwards.
The lamp itself looks minimalist enough for my taste. A simple thin column that should be turned towards the wall for some nice indirect light. The diffusion is good enough that you can really see the single LEDs with the naked eye. A slim base to keep everything upright and an external power brick with an on/off button and a quick connector. Nice! This allows a quick change of the power source if needed or for longer cables where necessary. I have the silver version but a black one is available as well.

Once done with the build the setup with their Govee app (and thats needed for Home Assistant as well) is quite simple and straight forward. Download the app, search for a new device there, plug in the power for your lamp and follow the instructions. A quick press of a button on the power cable confirms the connection and you can start using it.
The lamp supports all the “basic” settings: color control, dimming, warm & cold white settings and even different settings for different parts of the light strip. It also has the biggest amount of additional features I have seen in a light so far. Among them are premade scenes, scene editors that even suggest matching colors, animations and even – best of all – a sync to music. This can be done using a build-in microphone or the phone (or some other external hardware I believe).
This music sync is really fascinating. Of course other hardware supports something like this as well (even WLED can do it) but I really enjoyed the simplicity here. I only wish the app would be a bit cleaner and easier to use but I guess that is the price to pay for all these features. I personally enjoyed it enough to buy a second light for another corner of the room. They both work together quite well.
Network connection and Home Assistant with the Govee H6076
Initially your phone controls the light(s) directly via Bluetooth. This works well after some short initial connection delay. In my case, of course, I want to connect it to my existing smart light setup similar to other lights and following the same style of automations and automatic dimming/color changing during the day.
The first steps to reliable remote control via Home Assistant is to connect the lights to your Wifi instead of using a direct Bluetooth connection. In my case I used a wireless network in a separate VLAN that can only connect to the Internet or my smart home server. This can be done via the Govee app as well (config button at the top right -> wifi connection).
Finally to be able to control these lights via the network you need to enable LAN control in the same settings menu. Unfortunately this only shows up with a newer firmware version (1.04.06 in my case) so I had to wait for around a month and install this update first.
Once that was done I started my mission to connect it to Home Assistant. My first choice was the Govee plugin which seemed to support my lights. Unfortunately I ran into an issue here pretty quickly: apparently it does not play well with multiple network interfaces (according to this thread). As my home server is part of multiple VLANs it seemed to be confused and unable to find the lights. Unfortunately it only supports scanning and no way to directly provide an IP address.
Fortunately these lights are apparently popular enough that someone came up with a separate solution: Govee2MQTT. The documentation is good enough and it provides access via the web API and directly via the LAN mode I already enabled earlier. Sounds good, lets give it a try.
Fortunately I run a pretty extensive server setup based on Docker containers and already have an MQTT broker. Check the linked Github repository if you want to know more. Adding this one was pretty simple then using the following docker compose file:
version: "3"

services:
  govee2mqtt:
    image: ghcr.io/wez/govee2mqtt:latest
    container_name: govee2mqtt
    restart: unless-stopped
    environment:
      - GOVEE_API_KEY=${GOVEE_API_KEY}
      - GOVEE_MQTT_HOST=homeserver
      - GOVEE_MQTT_PORT=1883
      - GOVEE_TEMPERATURE_SCALE=C
      - RUST_LOG_STYLE=always
      - TZ={TZ}
      - GOVEE_LAN_SCAN=192.168.3.25,192.168.3.26 # added later
    network_mode: host
It is a basic container definition (host mode seems to be required to have enough access to send the needed messages) with some important environment variables. The API key is not strictly needed but must be there for online access as far as I know. You can apply for one here.
The MQTT host & port need to point to your MQTT server, in my case the smart home server itself. The rest are standard settings you can adapt to your liking and the last LAN_SCAN line will be needed later. A quick docker-compose -f nameOfTheFile.yaml up -d should start your container. Check the logs and then open a connection to port 8056 like http://homeserver:8056/assets/index.html to see the web interface. Here you can already do basic control and most importantly see the source.

The source field shows you how you are connected. The screenshot already shows the LAN API but initially I was connected via the web and their online API. Unfortunately this means relying on the web and their server to be available and introduces huge delays.
Initially I also got some errors in the logs: again the container was not able to find the lights on the local network. Fortunately this time there is a manual override: adding the – GOVEE_LAN_SCAN=192.168.3.25,192.168.3.26 line forces it to scan these specific IP addresses (can be a range as well) for devices. Use your router to find the exact addresses but those are the ones for mine. Now finally after another restart both lights showed up like this with a fully local connection and an amazing reaction time.
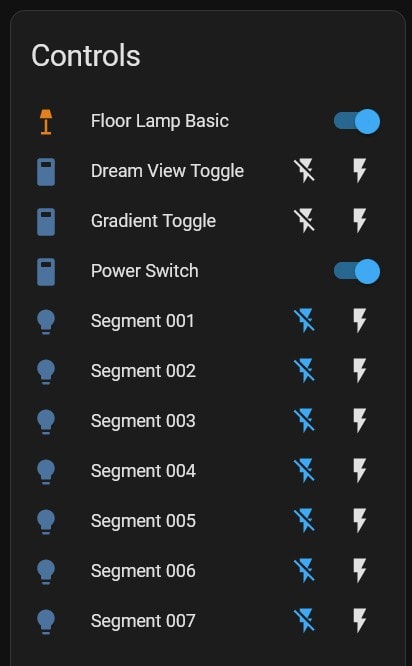
The connection to Home Assistant is now super simple as they support auto discovery via MQTT. If you have already added the MQTT integration you should now see a new “govee2mqtt” device with your lamp(s) connected to it.

Each lamp comes with a whole set of controls. They can turn it on/off, control single segments or, what I use most, provide a full light control with dimming, color and warm/cold white control. The only thing missing unfortunately are the crazy control modes like music sync. I will have to have a look at the API documentation to see if it is even possible to add those.

Then I added the lights to my dashboard, the light group helper for the room and to a new config for my adaptive lighting setup that smoothly dims and changes colors for all my lights over the day. These settings are pretty basic and work well for me.
adaptive_lighting:
  - name: "Adaptive govee"
    lights:
      - light.floor_lamp_basic
      - light.floor_lamp_basic_2
    min_brightness: 60
    max_brightness: 100
    #min_color_temp: 2000
    #max_color_temp: 5500
    sleep_brightness: 10
    take_over_control: true
    detect_non_ha_changes: true
Overall I am super happy with these lights. Yes the build process could be slightly smoother and a fully working and officially supported local first Home Assistant integration would be amazing but with these steps it works well enough for me and has been super stable.
The lights look minimalist and add a great accent to my living room, brightening up the dark corners making it overall much more cozy during this dark time of the year. The app with all its modes, and especially the music sync are a really cool toy and the integration with Home Assistant works flawlessly once set up.