The ultimate automatic smart light system with Home Assistant
I built my ultimate automatic smart light system and this is how you can do the same. You want lights that turn on and off automatically and always dimm to the right level? Lights that even change color (adaptive lighting/true tone/flux…) all on their own? It is possible with some affordable hardware and Home Assistant.
How a smart light system should work
Why build a smart home if nothing about your lights is really smart? Turning them on and off via app (or voice control) is pretty cool but not really that much better than just using plain old light switches. Sometimes even worse.
Fortunately modern sensors and smart home systems offer you all the tools you need to make your lights a lot smarter. I set out to build such a smart light system for myself (part 1, part 2, part 3) based on OpenHab in the past. It was mostly based on motion sensors triggering my lights during certain times of the day. After I set up my new smart home system based on Home Assistant I decided to also build a even more powerful system.
Lights turning on and off based on motions sensors are a great start (and you get used to that really fast) but there are a couple of shortcomings to this approach. Fist of all I had couple of situations where the lights did not turn on even though it was dark enough (but not night) for example during a storm. Contrary scenarios also happened where the lights turned on already although there was still enough natural light.
Then there is the brightness: during they night I do not want to get blinded by the lights but during the evening I might need bright lights to properly read. Lastly I also have some lights that can change colors or the white “tone” (warm and old whites). I was looking to also include that similar to the way f.lux changes computer screens, Apple devices update colors via true tone and adaptive color and auto brightness change Android phones.
So overall smart lights should automatically turn on when you enter a room. They should adjust brightness and color automatically to the time of the day and other environment factors and turn off again once you leave.
Keeping those ideas in mind I started building my new ultimate smart light system.
Turning lights on and off
Turning lights on and off based on presence detection might be THE usecase for smart homes. It sounds very simple but it feels like magic and can be super useful.
To do this I am using similar hardware as described in my old smart light system guide. I am using small and affordable Aqara motion sensors that are connected to my Home Assistant installation via ZHA and a Sonoff Wifi Zigbee bridge running Tasmota. Together with other means of presence detection like my router recognizing my smartphone this allows me to figure out when to turn my lights on and off.
- The H801 LED controller (don’t forget to flash Tasmota)
- Sonoff S20 smart plug (or S26 for the US, also flash Tasmota)
- Shelly 1 smart switch or any other switch from the Shelly line
- If you are looking for a simple system: IKEA tradfri gateway , LED bulb or motion sensor
- More expensive: the Philips Hue gateway set (I am only using single bulbs via ZHA)
- My favorite Zigbee sensors from Aqara: temperature/humidity, motion/brightness and doors/windows
If you are looking to build a similar system consider buying the hardware via these affiliate links to support this blog!
To actually control the lights I am using a mix of Hue and Tradfri lightbulbs, also controlled via ZHA and the Sonoff bridge and H801 RGBW LED controllers flashed with Tasmota. There is also a “Tasmotized” S20 smart plug to control another lamp.
Basic automation
To turn on and off the lights automatically we can use automations in Home Assistant. There is a blueprint feature which makes this really really easy. The default installation already comes with a blueprint “motion-activated light” which is covering this use case. Just create a new automation based on this, select the motion sensor entity, the lights you want to control and set a timeout for them to turn off again.
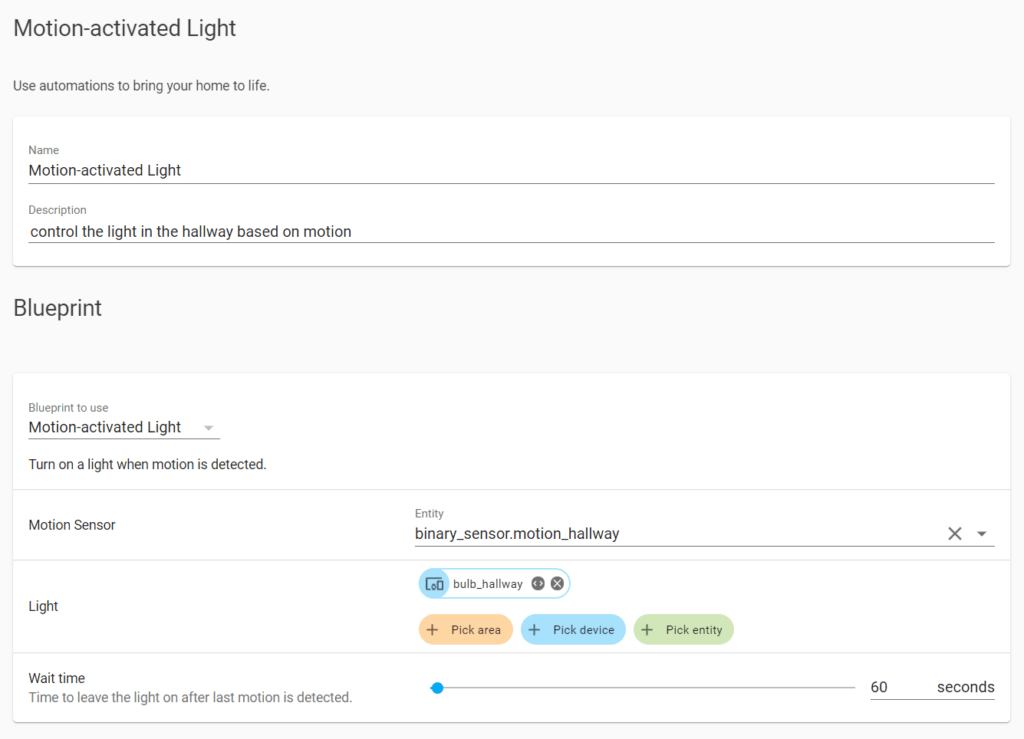
I used this for some time. I have a motion sensor in each room and I have linked them to all the lights in the room. Timeouts differ a little bit from room to room. In some rooms like the hallway they are pretty short (60 seconds for example). In others like the kitchen I set them to higher values (5-10 minutes) to avoid sitting in the dark if I don’t move enough for triggering the sensors.
Advanced automation
The solution solution so far is basically what I also used before. Unfortunately there is also the same drawback I described earlier: this is not flexible enough in terms of actual brightness in the rooms. This is where the Aqara motion sensors come in really handy: they also measure and transmit the current brightness.
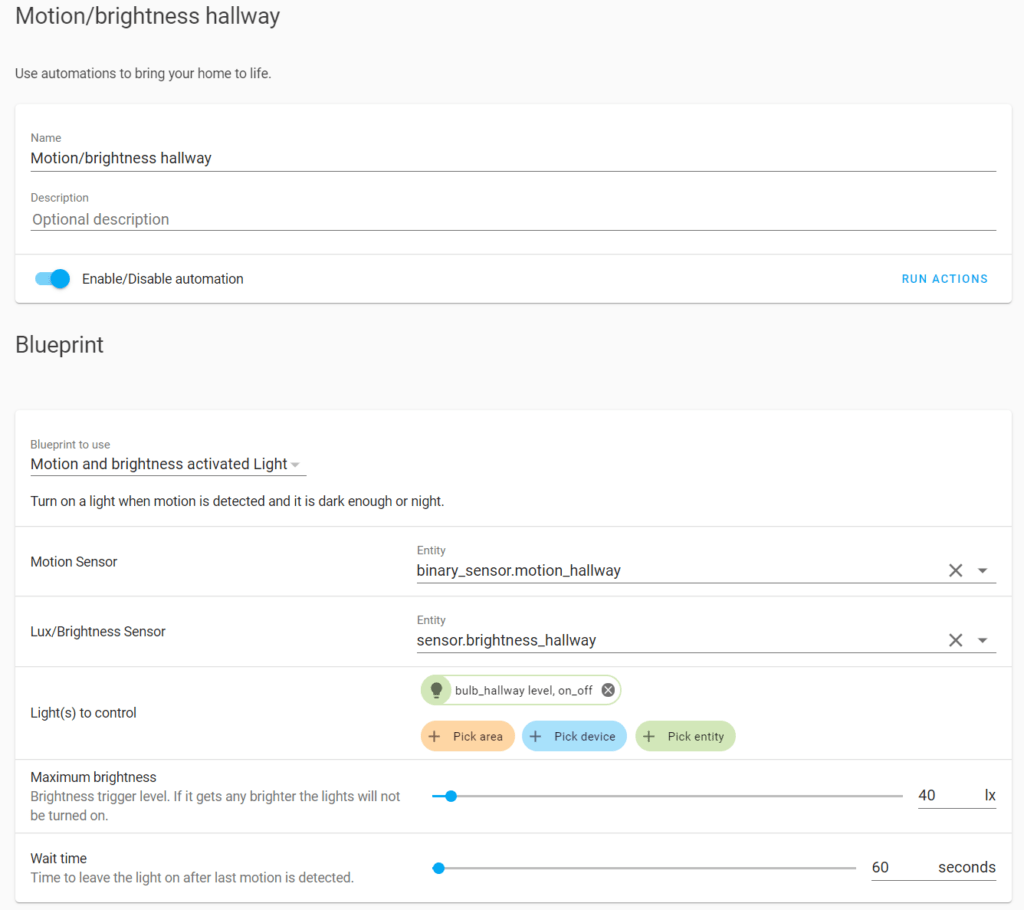
So I wrote an updated blueprint for Home Assistant which also takes into consideration the current brightness before triggering the lights. You have to provide motion and brightness sensors and some target lights to be controlled.
blueprint:
   name: Motion and brightness activated Light
   description: Turn on a light when motion is detected and it is dark enough (or night).
   domain: automation
   source_url: https://github.com/OliverHi/blueprints/blob/main/motion_brightness_light.yaml
   input:
     motion_entity:
       name: Motion Sensor
       selector:
         entity:
           domain: binary_sensor
           device_class: motion
     brightness_entity:
       name: Lux/Brightness Sensor
       selector:
         entity:
           device_class: illuminance
     light_target:
       name: Light(s) to control
       selector:
         target:
           entity:
             domain: light
     brightness_trigger:
       name: Maximum brightness
       description: Brightness trigger level. If it gets any brighter the lights will not be turned on.
       default: 20
       selector:
         number:
           min: 0
           max: 1000
           unit_of_measurement: lx
     no_motion_wait:
       name: Wait time
       description: Time to leave the light on after last motion is detected.
       default: 120
       selector:
         number:
           min: 0
           max: 3600
           unit_of_measurement: seconds
# If motion is detected within the delay,
# we restart the script.
mode: restart
max_exceeded: silent

trigger:
  platform: state
  entity_id: !input motion_entity
  from: "off"
  to: "on"

condition:
  - condition: or
    conditions:
      - condition: sun
        before: sunrise
        after: sunset
      - condition: numeric_state
        entity_id: !input brightness_entity
        below: !input brightness_trigger

action:
  - service: light.turn_on
    target: !input light_target
  - wait_for_trigger:
      platform: state
      entity_id: !input motion_entity
      from: "on"
      to: "off"
  - delay: !input no_motion_wait
  - service: light.turn_off
    target: !input light_target
The full up-to-date code can be found in my GitHub repository. I covered the installation of blueprints here. Beside the actual sensors you can also provide a time that the lights will stay on (in seconds) without a further trigger and a brightness level (in lux usually) that the automation will use to determine when to turn on the lights.
I also added a second condition for the lights to turn on during the night, regardless of the actual brightness. You can easily delete that and just keep the numeric_state condition if you don’t need it.
So far this solution has been working really well for me, even during the day the lights are turned on for example during bad weather with a lot of clouds outside.
Dimming lights & changing color
Automating the lights is great but you are still wasting some potential of smart lights. Often they also come with RGB support or warm/cold white switching (which I personally find much more useful).
Personally I am using these bulbs. Consider buying them for yourself via these affiliate links to support the blog.
Hue white (dimmable and warm/cold white) bulbs
Tradfri bulbs (get the warm/cold white version)
After using f.lux on my desktop computer for years to control the blue/red light during the day I was looking for a similar solution for my smart lights. I found an awesome solution in adaptive lighting. You need to install the HACS community store to install this integration but the process is pretty simple if you just follow their manual.
What this integration does is automatically adjust brightness and color of your lights according to the time of the day. This is based on the position of the sun and will automatically update over the year. The full setup can be done via the UI but I decided to do it via the configuration.yaml file as I have multiple different setups.
adaptive_lighting:
  - name: "Adaptive hue"
    lights:
      - light.bulb_bedroom_level_light_color_on_off
    min_brightness: 65
    max_brightness: 100
    min_color_temp: 2000
    max_color_temp: 5500
    sleep_brightness: 30
    take_over_control: true
    detect_non_ha_changes: true
  - name: "Adaptive default"
    lights:
      - light.bulb_bath_level_on_off
      - light.bulb_hallway_level_on_off
      - light.bulb_kitchen_level_on_off
      - light.bulb_living_table_1_level_on_off
      - light.bulb_living_table_2_level_on_off
      - light.bulb_living_table_3_level_on_off
    min_brightness: 30
    max_brightness: 100
    sleep_brightness: 10
    take_over_control: true
    detect_non_ha_changes: true
Different smart lights have different brightness (ranges) and different rooms might required slightly different setups. Therefore I have multiple (currently two but I am experimenting) different configurations as you can see above.
The Hue light bulb in my bedroom does not get super bright when it is set to warm white light so I set min_brightness to a pretty high value of 65%. The color values are default but take_over_control and detect_non_ha_changes are important.
There are sometimes situations where I want to change the settings temporarily by just adjusting it from the Home Assistant App or via voice control. Enabling take_over_control will mark those devices as manually controlled and not instantly overwrite the values again. Once the light is turned off and then on again it will be automatically controlled again. Very neat! detect_non_ha_changes is part of the feature and will also detect changes made from outside Home Assistant (for example if I directly control a light via MQTT and Zigbee2MQTT). This will most likely not happen for me but I enabled this to not break my setup later.
Lastly the lights parameter takes a light of lights that will be controlled with these settings. There are also settings for a separate sleep mode that can be activated for minimal brightness and warm colors. The mode can simply be activated by another automation for a certain time. I have not used this so far but there is a simple example in the documentation.
Overall I think I reached my goal of an awesome automated lighting setup. There is pretty much no need anymore to use any light switches. The light automatically adapts color and brightness over time, which you might not notice at first but that really has some positive impact on the mood. All of this with a setup that is pretty simple to operate and extend only relying on a couple of very easy to use blueprints/automations and one integration. I can tweaks the values in the configuration. Let me know if you have built a similar system! What else did you include?