Brighten up your day! How to build an affordable and reliable smart light system – part 2
If you have read part 1 (otherwise you really should!) you now have nicely lit rooms, but this is about smart lights, right? What we are still missing are actual hardware controllers for the lights. The next step is to add some hardware to be able to actually control those lights in any way but by traditional switches.
In this article I will describe the devices I found to be most useful and list some alternatives. This won’t be an overview of all possible solutions though, so there might be other great ideas and devices out there. This is what has been working for me.
If you are looking for a list at the end of the article I will add links to all the listed hardware I am using for my setup.
To WiFi or not to WiFi?
Before you start buying smart bulbs and led controllers and such there is a general question you need to answer: how will you connect those devices to your network?
The best way would be to wire everything (KNX for example) but for most people this is not feasible as you just can’t run wires everywhere. You have to go wireless instead. For smart home devices there are basically two ways to do this: you either rely on (existing) Wifi or you use some different network.
WiFi is already available in most homes and allows you to directly access your devices from your controller/phone/tablet/… Yet it is not the greatest solution for a smart home as lots of new devices tend to clog your network and low power devices will run out of battery really fast if they use WiFi.
The alternative? Use network technology build for these kind of devices: mainly Zigbee or Z-Wave. Those are suitable for low power devices and they build mesh networks, meaning every directly powered device in this network extends its range and resilience. You also don’t have any more devices than needed in your actual WiFi. The only drawback here is that you need a bridge for each type of network: a device that is connected to your LAN/WiFi and to your Zigbee/Z-Wave network.
For each kind of light there are different ways to control it. Here I will show for each one which way I prefer.
LED strips
How do we control them?
Lets start with the LED strips. To integrate them into our smart lighting system we need some kind of controller unit. There are existing systems like that (for example Hue has some controllable LED strips) but those are really expensive most of the time. This is especially annoying as LED strips themselves are quite cheap.
What LEDs am I talking about? In general there are two different kinds of LED strips: analog and digital ones. The digital ones come with small control chips directly on the LED strip and usually 3 wires (usually 5V/GND/Data line). Neopixels are one example if a digital LED. They are called digital because you can send data via this data line to each individual LED on the strip, thus controlling them all separately. This might be great for some usecases but they are more expensive.
Analog LEDs on the other hand are the “normal” LED used almost everywhere. They don’t have any build-in logic and usually require “amount of color”+ 1 connection (so a RGB LED strip has 4 connections). They can be controlled by switching on and off the different colors but these changes always affect the whole length of the strip. There is no way to control individual lights.
I chose to use the cheaper analog LED strips for most places. Especially for the long strips needed for indirect lighting in a room the cost difference is just too high. You can definitely choose between white/RGB/RGBW/RGBWW/… combinations though. Pretty much all of them can be controlled by this cheap Wifi enabled controller I am using: the H801.
The H801 comes in a small package, about the size of a credit card, and features connections for the incoming power as well as up to 5 control channels. That means you could control an LED strip with a red, green, blue, warm white and cold white channel. Or anything with less. You could even use it with several LED strips with only one channel.

The best part about the H801? It only costs about 10€, less if you order it from China. Now there is one problem though: you are supposed to use an App on your phone to control it. This seems to be the only supported way and you would have to trust whoever made this App. If you have read my smart home lessons you know that this is really not acceptable. Fortunately there is a better way. It is called Tasmota.
Custom firmware for the controller
So before you connect your LEDs to the H801 head over to my in-depth article on how to flash Tasmota on your device.
Once you have successfully flashed the tasmota software you can connect the device to power (get a properly sized power adapter for your LEDs, usually at 12V). Depending on whether you supplied Wifi credentials before uploading the firmware you should now either see a new device in your network or a new Wifi created by the H801. In that case just connect to it and provide your Wifi credentials.
Now you can connect to the device and test the brightness controls in the main menu. If the lights are not working check your connections. If you already have an MQTT server up and running you can also add those details in the “Configuration -> MQTT” tab. If you don’t (or if you don’t know what MQTT even is) don’t worry. I will explain the software part in the followup post.
Alternatives
If you don’t like to use Wifi you can also buy Zigbee based LED strip controllers. The Gledopto GL-C-008 RGBCCT controller works with Zigbee2MQTT too and Hue and Tradfri also have their own controllable LED strips. All of those are quite a bit more expensive though.
If you are trying to save some more money but have some time on your hand you can also go and build some yourself. I designed a RGBW controller based on the MySensors project. I was never able to run that network as reliable as Wifi and Zigbee though.
Congratulations, the first part of your smart home lighting system is done. The journey is not over yet though… so lets get to the next part, shall we?
Spotlights
What I am using
If you followed my advice from part 1 you will most likely have indirect spotlights or something like reading lights ready and set up. Those lamps usually have a build-in power cable and directly connect to an outlet. There are two ways you can control these: if there is some space left somewhere in the lamp you could cut the wire and add a Wifi relay like the Sonoff basic or mini. This works well and can be well hidden.
I did not want to cut any cables or touch high voltages though so I decided to go a different way: buy a controllable plug that goes in between the power cable and the wall socket. Many different brands offer these, so you can definitely go with the ones sold by Ikea or Philips Hue if you want to. I chose to use the cheap Sonoff S20 plugs because they can also be flashed with the tasmota firmware.
The procedure for flashing is mostly the same as with the H801 I described above. Once you are done flashing tasmota and connecting the device to your Wifi just plug in your lamp. Now you should be able to turn it on or off via the button the smart plug and via the web interface.
Alternatives
As I said Philips and Ikea offer Zigbee based smart outlets that you can use via Zigbee2MQTT for example. The Xiaomi Aqara brand seems to also offer one but apparently there is no EU version of that yet, so I was unable to try that out.
There is also a huge amount of Wifi based solutions that you can try. Most of these alternatives are way more expensive than the S20 I use.
Light bulbs
My solution
The most interesting part of the smart lighting concept are light bulbs. Again there are multiple ways you can control those. Either use smart switches that replace existing wall switches or use smart light bulbs. Both will give you control over the ceiling lights but with different pros and cons.
A clean solution would be smart light switches. They allow you to keep using the existing in-wall switches as every is used to doing and they are able to control anything wired to that switch. Not just light bulbs. Personally I have not used this method yet as you need a certain kind of wiring (neutral wires needed in most cases) and, most importantly, you need to directly deal with mains voltage, which I like to avoid as much as possible. If you go this route the Shelly switches use great open software and I heard quite good things about them.
The alternative to switches are smart light bulbs. They are super easy to install (just screw in a new light bulb) and you might already have some of them if you used my easy beginners setup. Their disadvantage is that you need to stop people from using the existing switches as a smart bulb won’t be that smart anymore without power. They make up for that with more possibilities for lighting though: pretty much all of them are able to dim their light and some offer different shades of white light or even full RGB colored light.

Depending on how much you are willing to pay and the exact features you are looking for I can recommend either IKEA Tradfri lights (pretty cheap if you just take the normal white ones) or Philips Hue (pretty much the best you can get but really expensive). Of course there are also alternatives but those two are available mostly everywhere and they both use Zigbee for communications.
How to control them
The great thing about using Zigbee (beside not adding even more devices to your Wifi) is that we can set up Zigbee2MQTT as I described here. By getting a cheap Zigbee USB stick we can directly control all these Zigbee devices with our smart home controller. No different hubs and different Apps needed and everything works locally, totally under our control. And it is not even complicated to set up. That way you can add any automation you want and even use voice assistants like Alexa and Google Home for all devices.
Alternatives
This one has to many alternatives to list them all. From smart light switches, to different Zigbee smart light bulbs to Wifi based bulbs. I can still recommend the Tradfri (hard to beat in the price category and works well via Zigbee2MQTT) or the Hue bulbs (expensive but pretty much the best out there). Using smart switches instead is definitely a good option though if you are fine installing them.
Sensors
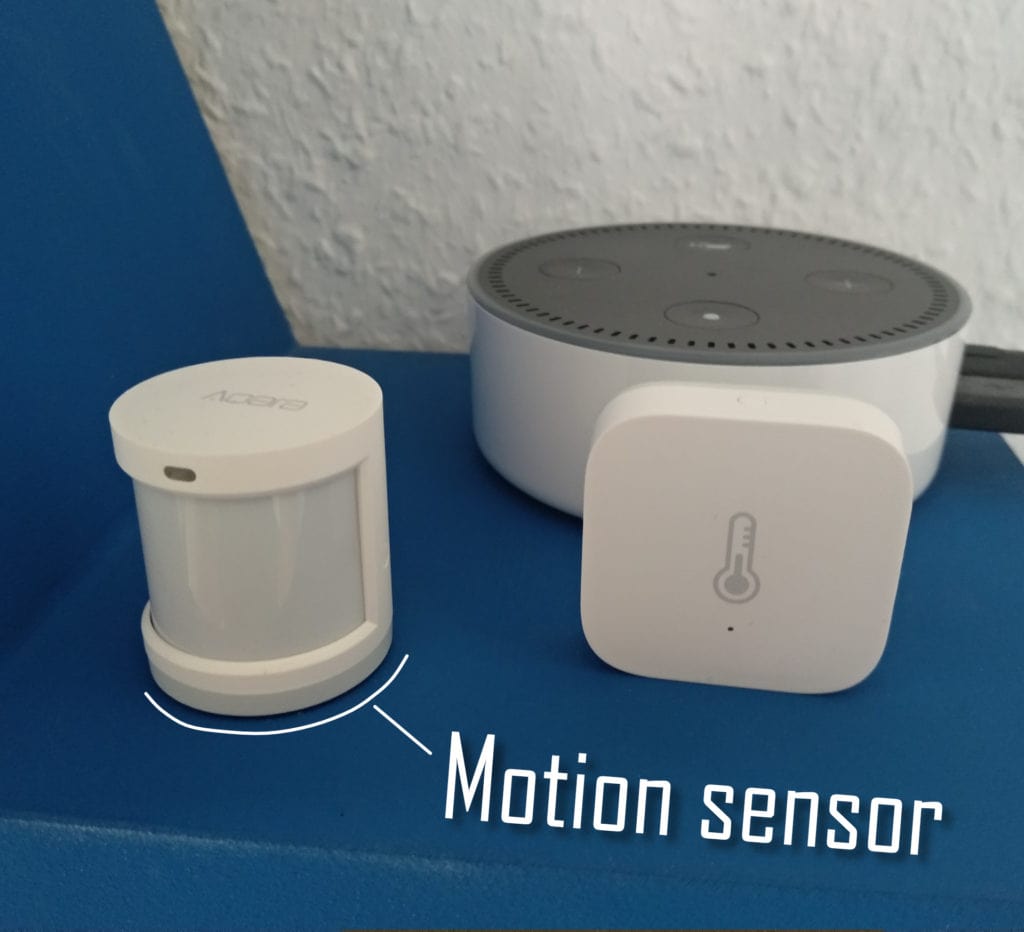
Now smart lights are pretty awesome but without any additional data they can only get so smart. To truly start automating things we do need some sensors too. For my smart lighting system I mainly use motion sensors to detect if someone uses a certain room.
I am using the Aqara motion sensors which are really cheap (less than 10€), super small and easy to use with the same Zigbee2MQTT setup. They also include a brightness sensor which can be used to automatically dim your lights. Pretty neat!
I do also have some contact sensors from the Aqara system for doors and windows, which are also used for some light based rules.
Of course there are more inputs for my smart home but these are the most important ones.
Bridge and control software
The last piece of hardware that is missing is our controller and bridge. The device that runs our smart home controller software and talks to our smart devices. Of course you can buy the bridges that come with the existing smart home systems, like the Hue bridge. Before long you will be using several different bridges though and a handful of different Apps. Oh and not very sophisticated options of actually automating anything.
Instead you can go with a cheap micro computer and open source control software. I chose to go with the Raspberry Pi 3 and OpenHab2. If you install OpenHabian the setup is super easy. The hardware is not even bound to this software though. At any point you can overwrite your system (or get a second SD card for testing first) and switch to another system like Domoticz or HomeAssistant.
To interface with your smart devices all you need to add is network access, either via Wifi or LAN cable, and a Zigbee USB stick like the CC2531. I described the hardware and software setup in depth in my Zigbee2MQTT article here. A similar solution is also available for Zwave with Zwave2MQTT. If you have an existing server you can also run this software on it (or in a virtual machine).
That’s it for now. In part 3 I will describe how to set up the software for your smart lights system and what kinds of automation I use.
List of parts
Here is a list of all the components I mentioned in this article with links to Amazon. If you are looking to also get some smart lights consider buying it via these affiliate links. No additional costs for you and I get to pay the servers.
- The H801 LED controller (don’t forget to flash Tasmota)
- Zigbee LED controller (I have not tried that one myself)
- Sonoff S20 smart plug (or S26 for the US, also flash Tasmota)
- Shelly 1 smart switch or any other switch from the shelly line
- If you are looking for a simple system: IKEA tradfri gateway set, LED bulb or motion sensor
- More expensive: the Philips Hue gateway set (not using this myself yet)
- My favorite Zigbee sensors from Aqara: temperature/humidity, motion/brightness and doors/windows