Home Assistant helpers & state machines – take your automations to the next level
Home Assistant helpers can greatly improve automations and make more complex ones possible. Normal automations can be very powerful but they miss one feature that is sometimes needed for more complex interactions: variable storage. Fortunately there is another feature – called helpers – that can be used to fix this by providing different sorts of information storage. I used the dropdown helper to build advanced automations with a state machine.
The restrictions of Home Assistant automations
Automations in Home Assistant always work via the same schema: when something happens – under certain conditions – do something. Those parts are called trigger, condition and actions. The concept works great for simple(r) automations. If I click a button and the lamp is turned off then it should be turned on for example.
Unfortunately the simple concept of the automations starts to fall apart for more complex scenarios where additional data should influence the decisions. Automations have access to all the state in Home Assistant, like devices states, daytime and much more but no direct access to meta information. Now what if the automation should only run during a certain (changeable) time? Or it should behave differently on the second activation.
The automation that made me look for a better solution was such a case. I wanted to control the light in my bedroom and adapt it to different scenarios all controlled by a single button. In the morning when I press it the lights should turn on and the blinds should open. In the event when I go to bed the other rooms should turn dark, the reading lights should turn on and the blinds close. Then once I am ready to go to sleep another click should turn off all the lights. How do you make one automation do all of this?
Home Assistant helpers to the rescue!
This is where helpers come in very handy! They are basically small variables (data storage) that you can create. You can find them via Configuration -> Helpers or add them directly to your sidebar. In the new menu you will see an overview of your existing helpers and you can create new ones.
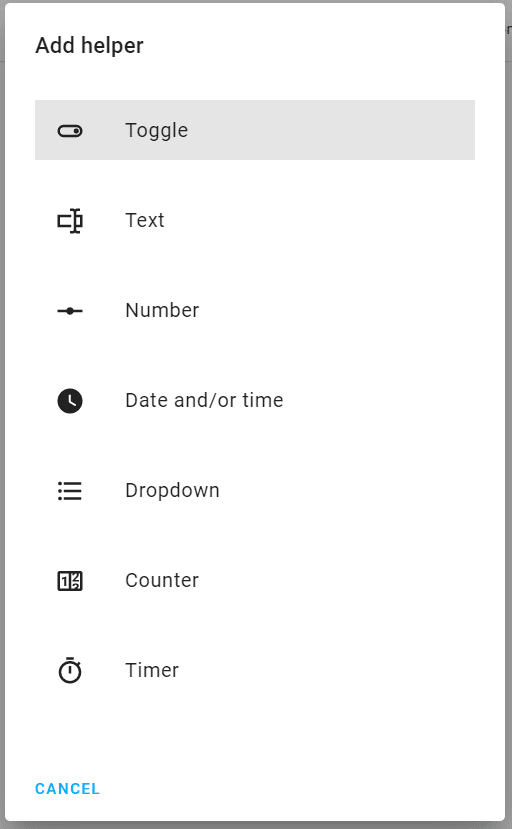
There are quite a lot of different kinds of helpers including simple boolean (on/off) toggle switches, dates and numbers. For my example I used the dropdown one create a set of possible states of the bedroom lights. They can either be in “get up” mode, in “reading” mode or in “sleeping” mode.

The new helper also gets a name of course, can be added to an area an can get its own icon. The icon should be a material icon. You can use sites like this to find the right one. Then use its name with the prefix “mdi:”. It is also important to know that the first entry in the list will be the default value.
Building a state machine
A (finite) state machine is a great tool that can be used to model a system with a set of states and possible transitions. We can use it to simplify and model the bedroom lights problem from before and the use helpers to implement it. The different light configurations are the different states and we want to only transition between them in a certain order.

Transitions are supposed to happen every time I click a button. Now I could click the button and react to it in an automation. But how does the automation know which state the lights should be in now? I could base it on the current state of the lights but that might change and is unreliable.
Instead I am using a state machine and save those states in the helper described above. Now the lights are always in one of those states (plus the external state of me just changing the lights in any other way) and I can cycle through them via rules or via the UI.
Automations for the state machine
Now the ground work is done. The actual automations can be pretty simple now. First I react to the button click by transitioning to the next state. The button is an Aqara mini switch, which I described in more detail in another post. Its small and wireless, the click is received via ZHA events.
Consider buying the switches via these affiliate links to support the blog!
Aqara mini switch
Aqara new H1 double switches
Aqara contact sensor (door/window)
The automation looks like this:
alias: Bedroom state button
description: On button click switch to the next light state
trigger:
  - platform: event
    event_type: zha_event
    event_data:
      device_ieee: 00:12:34:00:56:36:da:da
      unique_id: 00:12:3d:40:06:78:da:da:1:0x0012
      command: single
condition: []
action:
  - service: input_select.select_next
    target:
      entity_id: input_select.bedroom_light_state
mode: single
The input_select.bedroom_light_state is the helper here. The handy select_next service just cycles through the states. The state can also always be seen and even changed from the normal Home Assistant UI.

Now all that is left are a couple of automations to react to the state change. Whenever we reach a new state we need to set the devices according to that. Again those automations are pretty simple. If I ever need more states I can just add a new one with its own automation. Here they are:
alias: Bedroom get up
description: ''
trigger:
  - platform: state
    entity_id: input_select.bedroom_light_state
    to: get up
condition: []
action:
  - type: turn_on
    device_id: 0214c4f14d875786912322acac06e838
    entity_id: light.reading_light
    domain: light
  - delay:
      hours: 0
      minutes: 0
      seconds: 10
      milliseconds: 0
  - device_id: acf09c09740a251412c095fb1eae1f87
    domain: cover
    entity_id: cover.blinds_bedroom_window_covering
    type: set_position
    position: 100
  - service: light.turn_on
    data:
      entity_id: light.bulb_bedroom_level_light_color_on_off
      transition: 10
      brightness_pct: 100
      color_temp: 200
mode: single

alias: Bedroom reading
description: ''
trigger:
  - platform: state
    entity_id: input_select.bedroom_light_state
    to: reading
condition: []
action:
  - service: light.turn_off
    target:
      entity_id: all
  - type: turn_on
    device_id: d9ce7a9e5f4c4f3d2ddb2c1984eb787d
    entity_id: light.steckdose1
    domain: light
  - type: turn_on
    device_id: 0214c4f14d875786912322acac06e838
    entity_id: light.tasmota
    domain: light
  - type: is_not_open
    condition: device
    device_id: 01487834a54101ae3d715977908a90bd
    entity_id: binary_sensor.bedroom_window
    domain: binary_sensor
  - device_id: acf09c09740a251412c095fb1eae1f87
    domain: cover
    entity_id: cover.blinds_bedroom_window_covering
    type: set_position
    position: 0
mode: single

alias: Bedroom sleeping
description: ''
trigger:
  - platform: state
    entity_id: input_select.bedroom_light_state
    to: sleeping
condition: []
action:
  - service: light.turn_off
    data: {}
    entity_id: all
mode: single
Those automations are all pretty simple. They just react to the state change (to a certain state) and set my devices accordingly. The only interesting part is in the reading state. Here I turn on a couple of lights and then check if my bedroom window is actually open via the binary_sensor.bedroom_window sensor (and Aqara contact sensor). If it is open this condition will stop the automation once it is reached. Only if it is closed will the automation reach the next step of closing the blinds (which would otherwise hit the open window).
Overall I love these helpers in Home Assistant. They make an otherwise super complicated or even impossible automation quite easy and simple to update. All of this results in a great new light control. I will definitely use this pattern again with other automations and also play around with the other helpers.


