My DIY bookshelf – rustic black pipes and beautiful oak wood
I read quite a lot and needed a new place for my books. The old shelf was not quite doing it anymore so I decided to build a new DIY bookshelf that fits the rest of the room out of oak wood and black pipes. This is how I did it.
Planning my DIY bookshelf
Over time I have amassed quite a lot of books – so many actually that I had to store them two rows deep in an old IKEA shelf. While being a good solution for some time when I bought it, it was far from perfect. The back row of books can not be seen without taking out some in the front, the single shelves started bending under the weight over time and overall the design is not really unique. So it was time for something new and better – a DIY bookshelf made for this room!

I started with a couple of ideas. I had seen shelves and furniture in a similar style online before so I had some inspiration. Choosing the materials was also pretty easy oak wood and dark colors are a nice combination and I have already built a big dinner table, a coffe table and a ceiling lamp in a similar style.
The next step was finding materials, which can be quite a challenge at the moment. Luckily a local German hardware store (Bauhaus) had black pipes made for such projects as well as wooden boards in stock. With those and some measurements of the room I wanted to place the shelf in, I started drawing.

I quickly came up with a general design that would work with the available parts. Two runs of pipes connected by vertical arms that can hold the shelves in place. The connectors are thick enough that they serve as one mounting point for the boards, the upwards angled end with a 90° fitting is the other one. The whole thing will just stand on the ground and be screwed into the wall at the top.
After some more drawings by hand to figure out the exact amount of components I need to buy I made some slight changes. The first pipes at the bottom are replaced by longer ones to make the first row easier to reach and I decided to add a small board between the wall and the mounting points at the top. This means I can slightly move the shelves away from the wall (allowing for more space for bigger books) and make it easier to connect. This way I can mount the boards to the wall and then simply drill wholes for the screws of the pipe end piece at exactly the right place.
- If you are looking to build something similar you can find the links to my materials here. Consider buying them via the affiliate links to support this blog.
- Drill
- Drill bit 26mm
- Pipes from German hardware store
- Oak wood panels (hardware store or a similar one from Amazon)
Preparation
Next I bought all the pipes, fittings and boards and did some test fitting first to see how my designs look in reality. After some “photoshopping” I decided to move the two pipes slight outwards for a better look and again more space for books.


Before starting the actual build process there was a lot of preparation work to do.
Preparing the pipes
To built two of these shelves you need dozens of pipes and fittings. Overall I had to do several orders from different stores to get all that I need. Then I had to order again because I forgot some 😉

Once I had all the pipes I could ever need I spent some very long hours preparing them. Each has to be cleaned up and the labels removed. Most importantly the on the bigger pipes the labels were glued directly to them. With a glue that leaves lots of residue of course. Very annoying! I had to use chemical glue remove to get rid of those.


This happens when you try to remove the labels – lots of time and chemicals needed to get rid of this mess 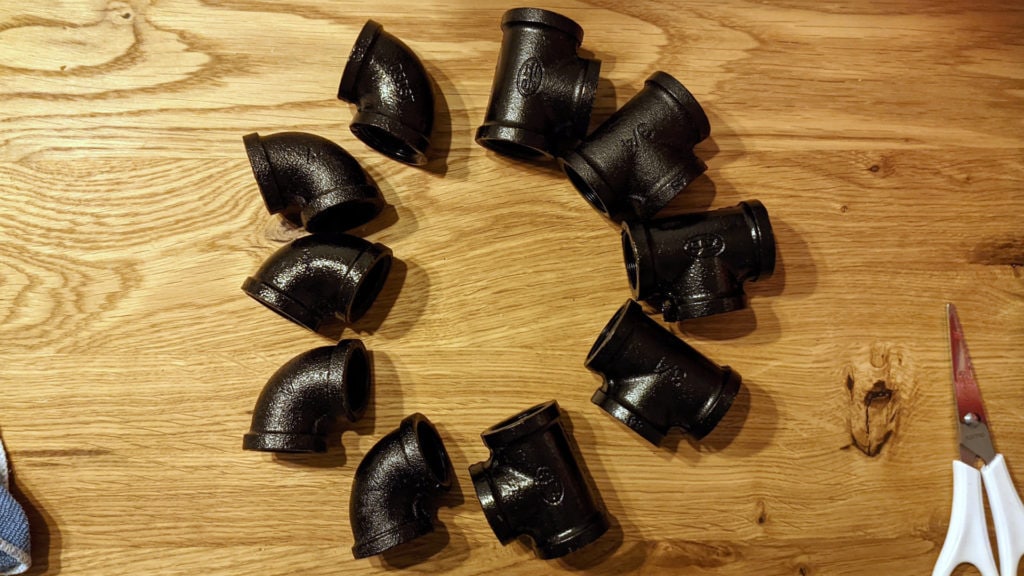
Fittings ready to be used 
Leftover labels
Once the labels were all removed I had to clean up each part again and sort everything for later use. Overall a lot more works than I expected at the start but well worth it in the end.
Preparing the wood
Next I needed to prepare the wooden boards. I decided to built the shelves into a corner and therefor needed to cut a 45° corner into each one. I also split one board into half to get two smaller strips to be mounted to the wall at the top. I was able to use a table saw which makes these kinds of repetitive cuts very easy. They can be done with a jigsaw or circular saw too though.

Next I drilled the holes in the boards needed to fit the pipes through. Each board needs two holes, plus a couple test ones that makes around 30 holes through very hard oak wood. I bought some more drill bits that were a little bit more expensive but I still had to use two of them to get through all the boards.

It might be better to use a stationary drill press here but I had to use my standard drill for this. Still worked out in the end and the holes are actually really clean. It is important though to progress slowly and pause between holes to let the drill bit cool down. If it gets too hot it will become dull very very fast.
Installation of the shelves
Then it was finally time to start assembling and installing the shelves. I did built two of them into the corner of the room. The first one was relatively easy to do as I had many pipe pieces left and did not need to worry about aligning anything too much.
I am talking about the pipes here because installing them was the (unexpected) major challenge of this project. For the shelf design to work all the pipes need to be oriented a certain way, all of them need to run in parallel. Unfortunately the threads in the pipes only allow for a very small range of adjustments. If you do not turn the pieces far enough they will not get a stable enough connection, if you turn them too far they either get stuck or you damage the threads. The pieces are not all exactly the same so you have to keep trying out different pieces of pipe until you find one that fits.


I started by putting the feet in place and connecting the first board by screwing the second row of pipes into them. This is where you need to start finding the right pieces that let you keep the small support pieces in parallel and then 90 degree ends all pointing straight upwards.
I continued this same process until all the boards in the shelf were done. I added the end pieces (flanges) at the top and started to roughly align everything. Until the shelf is connected to the wall there is a lot of wiggle in the construction. After getting the everything aligned as well as possible I measured the exact height. Then I removed the shelf again and used those measurements to mounted the top piece of wood to the wall using a level and some wall ankers.


After all that preparation work was done, the final installation was actually pretty easy. I moved the shelf into position, aligned everything again and drove some screws into the piece of wood at the top to secure everything. Afterwards I had to do some more leveling, adding some material under one foot (uneven floor). Then I was finally able to move some of my books into the shelf.
Then it was time to finish the second shelf. This time installation was a little bit harder as I had fewer pieces left. I built up both “legs” of pipes before actually assembling the shelf to make sure that I get them in a position where they all align. Unfortunately with less pieces to swap out this proved to be an impossible task. To fix this issue I had to add some tape (usually used for climbing) to the end of some pipes. Putting the tape on the threads means that they get some grip at the right position.
Then I built up the seconds shelf very similar to the first one. This time I did not have to measure again but instead I installed the seconds top piece of wood in parallel to the first one at equal distance to the corner of the room. Then I moved the shelf into position and again took some time to align everything and make sure that it is as level as possible. Finally I also put in some screws to secure it.


Then it was finally time to put all the books into their new shelves – it turns out I actually have to start building more of them soon. The old one had the books stored in two rows, now I can see all of them. I think it also looks way more modern and the boards will definitely not start sagging so quickly. Now I only have to clean up the wires running underneath and maybe plan more shelves for the future 😉

Here is a final picture where you can see the shelves, my custom ceiling lamp and my dining table. I built all of them myself and tried to use very similar materials in each case. I think they harmonize very well – now I just need something for the wall – maybe some colorful art to go with the rest.