How you can add affordable smart switches anywhere in your smart home
One of the main problems with smart homes is how to improve usability by allowing control via “legacy” switches instead of relying on Apps and voice assistants. One great way of doing this is by adding smart relays to your existing wall switches and keep using them. For any case where this is not an option there is another solution though: add wireless & battery powered smart switches to your setup.
The problem with smart wall switches
Many smart home brands offer in wall smart switches that can be used to control existing circuits. Small devices like the shelly switches are working great. There is one huge problem though: in many cases you might not want to, or be able to (renting) modify high voltage circuits. I was facing the same issue and decided to use smart light bulbs instead.
Using smart light bulbs means we have to face another problem though: control is only possible via a phone App or via a voice assistant like Alexa. While this works great there are situations (and people ;)) where direct control via a switch is the preferred way.
Fortunately there is a way how to use switches and avoid fiddling with high voltages at all. The solution is using wireless, battery powered switches that can be placed anywhere in your home.
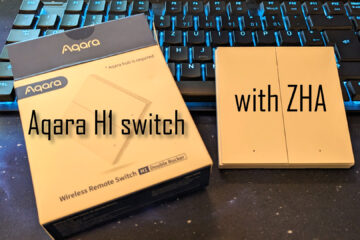
The Aqara wireless smart switch
As I am already using a setup including several cheap Aqara sensors controlled via Zigbee2MQTT without any external cloud I decided to go this way too with the switches. Aqara, while offering “proper” in wall switches with relays, also sells several battery powered Zigbee smart switches. These offer a bunch of advantages: they are quite cheap, come in different varieties and can be placed anywhere as they are using batteries.

The Aqara switches are using the Zigbee wireless protocol. Due to this they work well with my existing devices and last a long time on batteries. I have used two for about a year and they have yet to fall under 90% battery capacity. Wifi based products are just using too much energy.
If you are interested in buying the smart switches consider doing it via my affiliate link. It does not change prices for you and allows me to pay for the servers 😉
Single button switch
Double button switch
How to connect the switch
Of course the button can be used with the Aqara gateway and their official App but I prefer to not rely on a cloud wherever possible. That is why I am controlling all my Zigbee devices locally with a cheap Zigbee to USB stick and the awesome Zigbee2MQTT software. If you are using a similar setup adding those buttons is simple: allow new devices to join the network and press the button for about 10 seconds until a small blue light starts blinking.
Now the switch should show up in the Zigbee2MQTT config and can be given a human readable name. Start clicking the button to see the events coming in. The great thing about these buttons is that they actually allow more than just a simple click event. They also support events for long holding, double clicks and left/right/both clicks in case of the double switch.
Once the switches are set up and send MQTT messages we can easily connect them to OpenHab. First create a new entry in your things file for MQTT items:
Thing topic Switch1Door "Main switch" @ "Hall" {
        Channels:
            Type string    :   click               "Button"             [ stateTopic="zigbee2mqtt/Switch1Door", transformationPattern="JS:js/getZigbeeClick.js"]
            Type number    :   battery             "Batterie"           [ stateTopic="zigbee2mqtt/Switch1Door", transformationPattern="JSONPATH:$.battery"]
            Type number    :   voltage             "Spannung"           [ stateTopic="zigbee2mqtt/Switch1Door", transformationPattern="JSONPATH:$.voltage"]
            Type number    :   link                "Link Qualität"      [ stateTopic="zigbee2mqtt/Switch1Door", transformationPattern="JSONPATH:$.linkquality"]
    }
This uses a small additional Javascript file in your /transform/js/ folder to transform the incoming data into something OpenHab can work with. It looks like this:
(function(x){

    var result = "none";

    var json = JSON.parse(x);
    try
    {
        result = json.click != null ? json.click : json.action;
    }
    catch (e)
    {
        result = "none";
    }

    return result;

})(input)
Now lets create the corresponding items. Add this to your item file:
String mainSwitch               "Main switch hall [%s]" <switch>      { channel="mqtt:topic:mosquitto:Switch1Door:click" }
Number mainSwitch_battery       "Battery level [%d%%]"      (grBattery) { channel="mqtt:topic:mosquitto:Switch1Door:battery" }
Number mainSwitch_voltage       "Voltage [%d mV]"                      { channel="mqtt:topic:mosquitto:Switch1Door:voltage" }
Number mainSwitch_link          "Link quality"                         { channel="mqtt:topic:mosquitto:Switch1Door:link" }
The mainSwitch item is going to hold the events the button sends (left/right/left_double/right_double/both/…) and will be used in some rules later to control devices. The other important item is the mainSwitch_battery item which (well you guessed it) contains the current battery level as a percentage. It is part of the grBattery group and will therefore automatically be tracked and I will be alarmed if the value falls under a certain threshold. You can read more about my battery level alarm system here.
We could now simply display the button state on the OpenHab frontend but course we want to actually use it to control some lights. In my case I put a double switch into my kitchen to control not one or two, but actually three different lights. There is a LED strip on top of my wall units, another one under it and a Tradfri smart light bulb in the ceiling light. Fortunately the switch provides enough events to control them all.
Map the switch to lights
My goal in mapping the different actions to different lights is to make it as simple as possible. Simple actions should work as expected, more complex ones just add usability. So I started by mapping simple left and right clicks to the two LED strips. A click on both buttons will switch the ceiling light.

On top of that I added some more complex interactions for things I tend to need a lot. Double clicking the left button will switch both LED strips at the same time and holding both buttons will turn off all the lights in the kitchen. Of course even more interactions could be added here. This is the rule I came up with:
rule "Add functionality to the double button in the kitchen"
when
	Item kitchenSwitch received update
then
	logDebug("Rule", "Kitchen button state is {}", kitchenSwitch.state)

	val org.eclipse.xtext.xbase.lib.Procedures$Procedure1<GenericItem> toggle = [
	switchItem |
		if (switchItem.state != ON && switchItem.state != 100) {
			switchItem.sendCommand(ON);
		} else {
			switchItem.sendCommand(OFF);
		}
	]

	if (kitchenSwitch.state == "left") {
		toggle.apply(H801kuecheObenDimmer);
	}

    if (kitchenSwitch.state == "right") {
		toggle.apply(H801kuecheUntenDimmer);
	}

    if (kitchenSwitch.state == "left_double") {
		toggle.apply(H801kuecheUntenDimmer);
        toggle.apply(H801kuecheObenDimmer);
	}

    if (kitchenSwitch.state == "both") {
		toggle.apply(Bulb_Kitchen_dimmer);
	}

    if (kitchenSwitch.state == "both_long") {
		sendCommand(H801kuecheObenDimmer, OFF);
        sendCommand(H801kuecheUntenDimmer, OFF);
        sendCommand(Bulb_Kitchen_dimmer, OFF);
	}

end
The toggle function is a small helper I wrote to avoid copying the same code for all the different interactions. The idea here is to toggle the lights on click. If the light was off before it will turn on, if it was on before it will turn off. This also handles the case of the ceiling light being a dimmer and therefore using percentages instead of ON/OFF.
Use the power of home automation
Now this is where smart homes can really be smarter than the boring old regular ones. While a normal switch can only control the lights it is wired to and nothing else smart switches can control anything connected to your smart home. They can even control different things depending on the context (time of day, who is home, …). Use your imagination!
Just don’t overdo it. If no one can remember what the smart switch does no one will use it. The basic functionality should still be self explanatory. Feel free to add extra useful possibilities on top though. In my experience it helps to just to keep an eye on which actions are repeated again and again. Then try to make those easier. This is how I came up with the idea to have one long press turn off all lights in the kitchen. It is just too annoying to do it manually. Yet the single buttons still do what anyone would expect them too.
Another example: I have another wireless button in my hallway next to the apartment door. While a single click does what one would expect (toggle the ceiling light in the hallway) I added another really useful feature: a long press on the button will shut down all the lights anywhere in my apartment. This way when I am leaving I can just press this button without need to go to each room to turn off the lights (or pull out the phone to do it via the App).
If you are looking for more information on how to build a smart light system I have another article describing my setup.


