Command your powerful robot army – How to integrate a Roborock S50 vacuum with OpenHab
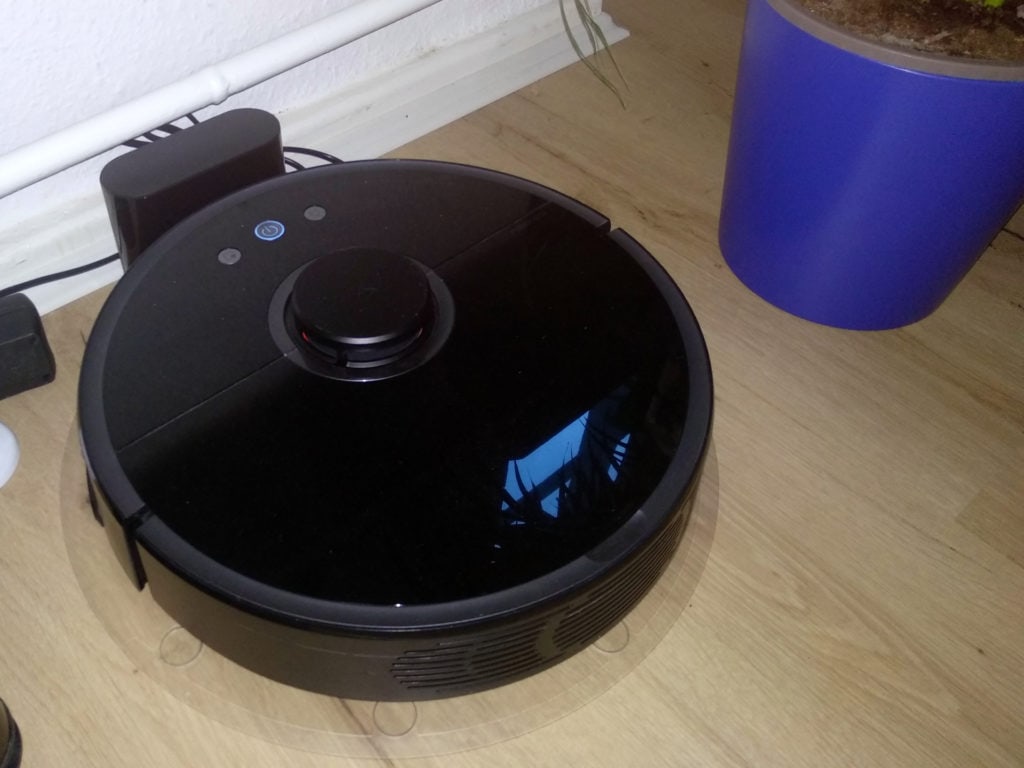
Cleaning robots are one of the best categories of smart home devices. I was looking for a model with a great price to performance ratio and ended up buying the Roborock S50. It works great but it means one more App on my phone and a device not controlled by my smart home. Here is how I changed that by controlling it from OpenHab 2.
The S50 – robots in general
Let me start by saying that the S50 is just a great device in general. It costs around 300-400€. This might seem like a lot of money but pretty much all the cheaper robots you can find just randomly drive around your room hoping to catch all the dirt. The S50 (and a lot of much more expensive robots) actually have a LIDAR which allows them build a map of the rooms they are cleaning. That map can be used to clean everything in an organized way but also to send the robot to a certain spot via the map or make it clean just one of your rooms.
Why do we need a robot vacuum anyways though? After all using a vacuum is not that much work, right? Using a robot for this tasks allows you to clean your room(s) every single day without actual work from your side. The robot can clean on a schedule during a time you are away from home. Daily cleaning means the dust does not have time to even build up anywhere. That means there won’t be that much dust in place the robot can not reach, like your furniture or in sharp edges. And all you need to do is clean the bin in the robot from time to time.
Unfortunately (or maybe also fortunately) the robots can not do everything yet. So you still have wipe the dust from your furniture and even vacuum some hard to reach parts of your room from time to time. I found that that is only need once every 1-2 weeks though.
What can it do?
To make this quick: the robot can vacuum and wipe the floor. It does that very well by using the map it builds to clean in an organized way and avoid obstacles nearly perfectly (if you disregard the things I wrote about above).
The wipe function works passively though, you just “click” a water tank under the robot. Because of the required work from my side, and the fact that this will not get rid of really sticky dirt on the floor, I am rarely using that function.
The robot can be fully used without any App, just by using the buttons, to clean everything in your home, to go back to the charging station, and to clean a certain spot. If you pair it with the App though you get some more functionality: a map of your home you can use to send the robot to a certain room or to block of parts of a room, timers to start cleaning automatically, notifications when the cleaning process starts or ends and software updates as well as options to change all the settings.
In the settings you can change the language the robot is speaking, the power and noise levels and get notified when you should clean the sensors or replace a part.
All those feature of the App are pretty great but I am not a huge fan of using all those different Apps when I have my own OpenHab one. I also did not want to use the provided Alexa skill for voice control, as I read a lot about it not working properly. Instead I found a (mostly) local solution to nearly completely control the robot from OpenHab.
If you are looking to also get the Roborock S50 consider buying it via my affiliate link here. No additional costs for you and I get to pay the servers 🙂
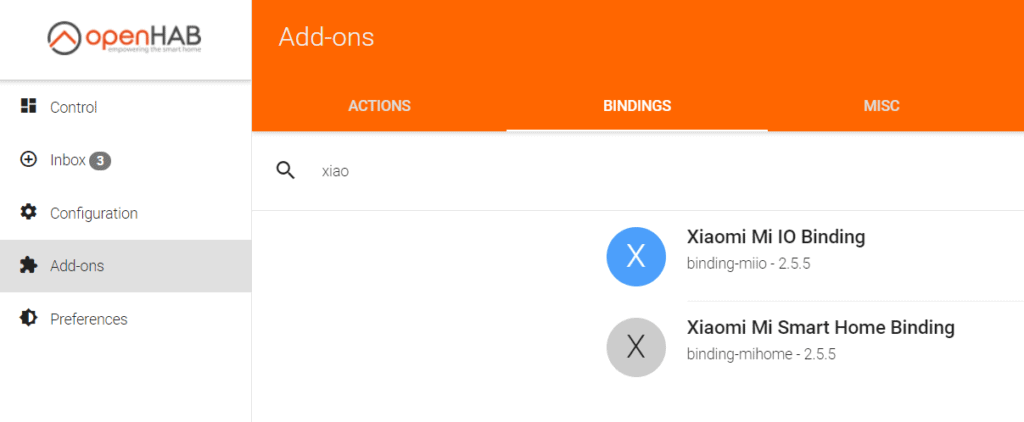
Configure the Xiaomi binding in OpenHab
To control the Roborock S50 and other models from OpenHab you need to first install the “Xiaomi Mi IO Binding”. This can be done via the PaperUI or file configuration.
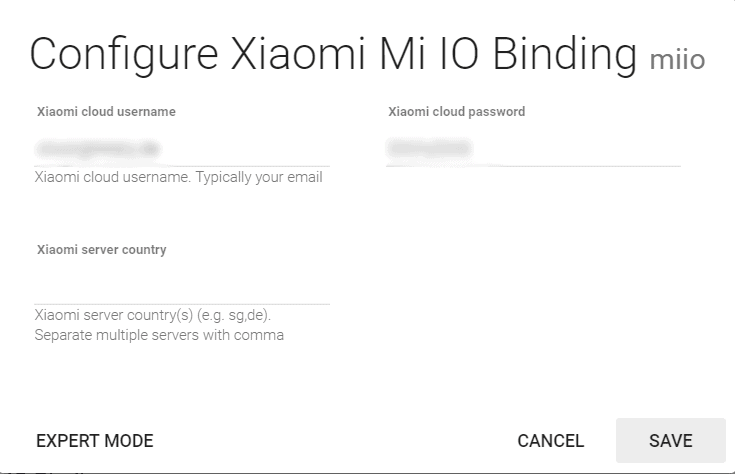
Once the binding is installed head over to the Configuration part of the PaperUI and find the settings for this binding. You need to now provide the username and password of the Account you created in the App. You can leave the server country field empty if you are unsure. The binding will then try all servers.
Now head over to the inbox and search for new devices with this binding. Your Roborock should show up. Just add it and remember the name of the Thing. We are going to use that now to create our Items.
Create the items in OpenHab
In my case the Roborock thing is called “miio:generic:123A1ABC” (with a different number in the end of course). There are a lot of things we can control about the Roborock, so lets start creating items. We will start by creating groups for all functionalities, so we can get a quick overview from the UI later.
Group gVac         "Jarvis"
Group gVacStat     "Status Details"             (gVac)
Group gVacCons     "Consumables"                (gVac)
Group gVacDND      "Do Not Disturb Settings"    (gVac)
Group gVacHist     "Vacuum history"             (gVac)
Group gVacNetwork  "Network Details"            (gVac)
Group gVacLast     "Last cleaning"              (gVac)
Then lets continue with the main control items
String actionControl  "Reinigung"          (gVac)       {channel="miio:generic:123A1ABC:actions#control" }
Number actionFan      "Modus"              (gVac)       {channel="miio:generic:123A1ABC:actions#fan" }
These can be used to actually make the robot start and stop cleaning and to change the mode it is working in (meaning the speed and noise levels). Then there is a bunch of information we can get about the status of the robot, the consumables and the do not disturb function.
Number statusBat        "Charge [%1.0f%%]" <battery> (gVac,gVacStat)     {channel="miio:generic:123A1ABC:status#battery" }
Number statusArea       "Cleaned area [%1.0fm²]" <corridor>   (gVac,gVacStat)     {channel="miio:generic:123A1ABC:status#clean_area" }
Number statusTime       "Cleaning time [%1.0f']"       (gVac,gVacStat)     {channel="miio:generic:123A1ABC:status#clean_time" }
String statusError      "Error [%s]"                   (gVac,gVacStat)     {channel="miio:generic:123A1ABC:status#error_code" }
Number statusFanPow     "Fan power [%1.0f %%]"          (gVacStat)          {channel="miio:generic:123A1ABC:status#fan_power" }
Number statusClean      "Cleaning status [%1.0f]"      (gVacStat)          {channel="miio:generic:123A1ABC:status#in_cleaning" }
Switch statusDND        "DND active"                 (gVacStat)          {channel="miio:generic:123A1ABC:status#dnd_enabled" }
String statusStatus     "Status [%s]"                   (gVacStat)          {channel="miio:generic:123A1ABC:status#state"}

Number consumableMainT      "Main Brush [%1.0f]"   <cleaningrobot> (gVacCons)  {channel="miio:generic:123A1ABC:consumables#main_brush_time"}
Number consumableMainP      "Main Brush [%1.0f%%]" <cleaningrobot> (gVacCons)  {channel="miio:generic:123A1ABC:consumables#main_brush_percent"}
Number consumableSideT      "Side Brush [%1.0f]"   <cleaningrobot> (gVacCons)  {channel="miio:generic:123A1ABC:consumables#side_brush_time"}
Number consumableSideP      "Side Brush [%1.0f%%]" <cleaningrobot> (gVacCons)  {channel="miio:generic:123A1ABC:consumables#side_brush_percent"}
Number consumableFilterT    "Filter Time[%1.0f]"   <cleaningrobot> (gVacCons)  {channel="miio:generic:123A1ABC:consumables#filter_time" }
Number consumableFilterP    "Filter Time[%1.0f%%]" <cleaningrobot> (gVacCons)  {channel="miio:generic:123A1ABC:consumables#filter_percent" }
Number consumableSensorT    "Sensor [%1.0f]"       <cleaningrobot> (gVacCons)  {channel="miio:generic:123A1ABC:consumables#sensor_dirt_time"}
Number consumableSensorP    "Sensor [%1.0f%%]"     <cleaningrobot> (gVacCons)  {channel="miio:generic:123A1ABC:consumables#sensor_dirt_percent"}

Switch dndFunction  "DND function"   <switch>   (gVacDND)   {channel="miio:generic:123A1ABC:dnd#dnd_function"}
String dndStart     "DND start [%s]" <clock>    (gVacDND)   {channel="miio:generic:123A1ABC:dnd#dnd_start"}
String dndEnd       "DND end [%s]"  <clock>    (gVacDND)   {channel="miio:generic:123A1ABC:dnd#dnd_end"}
The “dndFunction” item can be used to activate or deactive this mode. The rest of the items are needed to retrieve status information about the robot. For example the “statusError” could be used to send a message to your phone.
The next part of the items are giving us historic information and network stats.
Number historyArea  "Total cleaning area [%1.0fm²]"  (gVacHist)  {channel="miio:generic:123A1ABC:history#total_clean_area"}
Number historyTime  "Total cleaning time [%1.0f']"      (gVacHist)  {channel="miio:generic:123A1ABC:history#total_clean_time"}
Number historyCount "Count [%1.0f]"     (gVacHist)  {channel="miio:generic:123A1ABC:history#total_clean_count"}

String  miNetSSID    "Network SSID [%s]"    <network> (gVac,gVacNetwork)  {channel="miio:generic:123A1ABC:network#ssid" }
String  miNetBSSID   "Network BSSID [%s]"   <network> (gVac,gVacNetwork)  {channel="miio:generic:123A1ABC:network#bssid" }
Number  miNetRSSI    "Network RSSI [%1.0f]" <network> (gVac,gVacNetwork)  {channel="miio:generic:123A1ABC:network#rssi" }
Number  miNetLife    "Uptime [%1.0f]"       <network> (gVac,gVacNetwork)  {channel="miio:generic:123A1ABC:network#life" }

String lastStart        "Last start [%s]"   <clock>     (gVacLast)  {channel="miio:generic:123A1ABC:cleaning#last_clean_start_time"}
String lastEnd          "Last end [%s]"     <clock>     (gVacLast)  {channel="miio:generic:123A1ABC:cleaning#last_clean_end_time"}
Number lastArea         "Last area [%1.0fm²]" <zoom>      (gVacLast)  {channel="miio:generic:123A1ABC:cleaning#last_clean_area"}
Number lastTime         "Last duration [%1.0f']"    <clock>     (gVacLast)  {channel="miio:generic:123A1ABC:cleaning#last_clean_duration"}
Number lastError        "Error [%s]"                       <error>     (gVacLast)  {channel="miio:generic:123A1ABC:cleaning#last_clean_error" }
Switch lastCompleted    "Last cleaning done"    <switch>    (gVacLast)  {channel="miio:generic:123A1ABC:cleaning#last_clean_finish" }
This information is mainly for UI purposes or can be saved to a database if you are interested. You don’t have to do this though, as it is also available via the App. Now comes the best part though: we can also retrieve the map from the App. That is the only part that actually used the Internet though. The rest of the data can be directly retrieved from the robot.
Image map "Map" (gVacLast) {channel="miio:generic:123A1ABC:cleaning#map"}That is it! Quite a lot of data, but we can now see everything we need to know about the robot from OpenHab, and even control it if we want to.
Controlling the robot from the Basic UI
Here is a quick sitemap I am using to control my Roborock from the basic UI in OpenHab. It only show the most important information on the main page, but offers more detailed menus for everything else. The descriptions here are in German, but they are just translations of the items above.

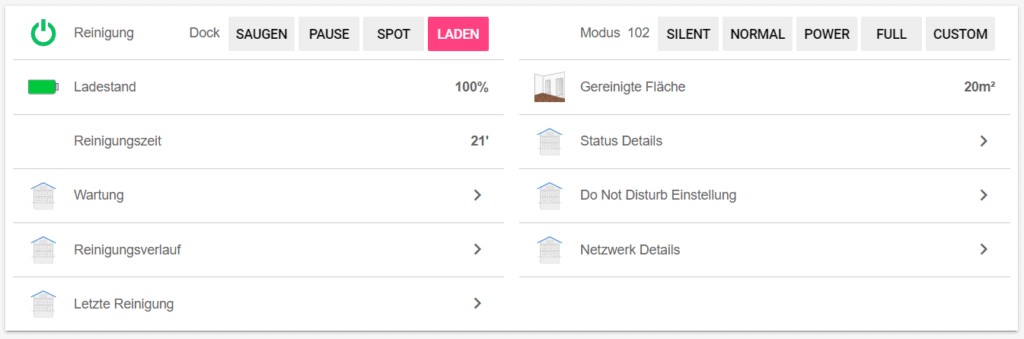
The switch on the main page can start a cleaning (“Saugen”) or send the robot to the charging station (“Laden”). Here is the full sitemap code.
Frame label="Jarvis" {
        Switch item=actionControl label="Status" mappings=[vacuum="Saugen", dock="Laden"]
        Group item=gVac label="Details" {
            Switch item=actionControl mappings=[vacuum="Saugen", pause="Pause", spot="Spot", dock="Laden"]
            Switch item=actionFan mappings=[38="Silent", 60="Normal", 77="Power", 90="Full", -1="Custom"]
            Default item=statusBat
            Default item=statusArea
            Default item=statusTime
            Group item=gVacStat
            Group item=gVacCons
            Group item=gVacDND
            Group item=gVacHist
            Group item=gVacNetwork
            Group item=gVacLast
        }
    }
As you can see I called my robot Jarvis. If you do not know who that is I really recommend watching the Iron Man movies 😉 If you have seen them though you know that something important is missing here: voice control.
How to add voice control
For this to be fully integrated into my setup (well and to make me feel great) I would really like to have voice control for the Roborock. You know, before the machines start to control us 😉
I am using Alexa and have found quite an easy way to control any device in OpenHab with Alexa. So we will use the same way here. We can add a new item switch to OpenHab with a tag that will expose it to Alexa. Than we can set up a rule that will start or stop the cleaning process if we enable or disable the switch. Here it comes.
// Item for Alexa control
Switch jarvisRunning "Jarvis" (gVac) ["Switchable"]

// Rule that will start/stop the cleaning
rule "vacuum on"
when
    Item jarvisRunning received command ON
then
    actionControl.sendCommand("vacuum")
end

rule "vacuum off"
when
    Item jarvisRunning received command OFF
then
    actionControl.sendCommand("dock")
end
Now we just need to search for new device with Alexa. Once that is done just say something like “Alexa, start Jarvis” and it will start cleaning. Awesome!


