Relaxed automation – a simple DIY bed / chair / presence sensor
Sit down = lights on? I built a very simple DIY presence sensor for your bed or chair that is used to trigger automations in Home Assistant. It is a cheap and simple build that opens up a lot of options for your smart home.
The sensor – FSR
In the past I have already described how I used helpers in Home Assistant to automate my lights and blinds in my bedroom on a smart rotation. Go to bed, click a button and all the lights dim down, a reading light turns on and the blinds close. Get up in the morning, click another button and the light turns on and the blinds open – ready to start the day.
Now if course this can be further automated but to do that I needed a sensor to detect when I go to bed. Luckily I found a great solution for this on the Home Assistant forum here. User tom_I describes the use of a FSR – a force sensitive resistor. That is basically a sensor that measures the amount of pressure you put on it. Placing it below a mattress or the cushion of a chair will register weight put on top of that.
A microcontroller and an FSR – the hardware you need
To use this sensor with a smart home controller like Home Assistant you need something to read the measurements and forward them. Fortunately a cheap ESP8266 or ESP32 with the great ESPhome software makes it cheap and easy to build something like that.

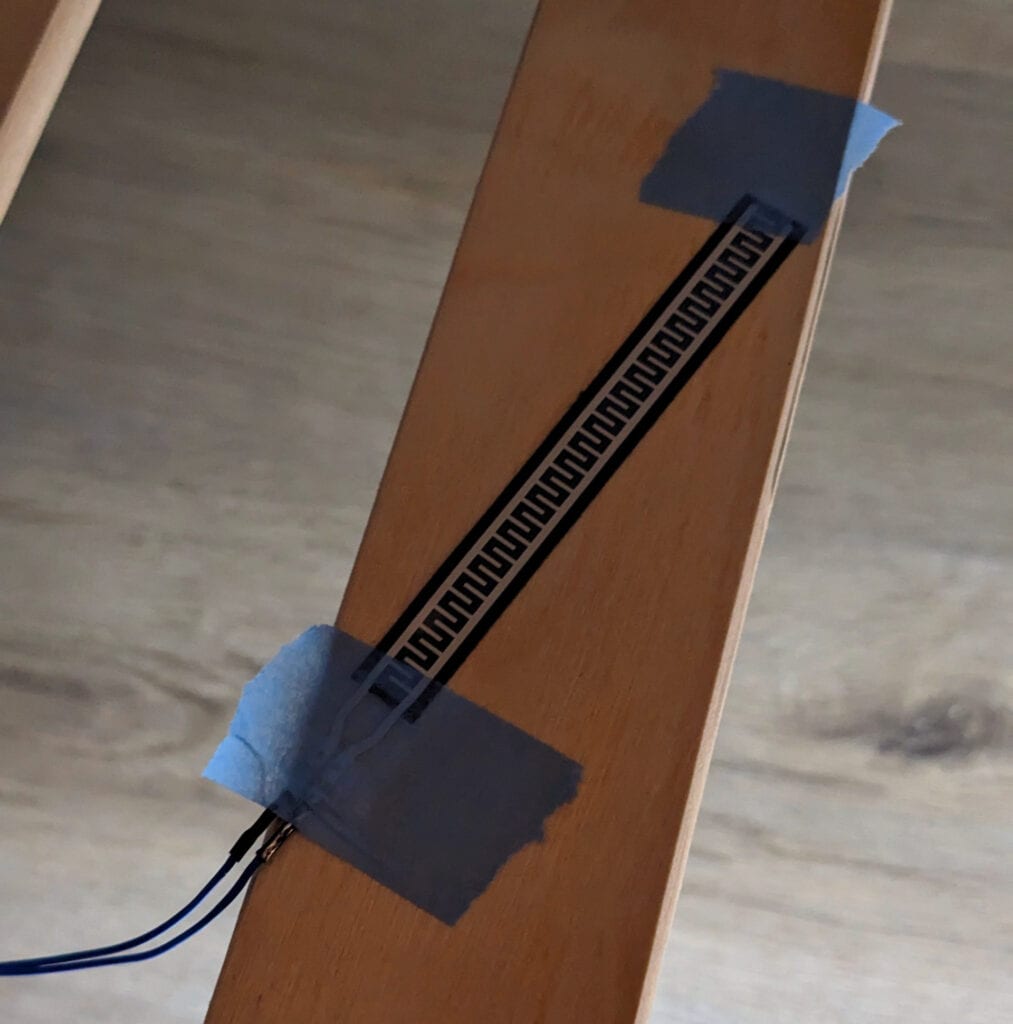
I used a small nodeMCU with and ESP8266 that I still had laying around from past projects and reactivated my soldering iron to connect to connect it to the FSR sensor I bought from Amazon. It is quite easy: connect one end of the sensor to ground and then the other end to the A0 analogue input. You will also have to connect a normal resistor between A0 and 3.3V.
The FSR sensor itself needs to be placed under whatever you want to measure and be flat on some ground so it can take and measure the applied forces. I simply taped it on a slat under the mattress in a central position.
To get the perfect range of detection the author of the forum post recommends measuring the voltage across the sensor a couple of times with you sitting on top and without. Then use this
Formula
R1 = SQRT( Rin_bed * Rout_of_bed)
Unfortunately my multi-meter was broken at the time so I simply used a 1k Ohm resistor that seems to be doing the job reasonably well. Now all that is needed is some software.
Installing ESPhome the easy way
If you use Hassio it is quite simple to install ESPhome on your server following this official guide. I personally use a different docker based setup but I simply added the software by expending my smarthome.yml file like this:
esphome:
  container_name: esphome
  image: ghcr.io/esphome/
  volumes:
    - ${DATADIR}/esphome/
    - /etc/localtime:/etc
  ports:
    - 6052:6052
  restart: unless-stopped
  environment:
    - USERNAME=${ESP_USER}
    - PASSWORD=${ESP_PW}
Then running docker-compose -f smarthome.yml up -d. Now you can open the web browser of your choice and go to the IP of your server and port 6052.

On the UI create a new sensor and paste in this code based on the original blog post:
esphome:
  name: bed-sensor
  friendly_name: bed-sensor

esp8266:
  board: esp01_1m

# Enable logging
logger:

# Enable Home Assistant API
api:
  encryption:
    key: "putSomeKeyHere"

ota:
  password: "changeMe"

wifi:
  ssid: !secret wifi_ssid
  password: !secret wifi_password

  # Enable fallback hotspot (captive portal) in case wifi connection fails
  ap:
    ssid: "Bed-Sensor Fallback Hotspot"
    password: "changeMe"

captive_portal:

sensor:
  - platform: adc
    pin: A0
    name: "Bed Sensor"
    id: "bed_sensor"
    icon: mdi:bed
    update_interval: 0.5s
    filters:
      - multiply: 3.3
      - sliding_window_moving_average:
          window_size: 10
          send_every: 1
      - or:
          - throttle: 180s
          - delta: 0.02

  - platform: homeassistant
    name: "Trigger Level"
    id: "trigger_level"
    entity_id: input_number.trigger_level_bed_sensor
The SSID and password of your Wifi will be stored in a separate secrets.yaml file that ESPhome should automatically create. You can find the values by clicking the “secrets” button at the top right corner of the main screen.
Preparing the NodeMCU
Now your ESPhome will show the device as offline – no wonder, we have not yet actually put it on the microcontroller. You can either connect the controller directly to your server, or (if that is not an option like in my case) you can connect it via USB cable to your PC and use the web client of ESPhome with a Chrome based browser to install the software.
Just follow the wizard and provide your Wifi credentials. You will also get access to a web console that shows you exactly what is going on on the device. Quite neat for debugging. To get the code on the device the simplest solution for me was to compile it via the ESPhome UI and then select the option to download it. Then simply upload it to the device itself.
Connecting the ESPhome device to Home Assistant
Now this next step is very simple. Once the NodeMCU is running ESPHome just start it by powering it via USB and make sure it is connected to a Wifi that has access to your smart home server. If you are interested in this topic, I have create a separate Wifi and VLAN for IoT and smart home devices that can only access the Internet and my smart home server.
Now switch to Home Assistant and go to the integrations tab. It should automatically discover a new ESP device. Otherwise click the add integration button and select ESPhome.

Now you will be able to see live values of the voltage that is reported by the FSR sensor! Try putting weight on the sensor and see how the value changes.
Creating a bed sensor in Home Assistant
Now that we have this raw value it is time to set up a proper occupation sensor in Home Assistant. First we need to store the trigger value – a threshold that once crossed should set the sensor to occupied. I used another helper for this: an input number.
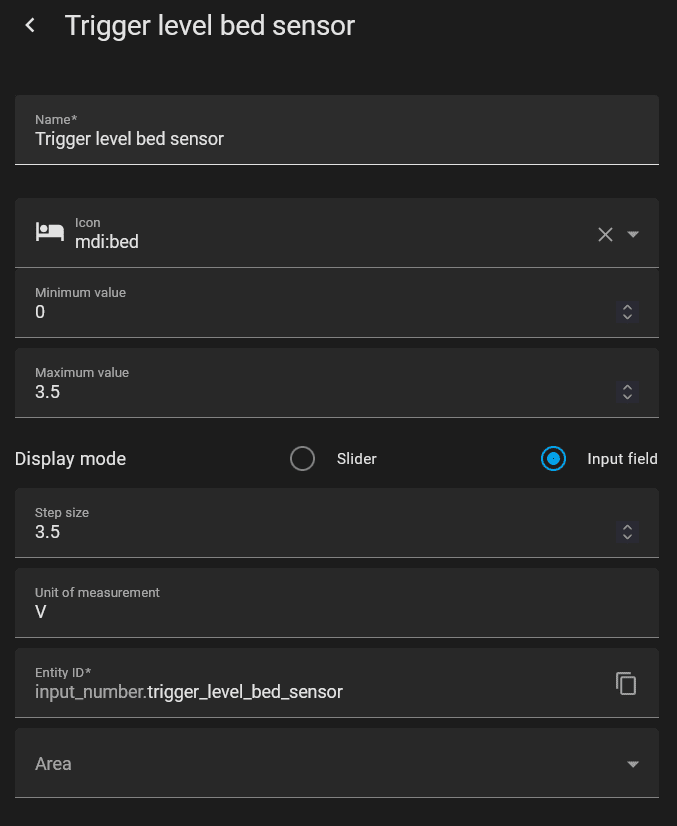
I set it up to represent a voltage between 0 and 3.5V. Currently it is set to 3.0V which works quite well. To find this value just check the value of the sensor data reported by ESPhome with or without someone sitting/lying on top of the sensor. If the range is not big enough to properly recognize that consider changing the resistor as described above.

Now we can finally create another helper which will compare the reported sensor value to the threshold and output a boolean occupied/not occupied value. This is done using a template – binary helper.
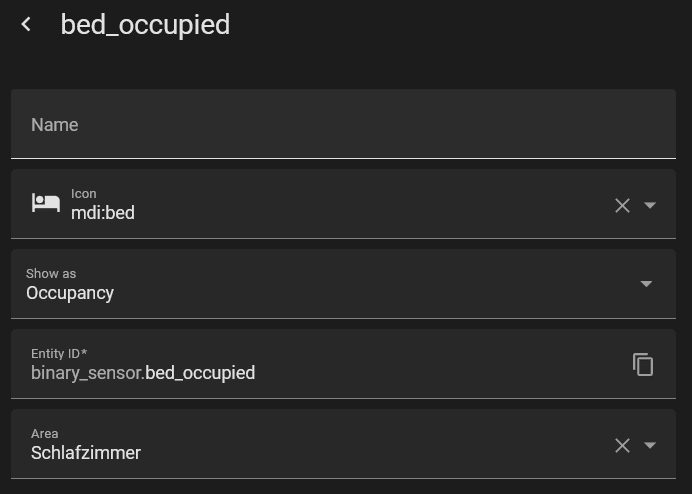
For the template value I used this: {{states('sensor.bed_sensor_bed_sensor') < states('input_number.trigger_level_bed_sensor')}}
This simply compares both values and if the sensor value falls under the threshold (which happens when you put weight on it) it will set the sensor to occupied.
Building an automation based on presence
The final step is to build whatever automation you need on top of this new sensor. I used it to automatically trigger state changes in my existing state machine. To avoid accidental triggers I added conditions to only trigger after sunset and if the current light state is correct.
alias: Nightlight
description: turns on or off lights under the bed based on occupancy
trigger:
  - platform: state
    entity_id:
      - binary_sensor.bed_occupied
    to: "on"
    id: "on"
condition:
  - condition: sun
    before: sunrise
    after: sunset
  - condition: state
    entity_id: input_select.bedroom_light_state
    state: get up
action:
  - service: input_select.select_option
    data:
      option: reading
    target:
      entity_id: input_select.bedroom_light_state
mode: single
Now whenever I lay down in my bed in the evening Home Assistant will automatically turn off all other lights, enable a reading light and other cozy lights nearby and close the shades. Of course similar automations can be build for everything else too.


