Octoprint and Home Assistant – making your 3D printer smart(er)
Here is how I integrated my Prusa Mini with Octoprint and Home Assistant. While 3D printers are a really great tool for makers in general they get even better when combining them with a smart home setup. With the free Octoprint software it is easy to make your 3D printer smart(er) and even more fun.
The printer
3D printers give you unparalleled possibilities for any DIY project. Custom cases, small missing replacements parts or prototypes for more complicated parts – all of that can be manufactured at home with a 3D printer. I have used mine extensively for many projects and have already gone through three different 3D printer model. The latest – and by far best – printer I have used is a Prusa Mini. This printer is small and portable but delivers great results quite reliable (I upgraded to the SuperPINDA probe).
I stored the printer in a small separate room where it can happily go about printing during the day while I work on other tasks (like writing this ;)). While this works well and the included screen and dial work fine to control the printer I was soon wishing for some more feedback & integration.
Octoprint
The solution to more (and remote) control over the printer is a free software called Octoprint. This awesome software is free, open source, has lots of great plugins and runs on something like a Raspberry Pi. While Prusa promises future support via an ESP8266 (or RJ45) it is not quite there yet. Octoprint on another devices can give you this control right now.
- Raspberry Pi, preferably the Pi 4 with 2 or 4 GB of RAM
- USB (C for the Pi 4, Micro USB for the older ones) power supply with around 3.0A
- A microSD card, 16+GB from a reliable manufacturer, should be fast: class 10/UHS-1
- Optional: a case (with cooling) for the Pi or at least heatsinks
- Optional: if you don’t have one yet buy a SD card reader/writer
- Optional: Network access. Either a LAN cable or if you are not using a newer Pi a seperate Wifi USB dongle.
- Alternatively you can get a kit including everything you need
If you are interested in buying a Raspberry Pi for Octoprint or other projects consider doing it via my affiliate links above. It does not change prices for you and allows me to pay for the servers 😉
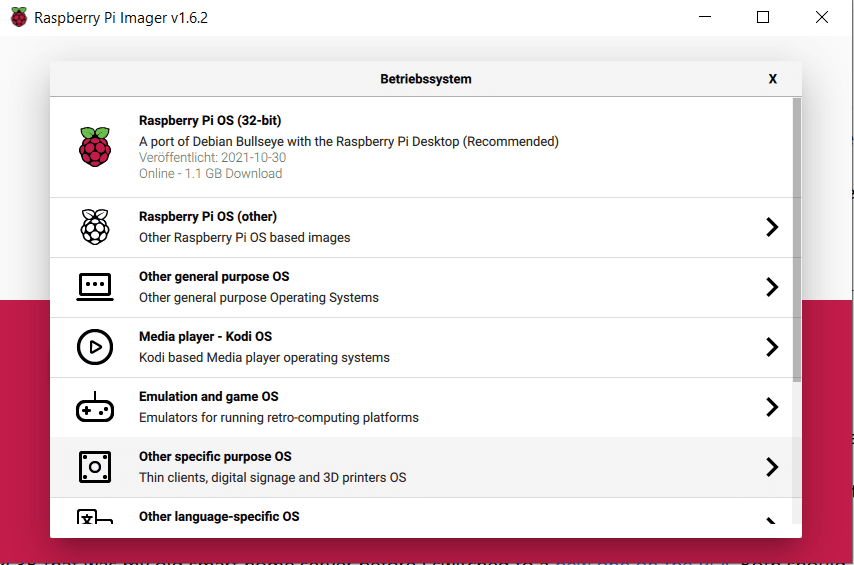
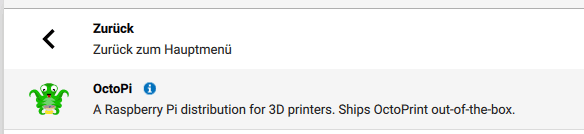
I used a Raspberry Pi 3B that was my old smart home server before I switched to a new one on the Pi 4. Both should work fine, older models of the Pi are not really recommended though – they are just not powerful enough in some cases. I just have the Pi, a power source and a case. The system is installed on an SD card via the Raspberry Pi imager. Select your SD card and “Other specific purpose OS”. Then you can select
In the following menu you can select Octopi.
Now before starting the flashing process I recommend pressing CTRL+SHIFT+X to go into the advanced settings mode. You can use that to change the hostname, enable SSH (I recommend using auth via public key) and provide your Wifi credentials if needed. I have connected my Pi via LAN. Then click this write button and wait. Afterwards the SD card can be put into the Raspberry Pi and we are ready to go.
Connection and setup in Octoprint
Once the operating system of the Raspberry Pi is ready we need to deploy it. Put it somewhere in range of your 3D printer and connect it to the printer via a USB cable. In case of the Prusa mini there is a micro-USB port next to the on/off switch that can be used for this.
Next connect a network cable to your Pi (optional but recommended for a strong, reliable connection) as well as a strong enough power supply, also via USB. Now you should see some LEDs light up on the Pi and you have to wait for a moment while it boots up. Then open your router and find the IP address of your Pi (or try to use the hostname that can be set in the advanced setting while preparing the OS). Type the IP or hostname into your browser to open the Octoprint web interface.
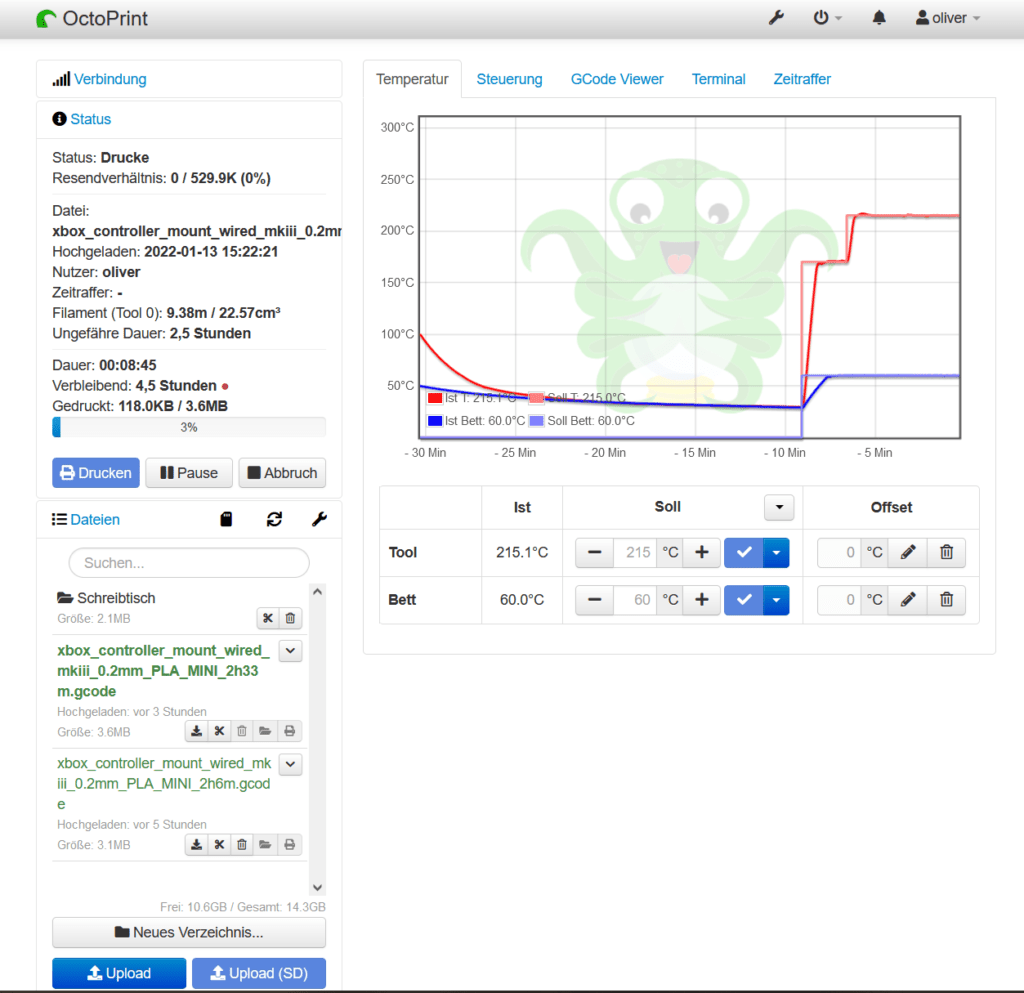
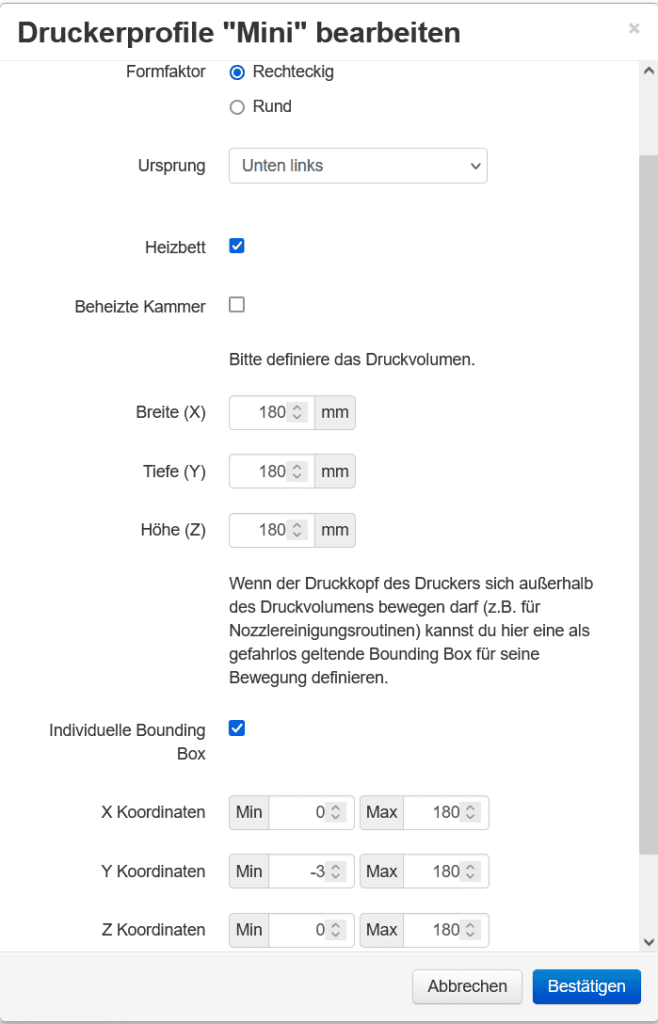
The first time your open it you are greeted with a setup wizard. Just follow the steps to setup a user for the web interface, select some general options and provide the data of the printer you are using. The Octoprint settings for the Prusa Mini can be found on Prusas website and look like this:
- Form: rectangular
- Origin: lower left
- Heated bed: yes
- Width: 180mm
- Depth 180mm
- Height 180mm
- Custom bounding box: X: 0/180, Y: -3/180, Z: 0/180
For other printers just check the manual or their website. The rest of the setting can stay unchanged.
That’s it. Now you can connect to the printer by using the connection box at the top left of the screen. Usually it will be a /dev/ttyUSB0 or /dev/ttyACM0 like setting. Now everything is ready for printing. Just upload a gcode file via the file menu and start printing.
Integrating Octoprint and Home Assistant
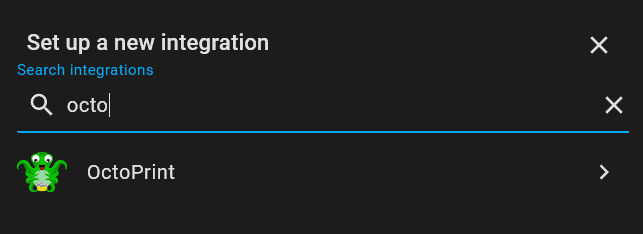
Once you have Octoprint up and running in your network integration into Home Assistant is pretty easy. The octoprint integration should automatically discover your instance. Go to the integrations menu and click the big enable button for the new integration. If it does not show up for some reason then click the “Add integration” button at the bottom right and find the Octoprint integration in the new menu.
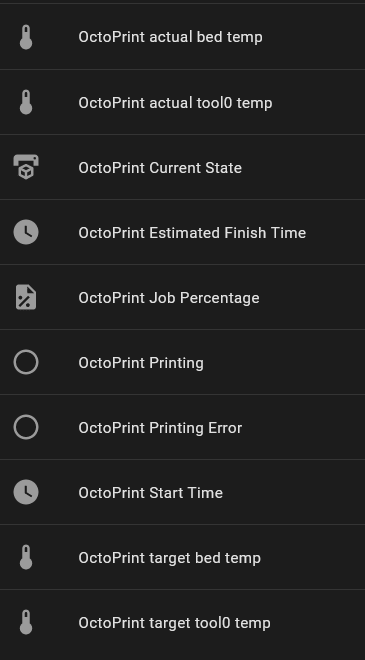
The integration will ask to create a new API key. Just agree and head over to your Octoprint instance. A new popup window should show up here asking for access. Click “OK” to give Home Assistant access to your Octoprint data. That’s the hard work done – you should now see a bunch of entities in Home Assistant. These include data like the current printer state (printing or operational), temperatures and print job percentages.
Automations
All this new data can of course be used for any automation. I used a simple automation to send a push notification via the Home Assistant app or my Pushover setup to my smartphone whenever a print is done without an error. You can of course also chose just one notification method and replace it with any other.
alias: Alert print done
description: Send a push notification & alert when a 3D print is done
trigger:
  - type: turned_off
    platform: device
    device_id: 6ad51d504f90235b2641abcdefghijk
    entity_id: binary_sensor.octoprint_printing
    domain: binary_sensor
condition:
  - type: is_off
    condition: device
    device_id: 6ad51d504f90235b2641abcdefghijk
    entity_id: binary_sensor.octoprint_printing_error
    domain: binary_sensor
action:
  - service: notify.notify
    data:
      message: A 3D print on the Prusa Mini is ready
      title: 3D print done
  - service: notify.pushover
    data:
      message: A 3D print on the Prusa Mini is done
      title: 3D print done
mode: single
Alternatively you can also use this automation to for example blink a light by using this:
service: light.turn_on
data:
  flash: short
target:
  entity_id: light.livingroom_ceiling_light
You could also combine you printer with something like a smart power outlet to turn it off when not in use.
Combination with other devices
Once the printer is integrated into your smart home you can combine the data with any other devices. If you have a temperature sensor in the same room nearby you can use that to turn off the printer via a smart outlet if it gets too hot with an automation like this:
alias: Alert when printer room too hot
description: ''
trigger:
  - type: temperature
    platform: device
    device_id: da65c4417f9f821938bcabvcdaserfah
    entity_id: sensor.lumi_lumi_weather_61a79306_temperature
    domain: sensor
    above: 40
condition: []
action:
  - service: notify.pushover
    data:
      data:
        priority: 1
      title: Printer room too hot!
      message: The temperature in the 3D printers room is over 40°C. Turning it off!
  - type: turn_off
    device_id: somedeviceid
    entity_id: someentityid
mode: single
Adding a camera
You can set up Octoprint with a camera to be able to remotely follow the progress of the print. If you do this you can also include the image in Home Assistant. You can find more information about how to set this up in this post.
Alternative: MQTT
If you do not want to use the Octoprint integration or prefer a more independent solution then you can also integrate Octoprint via MQTT. If you install the Octoprint MQTT plugin as well as the HomeAssistant discover plugin your Home Assistant instance should also be able to automatically find the printer. You need to have an MQTT broker running and integrate it with Home Assistant. The setup is simple though and my smart home setup already comes with a MQTT broker called Mosquitto.
I have described the full integration with Home Assistant via MQTT here.
Monitoring the OctoPi
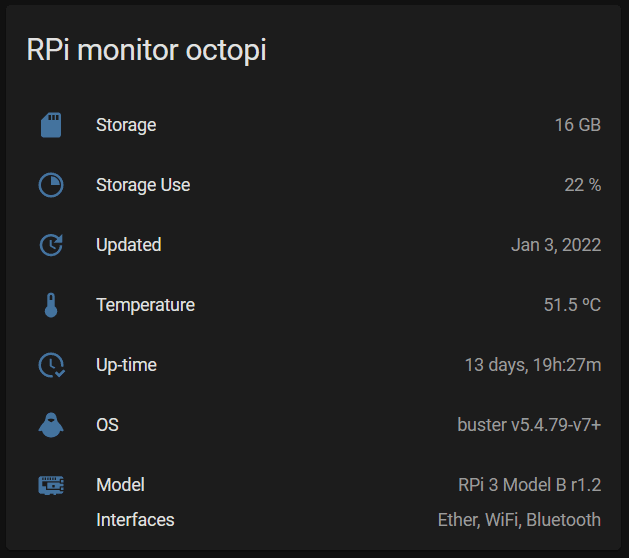
If you run OctoPi then the Raspberry Pi is responsible for providing the print data to the actual 3D printer. While there is usually a buffer you might still run into problems with the print if the Pi’s CPU or RAM runs out. Usually this should not happen with a newer version (3 or 4) but it might if there are some unforeseen software issues.
After running into some such issues with my Pi that is running Home Assistant some time ago I set up a monitoring system for the Pi with MQTT and Home Assistant. I decided to use the same warning system for the Pi running Octoprint. A simple installation of the reporter daemon as described in my guide above made the data appear in Home Assistant too.
The only issue I ran into was git being disabled for the root user on the OctoPi installation. Running sudo rm /root/bin/git as the text suggested fixed this issue though. Now I have a nice card on my dashboard showing me all the data about the OctoPi and an alert that gets triggered if there are any problems with CPU/RAM/SD card usage.
Bonus: how to send gcode directly from Prusa slicer to Octoprint
This Octoprint setup has been great so far. There was one annoying thing for me though: I still had to slice models in Prusa Slicer and then upload them to Octoprint manually. Fortunately there is a simple solution for this too: simply create a new printer in the slicer under “Printer settings” menu at the top and provide a “Print host upload” value.
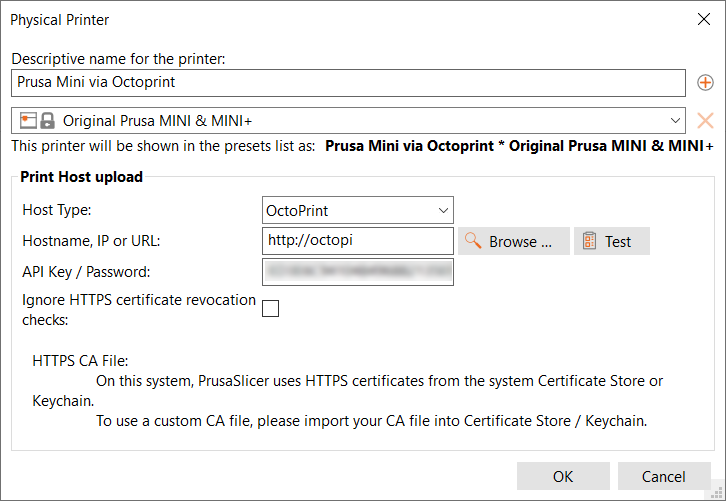
To be able to automatically access octoprint you need to provide an API key here. To get that one go to Octoprint, click the small icon at the top to go to the settings and select “Application keys”. Create a new one here, I named it “Prusa slicer” and copy it to the dialog in Prusa slicer. This will allow the slicer to upload and control Octoprint. Now after slicing you can simply click one button to upload the file and start the printing.