Connecting OctoPrint to Home Assistant via MQTT
OctoPrint and your 3D printer can be controlled and monitored by Home Assistant either via an integration or via MQTT. This article will describe the more generic MQTT solution.
Connecting OctoPrint to MQTT
In another article I have already described how to connect Home Assistant to Octoprint via an integration. That is very easy to do and works reasonable well. The downsides are that this is strictly limited to Home Assistant and that I was encountering some difficulties with this solution. There is not simple “Is printing” switch to use in automations and the very nice looking threedy custom card was not working properly.
The alternative is to use the lightweight MQTT protocol for communication. You need a MQTT broker for that (Mosquitto is included in my smart home server setup for example) but you are not restricted to use the data with only Home Assistant.
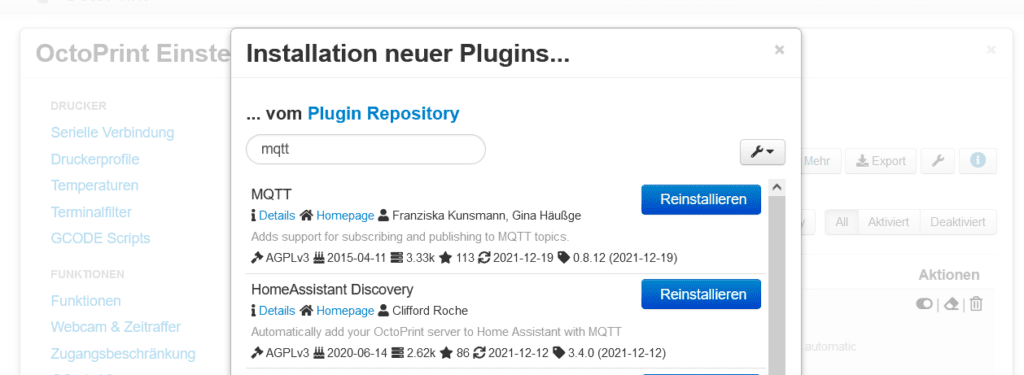
The setup is also quite simple. Go to your OctoPrint dashboard and click the small icon at the top right to open your settings. Open the plugin manager and search for new plugins. You need to install the “MQTT” and the “HomeAssistant Discovery” plugins.
After installing those OctoPrint needs a restart. Once that is done go back to the settings menu and open the MQTT settings under Plugins. The most important setting here is the “Host”. Enter you MQTT-servers IP address or name. Unless you enabled username/password authentication on your server you are now done.

That’s it, your OctoPrint server will now start sending relevant information to the MQTT broker. Using any MQTT client (I recommend MQTT Explorer) you can see the data.

Discovering OctoPrint from Home Assistant
I did not need to change any settings for the Home Assistant discovery plugin. This will just make sure that OctoPrint sends data in a format that Home Assistant can automatically discover. If you now switch back to your Home Assistant interface you should see a new entry in the MQTT integration.

The new entry contains a couple of sensors by default (and a lot more that are hidden). To me the most important ones are “Connected” which tells you whether OctoPrint is connected to the printer and “Printing” which is a nice switch that will always be either on or off depending on whether the printer is currently printing something.
Easy automations
This new printing switch is great for use in automations. I updated my automations from the last blog post to use these and it makes them even easier to understand. This automation is triggered by the printing-sensor turning off and will then send two notifications and turn off the light of the printer 10 minutes later.
alias: Alert print done & light
description: Send a push notification & alert when a 3D print is done
trigger:
  - type: turned_off
    platform: device
    device_id: b29fd3259585c2f45044279ff82dbc9d
    entity_id: binary_sensor.octoprint_printing_2
    domain: binary_sensor
condition: []
action:
  - service: notify.notify
    data:
      message: A 3D print on the Prusa Mini is ready
      title: 3D print done
      data:
        image: http://192.168.2.142/webcam/?action=snapshot
  - service: notify.pushover
    data:
      message: A 3D print on the Prusa Mini is done
      title: 3D print done
  - type: turn_on
    device_id: 74376206a9ebd80198c046a297307544
    entity_id: light.led_controller_3dprinter_level_light_color_on_off
    domain: light
    brightness_pct: 15
  - delay:
      hours: 0
      minutes: 10
      seconds: 0
      milliseconds: 0
  - type: turn_off
    device_id: 74376206a9ebd80198c046a297307544
    entity_id: light.led_controller_3dprinter_level_light_color_on_off
    domain: light
mode: single
I have a similar automation that turns on the lights when the printer starts printing. You could also easily add some alarm when temperatures get too high and there is even an emergency stop switch.
UI for OctoPrint in Home Assistant
Of course you can just use the built-in components of the lovelace UI in Home Assistant to control your printer via MQTT. That would be a wast of potential though as there is a great custom card called threedy. You can install it via HACS, the installation is easy and fully explained in the readme file on GitHub.
Before getting started with that I prepared two other devices though. I used a great Zigbee LED controller to add some lights to my printer that I can control and I added a camera to the Pi running OctoPrint.
All the details on how to set up the camera with Octoprint and Home Assistant can be found here. Afterwards you should see an image of the camera on your dashboard.

With that out of the way, lets get to the threedy card. Go to your dashboard, click edit and add a new custom threedy card. Edit that and select the MQTT device for OctoPrint. You can also change the type of your printer and rename it.

Under advanced settings you can also provide a camera (will open if you click on the printer on the card) and a light controller (can be switched on/off on the top right). To tell threedy to not use the OctoPrint integration but MQTT instead you need to click “Show code editor” and add use_mqtt: true. My final setup looks like this:
type: custom:threedy-card
base_entity: sensor.octoprint
monitored:
  - Status
  - Hotend
  - Bed
  - ETA
  - Elapsed
  - Remaining
printer_type: Cantilever
name: Prusa Mini
theme: Default
use_mqtt: true
light_entity: light.led_controller_3dprinter_level_light_color_on_off
camera_entity: camera.octoprint
I really like the result. A small and very well designed card showing all the data I need, including camera and light control.
OctoPrint integration vs MQTT – what works best with Home Assistant
After trying out both – the integration and MQTT – I have to say I actually prefer MQTT for now. While the integration is certainly a bit simpler to set up, MQTT was also quite easy and offers way more and better control over OctoPrint.
The great Threedy custom card has some bugs with the integration currently and until those are fixed I recommend the MQTT way to everyone that wants to use this card. MQTT also comes with the added benefit of working with multiple clients. You could also interact with it from any other (smart home) platform at the same time.