Embracing AI for a better workflow? Migrating my DMS from Teedy to Paperless-ngx
Efficiency and organization are crucial to me, especially when it comes to work. That’s why I have been using a reliable document management system to sort through my digital files for some time. For a while, I used Teedy, a self-hosted DMS, to manage my personal documents. While Teedy was effective, I was intrigued by Paperless-ngx’s advanced features, which include automated data assignment and advanced filtering. In this article, I want to share my personal experience of switching from Teedy to Paperless-ngx and how it has significantly improved my document management process. I will discuss the features of both systems, the migration process, and how Paperless-ngx has streamlined my workflow, ultimately leading to greater efficiency and organization in my personal life.
Teedy DMS – simple or too simple?
Teedy DMS is a lightweight and open source document management system (DMS) that I have been using for a while. It allows uploading of all kinds of digital files like PDFs and images and organizes them using tags, document names and a full-text scan using OCR.
The interface looks pretty good and is really snappy and fast. I was able to open most documents pretty much instantly and never had to read any manual: it is pretty intuitive to use. It also has user management with different users and groups that can be assigned to different documents. It keeps track of any changes for an audit trail – in case you are using the system with more than one user this might be useful.
If you are looking to set up your own home server consider buying some hardware via my affiliate link to support the blog:
Raspberry Pi 4
Intel NUC 11
Western Digital Red Plus series
Seagate IronWolf Series
I self-hosted the program on my home server using Docker & docker-compose. The setup is quite easy, I use two containers in a separate network accessible from the Internet via my reverse proxy Traefik. That is what the networks and the labels are needed for. If you just want to run the software locally simply use the two containers without them.
version: '3.7'

networks:
  traefik_proxy:
    external:
      name: traefik_proxy
  teedy_network:
    driver: bridge

services:
  teedy:
    image: sismics/docs:v1.10
    networks:
      - teedy_network
      - traefik_proxy
    depends_on:
      - teedy_db
    restart: unless-stopped
    volumes:
      - ${DATADIR}/teedy/data:/data
    ports:
      - "8222:8080"
    environment:
      DOCS_BASE_URL: "https://teedy.${DOMAINNAME}"
      DATABASE_HOST: teedy_db
      DATABASE_DB: ${TEEDY_DATABASE_DB}
      DATABASE_USER: ${TEEDY_DATABASE_USER}
      DATABASE_PASSWORD: ${TEEDY_DB_PASSWORD}
    labels:
      - "traefik.enable=true"
      - "traefik.backend=teedy"
      - "traefik.frontend.rule=Host:teedy.${DOMAINNAME}"
      - "traefik.port=8080"
      - "traefik.docker.network=traefik_proxy"

  teedy_db:
    image: postgres:alpine
    container_name: teedy_db
    restart: unless-stopped
    networks:
        - teedy_network
    environment:
      POSTGRES_DB: ${TEEDY_DATABASE_DB}
      POSTGRES_USER: ${TEEDY_DATABASE_USER}
      POSTGRES_PASSWORD: ${TEEDY_DB_PASSWORD}
You need to provide the values for the database & users in a separate .env file. After starting the service with docker compose up -d it will be available on port 8222 and the data will be stored in ${DATADIR}/teedy where the DATADIR is again a variable that needs to be defined in your env file.
That’s the positive part. Unfortunately the lightweight approach also comes with some drawbacks. From what I can tell you have only the file names and tags to sort your documents. I used the tags in two different hierarchies, one for all the contacts, one for the purpose. For example an invoice for my hosting provider would be assigned to both tags: “hosting provider XYZ” and “blog”. Possibly also others. While this works for most cases I feel the system could be improved.
Another issue was the search. While it can search the full file content with OCR it does this only if you use the advanced search. I am not sure why (maybe to save resources?), I feel that is wasted potential. Finally you have to assign any tags and the document name manually.
Paperless-ngx DMS – more power and magical automation
Paperless-ngx is a well-known open-source DMS that has been around for quite some time. It was originally a fork of the older paperless-ng system, which itself was based on paperless. The project is community-driven and receives regular updates. New features are also discussed on Github out in the open.
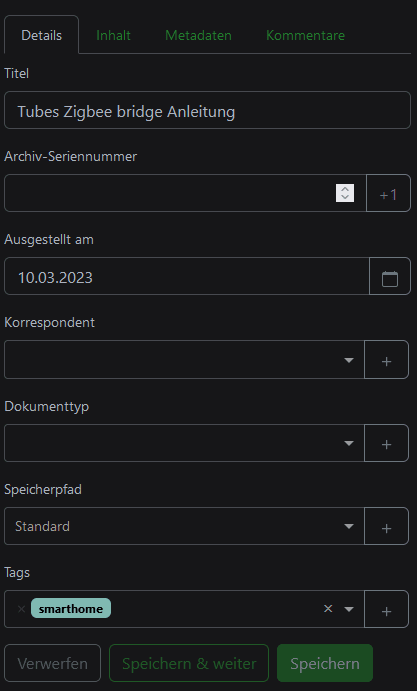
What I appreciate about Paperless-ngx is that it offers many of the same features as Teedy, but also supports them with additional ones that make it stand out. For example, unlike Teedy which only uses tags for sorting, Paperless-ngx supports correspondents, document types, and document metadata such as name and date. This makes it much easier to categorize and search for documents.
What’s even more impressive is that Paperless-ngx utilizes machine learning to automate most of the manual work. Once correspondents, tags, and other metadata have been assigned to documents, the system will learn from this and suggest matching ones for future documents. As a result, uploading a new document is a breeze, as the system suggests the right date, correspondent, document type, and even tags. All that’s left for me to do is add a proper name and click save.
In my experience so far this works very well for parsing the documents date and sender from the text. Even suggested tags are usually quite useful. Of course this fails in cases where you add entirely new documents to the system.
Finally, Paperless-ngx has a powerful search feature that allows you to save your searches and put them as a separate view in the sidebar. This is a neat feature that saves a lot of time and hassle when searching for documents. Overall, I find Paperless-ngx to be an excellent DMS that offers a range of features designed to streamline the document management process.
For hosting it I use the same Docker based server I described above. Again the networks and labels are optional and used to expose the service to the Internet. Variables need to be again declared in a .env file and all the data is stored in subfolders of ${DATADIR}/paperless.
version: '3.7'

networks:
  traefik_proxy:
    external:
      name: traefik_proxy
  paperless_network:
    driver: bridge

services:
  broker:
    image: docker.io/library/redis:7
    restart: unless-stopped
    volumes:
      - ${DATADIR}/paperless/redis:/data
    networks:
      - paperless_network

  db:
    image: postgres:13
    restart: unless-stopped
    volumes:
      - ${DATADIR}/paperless/db_data:/var/lib/postgresql/data
    environment:
      POSTGRES_DB: ${PAPERLESS_DATABASE_DB}
      POSTGRES_USER: ${PAPERLESS_DATABASE_USER}
      POSTGRES_PASSWORD: ${PAPERLESS_DB_PASSWORD}
    networks:
      - paperless_network

  webserver:
    image: ghcr.io/paperless-ngx/paperless-ngx:latest
    restart: unless-stopped
    depends_on:
      - db
      - broker
    ports:
      - "8223:8000"
    healthcheck:
      test: ["CMD", "curl", "-fs", "-S", "--max-time", "2", "http://localhost:8000"]
      interval: 30s
      timeout: 10s
      retries: 5
    volumes:
      - ${DATADIR}/paperless/data:/usr/src/paperless/data
      - ${DATADIR}/paperless/media:/usr/src/paperless/media
      #- ./export:/usr/src/paperless/export
      #- ./consume:/usr/src/paperless/consume
    environment:
      PAPERLESS_REDIS: redis://broker:6379
      PAPERLESS_DBHOST: db
      PAPERLESS_DBENGINE: postgresql
      PAPERLESS_DBNAME: ${PAPERLESS_DATABASE_DB}
      PAPERLESS_DBUSER: ${PAPERLESS_DATABASE_USER}
      PAPERLESS_DBPASS: ${PAPERLESS_DB_PASSWORD}
      PAPERLESS_FILENAME_FORMAT: '{created_year}/{correspondent}/{title}'
      PAPERLESS_SECRET_KEY: ${PAPERLESS_SECRET_KEY}
      PAPERLESS_URL: paperless.${DOMAINNAME}
      PAPERLESS_OCR_LANGUAGE: deu+eng
    networks:
      - paperless_network
      - traefik_proxy
      - default
    labels:
      - "traefik.enable=false"
      - "traefik.backend=paperless"
      - "traefik.frontend.rule=Host:paperless.${DOMAINNAME}"
      - "traefik.port=8000"
      - "traefik.docker.network=traefik_proxy"
The interesting part is the environment for the webserver container. It is important to set the URL to the same URL you use to expose the service via the reverse proxy if you use one. You also have to provide your own and custom secret key here for security reasons, don’t use the default one! Finally you can change the way the documents are stored on disk here using the PAPERLESS_FILENAME_FORMAT variable. I decided to store documents by year, then by correspondent and finally by title. More details can be found here.
This is another awesome feature that makes migrating from this system to others very easy as you still have a normal file system with all the documents available. I did also set the OCR software to recognize German as well as English documents.
The migration
After setting up both systems I finally had to migrate all my existing documents. Teedy does not seem to have a proper export functionality and does not store the documents in a simple file structure (instead in a DB).
To free my documents I used the great export script I found here. Copy the script, change the variables at the top to provide username, password, URL and a target directory and run it. I ended up with a list of all of my documents in the folder. I then manually uploaded them to my new paperless-ngx instance and started creating all the correspondents, document types and labels I need.
I ended up creating very specific correspondents as well as a bunch of tags to group related documents (like sport, my blog, …) and mark important things (tax related, …). I also created a TODO tag that gets added to all documents by default. I then searched for that tag and created a view from it that I pinned to the start page. Now I will see all unsorted documents right away. This can work very well with automatic upload of documents from a certain folder.
I also set up a couple of document types but I feel like that is not a very important functionality so far. What works really well is the automatic learning and assignment of data though. Most documents are now automatically assigned to the right tags/dates/correspondents/.. I usually just have to add a name.
For now the Paperless-ngx system works very well for and improved my workflow quite a bit. The UI feels slightly slower though and a multi-user feature would be great to have too. Fortunately it looks like that feature will be coming soon.