Adguard Home or PiHole – How to block obnoxious ads for your whole network
Network wide DNS ad blocker like Adguard Home and PiHoleAds can be a great solution to a big problem. Ads can be really annoying and even a huge security risk, but many modern devices like smart TVs are out of your direct control. Network wide ad blocker can get around these restrictions. Here is how to quickly set them up and how to integrate them with Home Assistant and Grafana.
Why do you need ad blockers?
While ads on the Internet can be a good thing when well used (they finance quite a lot of great and otherwise free services) they can also be very annoying and make the web nearly unusable in some cases. They also waste a lot of bandwidth and can even be a potential security risk.
On your desktop PC you can use some great browser plugins (like ublock Origin for Chrome in my case) to get rid of ads. On your (unrooted) smartphone this becomes a much harder problem, on other devices like smart speakers you have no control at all.
How do DNS ad blockers work?
To circumvent that problem you can utilize something else you (should) still own: your network infrastructure, or more precisely your router. If you open a website you are usually using a DNS name (like thesmarthomejourney.com) to avoid having to remember the actual IP address. A DNS server is used to resolve this name to the actual address. Usually all devices in your network ask your router for a DNS server which will point them at the one chosen by your internet service provider.
This is where DNS based ad blocking steps in. You basically run your own local DNS server that checks all requests for known spam/ads/unwanted content. If such content is found no address is returned. To the client it looks like the server is just not reachable. Everything else is passed on to a (configurable set of) external DNS server. As you have this local instance now cached requests can be even faster than before now and you avoid all the unnecessary traffic for ads.
How to install Adguard Home or PiHole with Docker
I suggest using Docker to install your DNS blocker to make the process as simple as possible. Both PiHole and Adguard Home have great Docker images you can use. First of all you need some always on device in your network to run this server on as DNS resolving will stop working if this server is down. You might even consider using two devices for backup, oherwise you have to manually switch to another DNS server on your clients if it goes down.
I am using a Raspberry Pi with a simple docker-compose software setup as described in my home server guide to host my Adguard Home instance. Setup is easy, the updates are automated and it also runs Home Assistant for my smart home setup (like my smart light system). If you have a full server available already or use a NAS that supports installing Docker containers you could also use those. The hardware requirements for the DNS servers seems to be pretty low.
- A Raspberry Pi, preferably the Pi 4 with 2 or 4 GB of RAM
- A USB (C for the Pi 4, Micro USB for the older ones) power supply with around 3.0A
- A microSD card, 16+GB from a reliable manufacturer, should be fast: class 10/UHS-1
- Optional: a case (with cooling) for the Pi or at least heatsinks
- Optional: if you don’t have one yet buy a SD card reader/writer
- Optional: Network access. Either a LAN cable or if you are not using a newer Pi a seperate Wifi USB dongle.
- Alternatively you can get a kit including everything you need
If you are interested in buying a Raspberry Pi consider doing it via my affiliate links above. It does not change prices for you and allows me to pay for the servers 😉
You can find all my docker-compose files for this setup on my Github repository. To run Adguard Home or PiHole just pull the hosting.yaml file (and the .env), comment/uncomment the container you want (Adguard is used by default) and run docker-compose -f hosting up -d to start the containers. The important part in the file is this:
# alternative adblocker
 pihole:
   container_name: pihole
   image: pihole/pihole:latest
   restart: unless-stopped
   ports:
     - "53:53/tcp"
     - "53:53/udp"
     - "67:67/udp"
     - "6080:80/tcp"
     - "6443:443/tcp"
   environment:
     - TZ: ${TZ}
     - WEBPASSWORD: ${PH_WEBPASSWORD}
   volumes:
     - '${DATADIR}/pihole/etc-pihole/:/etc/pihole/'
     - '${DATADIR}/pihole/etc-dnsmasq.d/:/etc/dnsmasq.d/'
   cap_add:
     - NET_ADMIN
   restart: unless-stopped

 adguard:
   container_name: adguard
   image: adguard/adguardhome:latest
   restart: unless-stopped
   ports:
     - "53:53/tcp"
     - "53:53/udp"
     - "443:443/tcp"
     - "853:853/tcp"
     - "784:784/udp"
     - "3300:3000/tcp"
     - "3380:80/tcp"
   volumes:
      - '${DATADIR}/adguard/workdir:/opt/adguardhome/work'
      - '${DATADIR}/adguard/confdir:/opt/adguardhome/conf'
   cap_add:
     - NET_ADMIN
You should only run one of those containers, the code for the other one can be commented out with # or deleted. Both will open some needed ports and store all configuration data in the DATADIR defined in the .env file in the same repository. I moved that directory to an external SSD. NET_ADMIN is added to the limited docker container rights in both cases so that they can properly function as a DNS server.
Once the containers are started you can reach their frontend at either port 3380 (Adguard Home) or 6080 (PiHole) where you can then configure everything.
Adguard Home or PiHole?
Which one should you use? There is a table with a feature comparison on the Github readme of the Adguard Home project but honestly both are very similar for their core usecase of blocking ads. I personally started by using PiHole but ran into some problems with stability. To me the UI also looks very oldschool. While not a problem in itself both together pushed me to look for an alternative.
I found Adguard Home, tried it and it works great for me so far. It also looks much more modern and the settings are pretty simple. The code is also open source (same as PiHole).

How to configure Adguard Home
The steps to configuring PiHole are very similar but as I described above I ended up using Adguard, so I will describe that process here. First open their respective web page, in this case http://ipaddress:3380. Next we have to set the upstream DNS server(s) (the server that requests that are not blocked are getting sent to). You can find this under settings-dns settings.
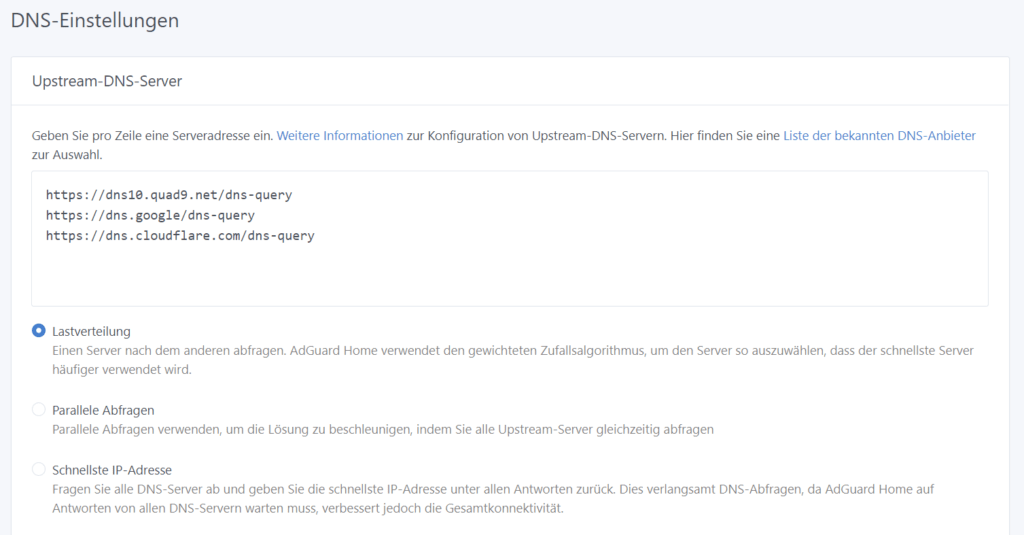
In this example I added the Quad9, Google & cloudflare DNS servers but of course you can select any other server too. There are some more privacy focused ones out there. Then there are a couple of different strategies for switching between those you can select from. I used the load distribution one.
It makes sense to put a bit of time into researching the best DNS servers and connection methods. “Standard” DNS is unencrypted. Instead I would recommend using some DNS-over-HTTPs servers or DNS-over-Quic servers (supposedly a bit faster). Adguard has a list of DNS providers here.
Under Filter you can also find some settings to control which requests should be blocked. I chose to use the default AdGuard DNS filter list to block ads but you can also add any other list here. That’s it, now you can start using your ad blocking DNS server.
Should you ever run into a website that gets blocked but you want to open it for some reason you can update you can add it to the allow-list under the Filter tab too.
Using your DNS ad blocker
To actually start using the new server network devices need to be told about it. There are mostly two options here. You can tell every single device to use this new DNS server in its settings, which can be a good idea if you only want to use this setup for a small selected group of devices. Otherwise the simpler solution (and one that also includes devices without these settings available) is to set the DNS server at network level.
Your router should have a setting where you define the DNS server that your networks devices should use. Usually this can be found in the DHCP settings somewhere. For my Ubiquity Unifi USG this setting can be found under “DHCP Name Server”. For a FritzBox it can be found in the network settings.

If you go this route and change the DNS server “globally” in your network I would advice to think for a second about what to do when the server is unavailable for some reason. It is a good idea to know the IP address of your router so you can manually switch the DNS server to restore proper Internet access or have a backup server.
If you want to run a second Adguard Home server as a backup you can install another small container called adguardhome-sync and have it automatically synchronize all your settings between the main and backup instances. I described how to do that here.

I personally switched the DNS server on my Raspberry Pi server itself to not use the one provided by my router but instead a hardcoded list. This can be done by editing the /etc/resolv.conf file manually and adding nameserver 8.8.8.8 for example or (even better) by updating /etc/netplan/xxx.yaml (there is usually only one yaml file here) and adding something similar to this:
network:
   ethernets:
     enp3s0:
       dhcp4: no
       addresses:
         - 192.168.1.147/24
       gateway4: 192.168.1.1
       nameservers:
           addresses: [192.168.1.1]
   version: 2
The IP addresses need to be adjusted of course. This way the server can still resolve DNS queries even if the Adguard container is down. After updating the DNS server settings in your router you might need to restart/reconnect your devices for them to pick up the new settings. Have fun using your phone with less ads 🙂
Monitoring from Home Assistant and Grafana
Both Adguard Home and PiHole offer some statistics about their activities and can be integrated with Home Assistant. Integration is simple in both cases: just install the respective integrations. All you need to provide is the address of your DNS server.

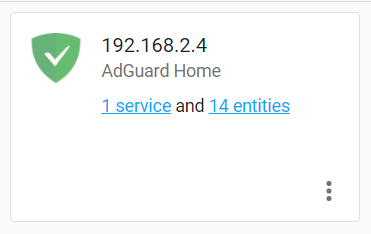
Afterwards you can see a bunch of statistics about your Server and enable/disable it with one click from Home Assistant. Pretty neat and easily integrated into your dashboard if you use that.
For even prettier and more useful dashboards you can also install Grafana and InfluxDB and link it to Home Assistant as I described here. Afterwards you can create beautiful visualizations for your network.
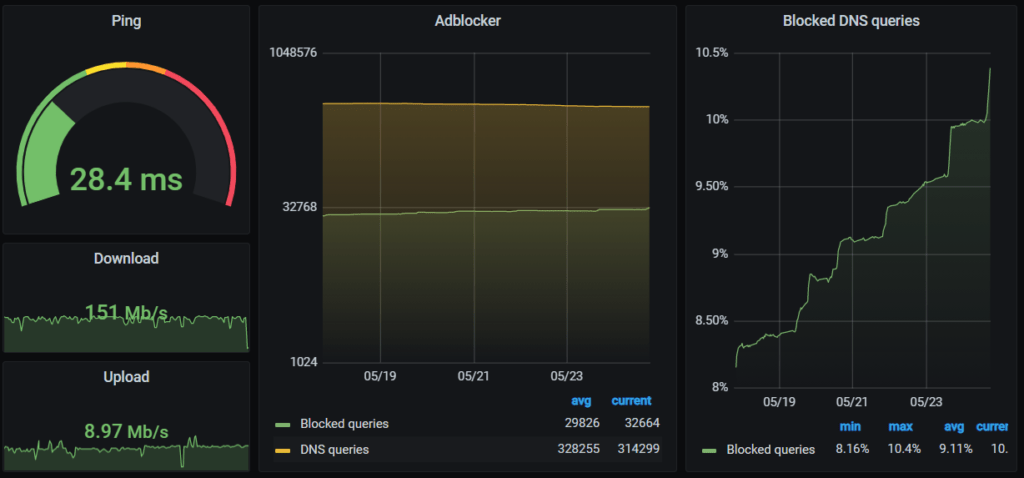
The amount of queries and the percentages in the image above are coming from the Home Assistant Adguard Home integration. I also added upload/download/ping information here using the speedtest.net integration.
Is it worth the trouble?
For me definitely yes! If you have the knowledge to set up such a system (and I guess you should have that now, after reading this post ;)) just go and do it. As you can see nearly 10% (actually its more than 20% now, although some of that might be retries) of my networks requests are blocked (and rising!). Even ignoring the actual ads it is very interesting to see how often some devices try to send analytics data.

It gives me some peace of mind to know that some very talkative devices on my network are now being silenced (at least partially). Of course this approach does not cover everything: if devices use hardcoded addresses they can’t be blocked like this and ads coming from the same domains as content (Youtube ads ;() are also not being blocked.


