adguardhome-sync – build an even better ad-blocking experience with Adguard home
Adguard home is a great network wide DNS based ad blocker with a cleaner interface than Pihole. adguardhome-sync is a small tool that allows you to set up an auto synced backup instance for Adguard home to avoid any issues you might have with your DNS resolver.
What is Adguard home?
Are you annoyed by all the ads everywhere online? Then an adblocker is the solution. Some devices like desktop PCs (in the browser) support them natively but other devices like some smartphones or media devices like the FireTV stick do not really have any support for ad blocking.
To block ads for everything on your own network you can use a DNS level ad blocker. I explained how to use the most popular choices Pihole and Adguard home here. Both will filter all requests from your devices to resolve domain names (like thesmarthomejourney.com) to IP addresses (like 159.69.241.216) for those that are known ad providers. This way most ads can actually be blocked. Only devices with hardcoded IPs and embedded ads (like on Youtube) can not be blocked like this.
How to make Adguard home more robust?
In general Adguard home is working great for me. It runs on my small Raspberry Pi based home server and runs well indeed. I even integrated it with Home Assistant and my Grafana dashboard. The web UI is also very simple to use and quite quick to react.

To make this work on all of my devices I had to change my Unifi network setup for the main and the IOT network to point to the Pi as a DNS source. This way all clients will resolve addresses via the Adguard instance. Unfortunately this also means that if this instance is down for any reason then I can’t access any web content anymore unless I know the exact IP address. While this may work inside my network who even knows the IP for google.de?
Adding an external DNS server as a backup does not work either as most devices will of course fall back to the second DNS server if the first one does not return any answer (like Adguard does when it is supposed to block ads). Instead a way around this is to set up a second local instance of Adguard home.
I could just manually set up a second instance and configure it exactly the same. But what if I change any setting? Now I have to do that on both instances. What if you have even more? This can be avoided with an automatic sync of settings.
Adguard-home-sync
The adguard home sync project does exactly that. Its just another docker container that will sync all configurations of your main adguard node to other replicas. To start you first have to set up the second (or third, forth, …) instance and run the initial setup via the web UI. I have a second Raspberry Pi running Octoprint to control my 3D printer.
On this second Pi I also installed Docker and docker-compose to start another Adguard home instance. The yaml file in this case is quite simple so Docker itself would also be enough. A simple docker-compose -f adguard.yml up -d will then start the container on port 3380. Of course you can use any other ports too.
version: "3"

services:
  adguard:
    container_name: adguard
    image: adguard/adguardhome:latest
    restart: unless-stopped
    ports:
      - "53:53/tcp"
      - "53:53/udp"
#      - "443:443/tcp" # already used by octoprint
      - "853:853/tcp"
      - "784:784/udp"
      - "3300:3000/tcp"
      - "3380:80/tcp"
    volumes:
       - '/home/pi/adguard/workdir:/opt/adguardhome/work'
       - '/home/pi/adguard/confdir:/opt/adguardhome/conf'
    cap_add:
      - NET_ADMIN
Then I switched to ipOfThePi:3380 in the browser and went through the initial setup without really changing anything. All the configurations will be synced from the main instance in a moment.
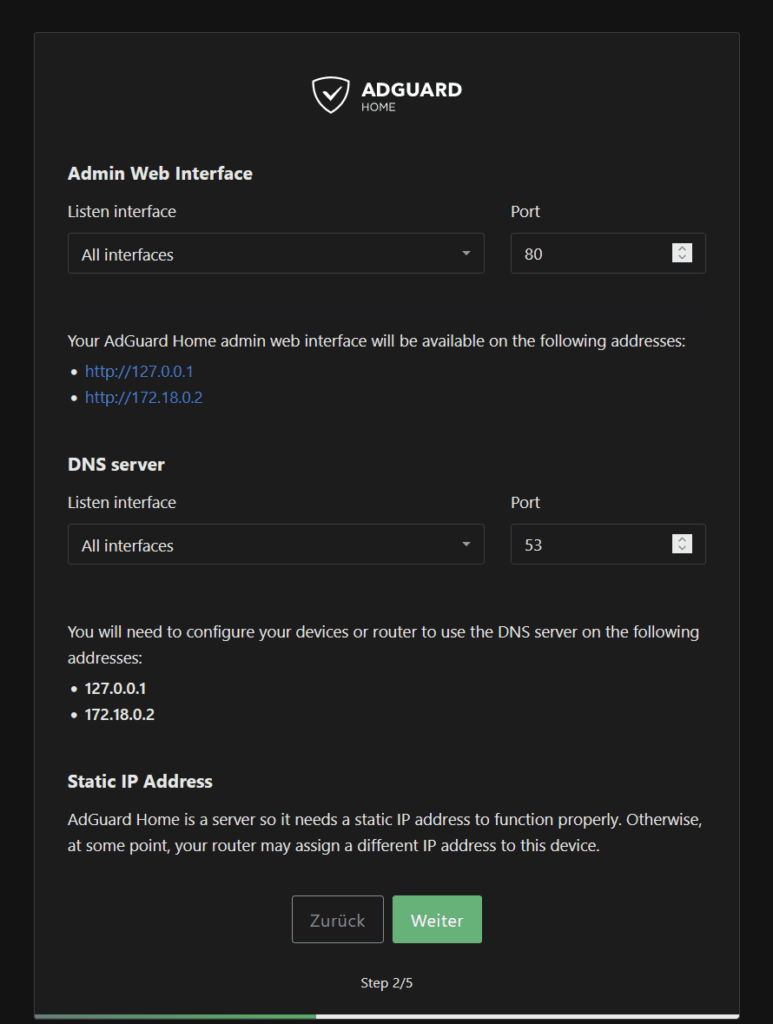
At this point you should also make sure that your replica host has a fixed IP address. In my case I am using 192.168.2.142 here.
Next I switched to my main server and added adguardhome-sync to my main hosting.yaml file (from my Github repo). I decided to go with the linuxserver.io image here as they provide very high quality images. In the end the container definition is quite simple and used my environment variable DATADIR to point to a path where I store all my docker related data and port 8082 for the web UI of the sync tool.
# other services ...

adguardhome-sync:
    image: lscr.io/linuxserver/adguardhome-sync:latest
    container_name: adguardhome-sync
    volumes:
      - '${DATADIR}/adguardsync/config:/config'
    ports:
      - 8082:8080
    restart: unless-stopped
Another docker-compose -f hosting.yml up -d adguardhome-sync will start this container. Now it should create a default configuration file you can find at ${DATADIR}/adguardsync/config/adguardhome-sync.yaml. Open this file in any editor like nano and update everything to your liking. My file looks like this:
# cron expression to run in daemon mode. (default; "" = runs only once)
cron: "*/10 * * * *"

origin:
  # url of the origin instance
  url: http://192.168.2.4:3380
  username: admin
  password: aSecurePassword

# replica instance (optional, if only one)
replica:
  # url of the replica instance
  url: http://192.168.2.142:3380
  username: admin
  password: anotherSecurePassword

# Configure the sync API server, disabled if api port is 0
api:
  # Port, default 8080
  port: 8080
  # if username and password are defined, basic auth is applied to the sync API
  username: sync
  password: reallySecurePassword

features:
  dhcp:
    serverConfig: false
    staticLeases: false
The cron expression at the beginning will tell it how often it should sync the settings. 10 minutes seems plenty enough. You can use this tool to generate other settings. The origin part is where you point it to your master instance of Adguard home. Use the same port here that you use to access the Adguard home web ui. By default it is port 80 but I moved this to 3380 as the default port was already used. Then you need to provide username and password data.
The replica block will do the exact same thing for your replica. In my case this is the instance we set up above. If you have more than one replica you can instead also use a list like this:
replicas:
  # url of the replica instance
  - url: http://192.168.1.3
    username: username
    password: password
  - url: http://192.168.1.4
    username: username
    password: password
The API part configures the port that is used to show the UI of the sync tool itself. I used 8080 but rerouted this in the docker-compose file above to 8082. In the same block you should also define a username and password used to access this UI. The UI itself is not very powerful though and will only show logs from the sync process that you could also get from the container logs.
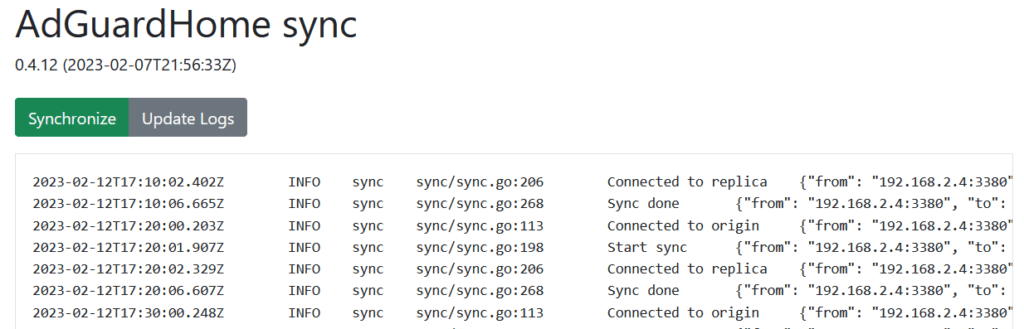
After you changed these configurations restart the container via docker-compose -f hosting.yml restart adguardhome-sync. Then it should start syncing settings from the master to the replica nodes. You can see the logs via the docker-compose logs command or on the web UI. The first time I ran this I saw an error regarding DHCP settings. I am not sure why that is because I have not enabled DHCP in Adguard home.
adguardhome-sync | 2023-02-11T22:24:32.777Z ERROR sync sync/sync.go:263 Error syncing dns {"from": "192.168.2.4:3380", "to": "192.168.2.142:3380", "error": "400 Bad Request(bad dhcpv4 configuration: dhcpv4: invalid IP is not an IPv4 address\n)"}To remove this error I simply added the last features block to the adguardhome-sync configuration to stop it from synchronizing any DHCP related configurations. Afterwards the process works without any errors.
How to make your devices using the backup DNS server
The final step is to make this new backup DNS server known to your devices. Of course you can change the DNS settings of every single devices but I opted to do this on a network level. I use a Ubiquity Unifi gateway so I switched to the Unifi controller (hosted on the same Raspberry Pi!) and changed the configurations for my main and my IOT network.

This is called a “DHCP Name Server” here instead of DNS for some reason and can be found in Settings – networks – edit. I am using two IPs here, my main server and my Octopi with the replica of Adguard home. Make sure both are using static IPs!
If you use a different router of course the setup is slightly different but every better router should have some DNS related configuration that you can change.
Finally I also wanted to use this second backup instance in my separate network for IOT devices. This network is quite locked down and has only Internet access and access to my main server. For those devices to be able to contact the octopi I added another firewall rule

So far this setup has worked great! The adguardhome sync container uses minimal resources (nearly no CPU and <20MB RAM) and works flawelessly. If I shut down my main DNS resolver Adguard Home instance then my clients all fall back to the second one without a problem.
This setup might not be strictly needed but if you run Adguard Home and have a second server available I can highly recommend this.