Building a smart mirror – MagicMirror² on a Raspberry Pi Zero W
I am currently building a smart mirror and want to use a small Raspberry Pi Zero W for that. Unfortunately MagicMirror² does not support it out of the box. Here is how I got it to run anyways.
PS I have since switched to a more powerful Pi 4. If you want to know how you can follow along here.
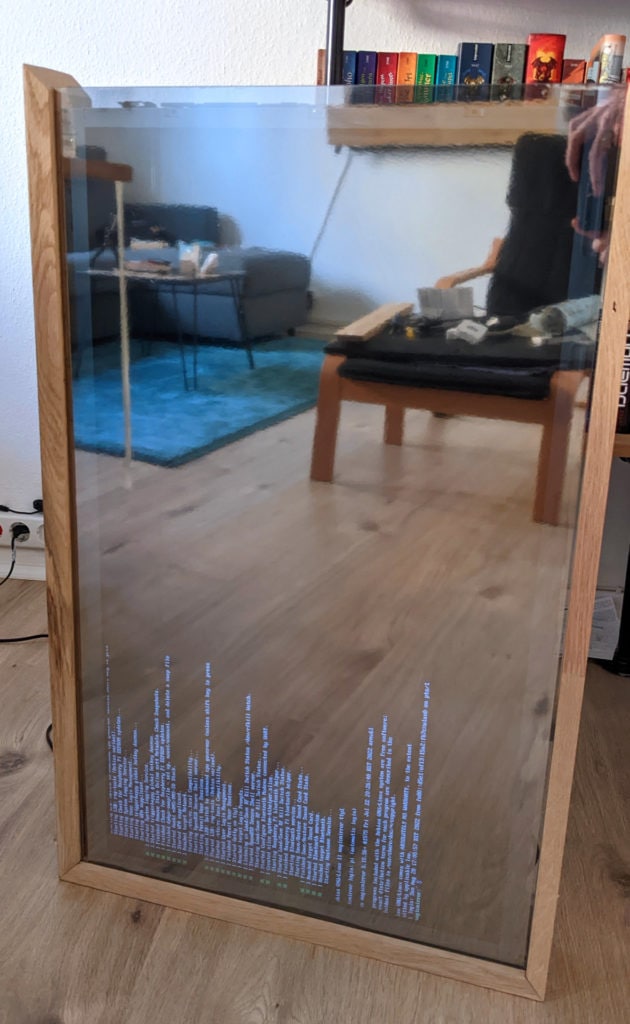
The magic mirror
For those who do not know what a magic mirror is: it is a normal semi transparent mirror with a screen behind it. If shown with a high contrast (white on black most of the time) the picture on the screen shows through the mirror making the elements shown appear like they are floating in the mirror. It looks very futuristic so naturally I wanted one.
While the hardware part is described in this article I needed to fix another problem first: Raspberry Pis are crazy expensive right now. A Pi 4 is too expensive right now for such a project but I still had a small Pi Zero W which would be perfect for this project – but is unfortunately not officially supported by the software I am going to use: MagicMirror².
This great open software usually makes it very easy to set up your smart mirror but does not support the Pi Zero W by default. I found a couple of guide like this one and this one but to my surprise none of them worked completely. Some were outdated other just did not work. So here is how I got it to work.
If you are looking for a simpler method jump to this part of the article. The method described below works nevertheless and very well in my case.
Prepare your Pi
The first step, which I will not describe in detail here, is to set up your Raspberry Pi. Some general steps are described here but this time I used the Raspberry Pi Imager to install the Pi OS Lite. Make sure to provide Wifi credentials, enable SSH and set a username/password. I suggest also uploading a ssh key.
If you want to support this blog and are working on a similar project consider buying the hardware via these affiliate links:
– Raspberry Pi Zero W
– USB-Power for the Pi
– HDMI cable to connect it to the screen
Afterwards you can just plug in the power, let the Pi boot up and connect to it via SSH for configuration. You can also use a mini HDMI to HDMI cable to connect it to your screen. I use Putty or MobaXTerm to connect to my remote devices. Now lets get to the installation.
Installing MagicMirror² on the Pi Zero W
Installation is a bit more complicated because you need to install a new version of NodeJS (which is not officially supported) and install the needed components to show images on the Lite version of the OS. Here are the steps:
# Preparation:
# install Pi OS lite
# setup wifi and SSH in imager
# connect via key
# ===========================================
# update all software and install git
sudo apt update && sudo apt upgrade
sudo apt install git
# install LTS 16.13.0 of node on zero w and reboot
wget https://unofficial-builds.nodejs.org/download/release/v16.13.0/node-v16.13.0-linux-armv6l.tar.xz
tar -xvf node-v16.13.0-linux-armv6l.tar.xz # the v is optional and more verbose
sudo cp -R node-v16.13.0-linux-armv6l/* /usr/local
rm -rf node-v16.13.0-linux-armv6l/*
sudo reboot
# now check if the installation worked - if you see the expected version as output it did
node -v
npm -v
# start installation of MagicMirror²
git clone https://github.com/MichMich/MagicMirror
cd MagicMirror/
npm install --only=prod --omit=dev
# copy example config to have a backup
cp config/config.js.sample config/config.js
# now change the config to your liking via
nano config/config.js
# change interface to be listen to LAN traffic
address: "::",
# allow clients from my network 192.168.2.x
ipWhitelist: ["127.0.0.1", "::ffff:127.0.0.1", "::1", "::ffff:192.168.2.0/24"],
# or
ipWhitelist: [],
# then save and exit the file. Now we can run the server component via
npm run server
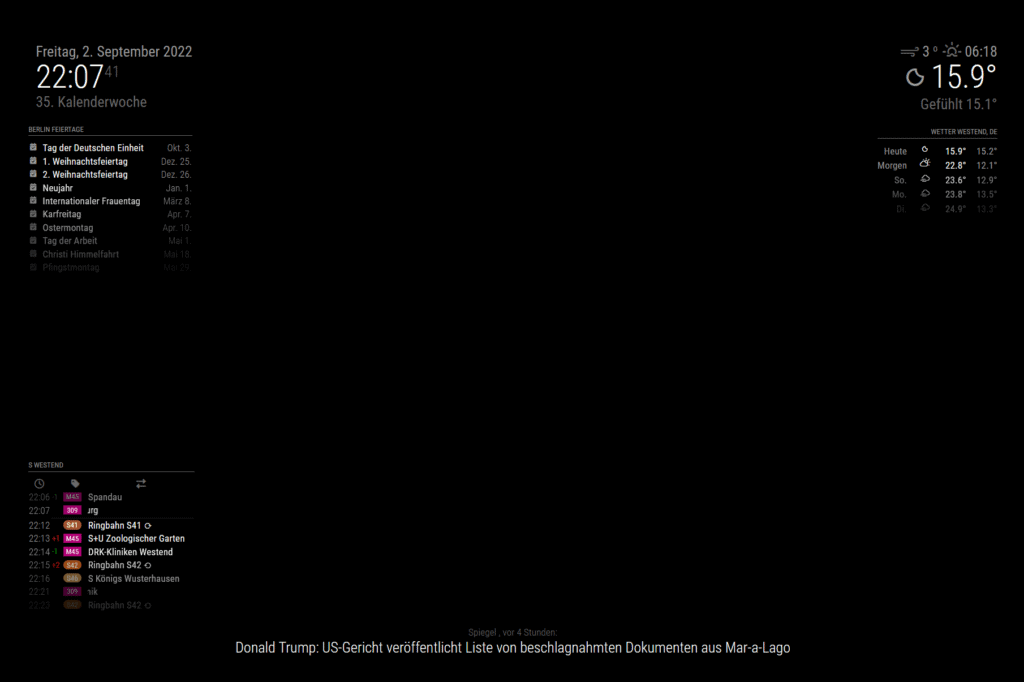
# you should now be able to see the UI if you go to http://ipOrNameOfPi:8080This is the main part of the installation. Unless you see any errors the MagicMirror software should now be running. Go to the web page to check if everything works. If you see any messages about denied access you might have to change your ipWhitelist config. By default your UI should look something like this.
How to show MagicMirror on the screen
Now that we can manually run the server part of the software we want to also show that image on the screen connected directly to the Pi. For that we need to install the X window server to get a “UI”, install a browser to show the website and use the unclutter program and some configuration to hide the mouse cursor.
# install all the needed software
sudo apt install chromium-browser xinit xorg matchbox unclutter

# create some autostart scripts
cd
nano start_magic.sh
nano start_chromium.sh
Now that the needed software is installed we can create two files for starting everything. The first one is called start_magic.sh, sets up everything and starts the server. The second one, start_chromium.sh starts the browser and points it to the right (local) website.
I am using nano to create the files. You can use CTRL+O to save and then CTRL+X to leave the editor again. Here is the content of the first file.
#!/bin/bash
cd ~/MagicMirror
npm run server &
sleep 30
sudo chmod 660 /dev/tty*
xinit /home/pi/start_chromium.sh
This starts the server in the background (via the &) and then updates the rights to the tty devices. I am not sure why the xinit program needs those but in my case it did not start otherwise. Also make sure that the user you are using is in the tty group. If your user is called pi you can use the sudo usermod -a -G tty pi command to add it.
Finally the file starts the x server environment and calls the second script.
#!/bin/sh
DISPLAY=:0 xrandr --output HDMI-1 --rotate right
unclutter &
xset -dpms # disable DPMS (Energy Star) features.
xset s off # disable screen saver
xset s noblank # don’t blank the video device
matchbox-window-manager &
chromium-browser --incognito --kiosk http://localhost:8080/ # MagicMirror runs on 8080 by default
The display line rotates the connected screen by 90° to the right as I am using it this way (you can also use left/normal/inverted). This setting does not survive a restart which is why I added it here. Delete it if you do not need it. You are supposed to use display_hdmi_rotate=1 in /boot/config.txt on some models to rotate the screen but that did not work for me here.
Afterwards it start the unclutter program to hide the cursor, disabled some screen saver settings and finally starts the chromium browser to show the website. If you changed the port in the MagicMirror config file you need to also update it here.
That’s it, now you should be able to start the software via ./start_magic.sh. It will only run until you restart the Pi.
How to auto start MagicMirror² on the Pi Zero W
To fix this we can also automatically start the software after each reboot. There are a couple of different ways to achieve this but for now I am using this one:
# enable auto login
sudo raspi-config
# -> system options, console auto login

# now add some lines to your profile file to start the scripts
nano .profile

# then save and reboot to test
sudo reboot
In the .profile file you can add any command and it will be run at startup. I added this to start the program:
#Start mirror on profile load, but only if this isn't an ssh session
if [ -n "$SSH_CLIENT" ] || [ -n "$SSH_TTY" ]; then
    echo "Hello, SSH!" # SSH session, do not try to launch SmartMirror, or it will make configuring things difficult
else
    sh ~/start_magic.sh # Not an SSH session, run SmartMirror
fi
Now the software should start after each reboot. It will take 1-2 minutes though so be patient. I will also investigate some other ways and add my findings here later.
Using a the MagicMirror_scripts
An alternative to this straight forward but a bit time consuming installation process is using a premade installation script. The (semi)official MagicMirror_scripts repository provides such a script. The installation even supports the Pi Zero W and the newest version of Pi OS. Make sure to install the full version though, not the lite one I used. Installation is as simple as:
bash -c "$(curl -sL https://raw.githubusercontent.com/sdetweil/MagicMirror_scripts/master/raspberry.sh)"Then the software can be controlled via the pm2 task manager like:
pm2 start MagicMirror
pm2 restart MagicMirror
pm2 stop MagicMirror
pm2 logs
In my case everything was working but the screen rotation was still wrong. I fixed this by adding the DISPLAY=:0 xrandr --output HDMI-1 --rotate right line to the MagicMirrors/installers/mm.sh file. I have also switched to using the lightweight Midori browser as Chrome in this setup pretty much maxes out the CPU. All of this results in a mm.sh file that looks like this:
cd ~/MagicMirror
export external_browser=midori
DISPLAY=:0 xrandr --output HDMI-1 --rotate right
DISPLAY=:0 npm start
I also had to manually add unclutter to get rid of the cursor.
Control the TV via CEC from the Pi Zero W
Now the Pi will show the MagicMirror image on the TV. You can control the Pi itself in various ways including SSH but what about the TV itself? I was looking for an automated way of doing that and thankfully the Pi supports CEC – a way of controlling a screen via HDMI.
This is a good tutorial on CEC with the PI but here is how to do it quickly:
sudo apt install cec-utils

# now you can use it like
echo 'scan' | cec-client -s -d 1

# which will show something like this if your TV supports CEC:
opening a connection to the CEC adapter...
requesting CEC bus information ...
CEC bus information
===================
device #0: TV
address:       0.0.0.0
active source: no
vendor:        Philips
osd string:    TV
CEC version:   1.4
power status:  on
language:      ger


device #1: Recorder 1
address:       1.0.0.0
active source: no
vendor:        Philips
osd string:    CECTester
CEC version:   1.4
power status:  on
language:      eng


currently active source: unknown (-1)

# 0 is the TV, 1 is the pi itself
# now you can turn the screen off
echo 'standby 0.0.0.0' | cec-client -s -d 1
# or on
echo 'on 0.0.0.0' | cec-client -s -d 1
# or get the current state
echo 'pow 0.0.0.0' | cec-client -s -d 1
More to come
After a couple of days of trial and error I finally managed to get everything working like described here. I hope this will also help others in the same situation. If you find anything here that is not working or could be done better please send me an email or a message on Twitter and I will update this post.
I am also still experimenting with better ways to run the software and might also add some monitoring in the future.
There will also be other posts here describing how I built the mirror itself and how I set up my current screen. Here is a sneak peek: