Simple Home Assistant configuration backup to the cloud with Docker
If you run the supervisor version of Home Assistant (or Home Assistant OS) a backup solution is built-in. If you prefer the more flexible installation via Docker there is no such solution. Here is how to keep regular backups of your Home Assistant configuration when running it in Docker.
Running Home Assistant via Docker(-compose)
I prefer hosting my services directly via Docker and docker-compose for easier management. You can find my full setup for my smart home server here on Github. As you can I see I simply added a container for Home Assistant here, using the Raspberry Pi 4 version. You can find the full code in this file.
homeassistant:
    container_name: homeassistant
    restart: unless-stopped
    image: homeassistant/raspberrypi4-homeassistant
    #devices:
    #  - /dev/ttyUSB0:/dev/ttyUSB0
    #  - /dev/ttyUSB1:/dev/ttyUSB1
    #  - /dev/ttyACM0:/dev/ttyACM0
    volumes:
      - ${DATADIR}/homeassistant/config:/config
      - /etc/localtime:/etc/localtime:ro
      - /dev/serial/by-id/:/dev/serial/by-id/
    # alternative needed for auto discovery, bluetooth,...
    network_mode: host
    #privileged: true
    depends_on:
      influxdb:
        condition: service_healthy
      mosquitto:
        condition: service_started
    #ports:
    #  - 8123:8123
    environment:
      - PUID=${PUID}
      - PGID=${PGID}
      - TZ=${TZ}
    labels:
      - "com.centurylinklabs.watchtower.enable=false"
    logging:
      driver: loki
      options:
        loki-url: "http://localhost:3100/loki/api/v1/push"
The service runs along with a couple of other related services like InfluxDB for my Grafana setup and Loki to aggregate all the service logs in my dashboard too. All the data is stored in one folder on my SSD as defined in this line: ${DATADIR}/homeassistant/config:/config.
This setup works great: updating the Home Assistant version can be done via two simple commands (pull and up) and all the containers data is stored in the one folder on my SSD. This means moving my Home Assistant instance to new hardware or recovering from some error means I just need to copy this data and start a new container.
One thing is missing though: proper backups. Over the last months and years I spent a lot of time setting up Home Assistant and it’s data so I do not want to loose it. After playing around with a couple of different backup solutions I found one that is easy to set up and works well.
PS Quite quickly after I wrote this post Home Assistant updated to version 2022.4.0 which now contains a backup function even if you are using a Docker image. This is a great addition! It still does not solve the issue of offsite backups though, so it might still be a good idea to use Duplicati as described here to copy these backups to some cloud service. It is also a neat solution to back up other (smart home related) data.
My backup solution for Home Assistant config: Duplicati
Duplicati (2) is a simple to use backup software that can encrypt all your backups and store them not only locally but also on a set of remote locations. I have my own Nextcloud server running so I chose to back up my data to that using the Webdav target supported by Duplicati.
Installation on a Docker based system is easy as there are at least two good images: the official one and a version from Linuxserver.io. I have used the linuxserver images quite often so I chose that.
duplicati:
    image: lscr.io/linuxserver/duplicati:2.0.6
    container_name: duplicati
    restart: unless-stopped
    environment:
      - PUID=${PUID}
      - PGID=${PGID}
      - TZ=${TZ}
      #- CLI_ARGS= #optional
    volumes:
      - ${DATADIR}/duplicati/config>:/config
      - ${DATADIR}:/source
    ports:
      - 8200:8200
    logging:
      driver: loki
      options:
        loki-url: "http://localhost:3100/loki/api/v1/push"
It is important to map the folders you want to be able to back up. I did this with my whole docker container data folder via ${DATADIR}:/source. If you want to store backups locally you could also add another volume linked to some backup location.
I also noticed later on that the PUID/PGID settings for the user used inside the container are quite important. I started using the local users PUID (like above) but switched to PUID=0 after Duplicati was not able to access some files that were stored as root by other containers. That fixed the issues for now.
The idea is to use Duplicati to regularly back up all the important container data to a remote location while keeping a couple of old versions of the data.
Setting up a backup with Duplicati
Once the Duplicati container is started its web UI can be reached on port 8200 (by default). After visiting the site for the first time you are asked to set a new password (you can skip that if none else has access to your network I guess). Then it is time to creat a new backup.
In the first screen you can set a name, description and enable or disable encryption of the data. I decided to not encrypt it as I own the server on the other side. In any other case I recommend encrypting the data.
Next you have to set the target of the backups. Google drive, Dropbox, S3 and lots more are supported by default but if you want to back up to Nextcloud you should choose WebDAV.

Enable SSL and enter your server and port (443 by default if you are using HTTPS). In the path you have to use something like remote.php/dav/files/<username>/<path>/<toBackup> where the last part is the folder structure inside your Nextcloud account. In my case I have a Backup folder there and a Homeserver folder inside that one. The backup files will be stored in that folder.
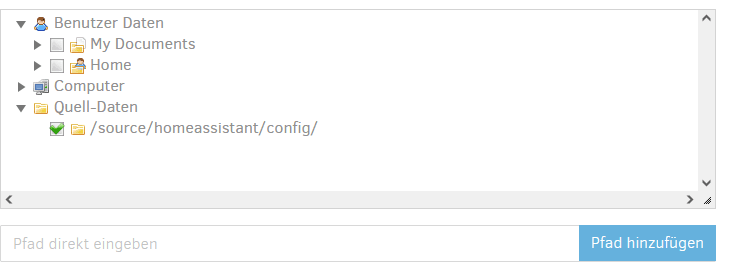
A click on check connection will do just that and also ask you if the system should create the backup folder if it does not already exist. Next you have to provide the path to the data that should be part of the backup. Remember that this will be a path inside the container so if you follow my example it should start with /source followed by the parts of the linked folder you want to back up (in my case /homeassistant/config/).
Next you can choose to automatically run your backup(s) at certain times and days. I run mine each day at 03:00 in the morning when I am asleep.
On the final page you can choose the size of the files stored on the target. You can stick with the default size of 50mb or increase it. Duplicati will not store single files but instead combine them in bigger archives – their size can be controlled by this setting. Finally you can choose here how many old backups should be kept. I choose the intelligent option which keeps one for each of the last 7 days, 4 weeks, 12 months, … and removes everything else.
Running a backup
After you are done configuring the backup(s) you need to only run them. Either wait until that is done automatically or use the “backup now” button on the main page of Duplicati. Depending on how much data you want to back up the process will take some time.
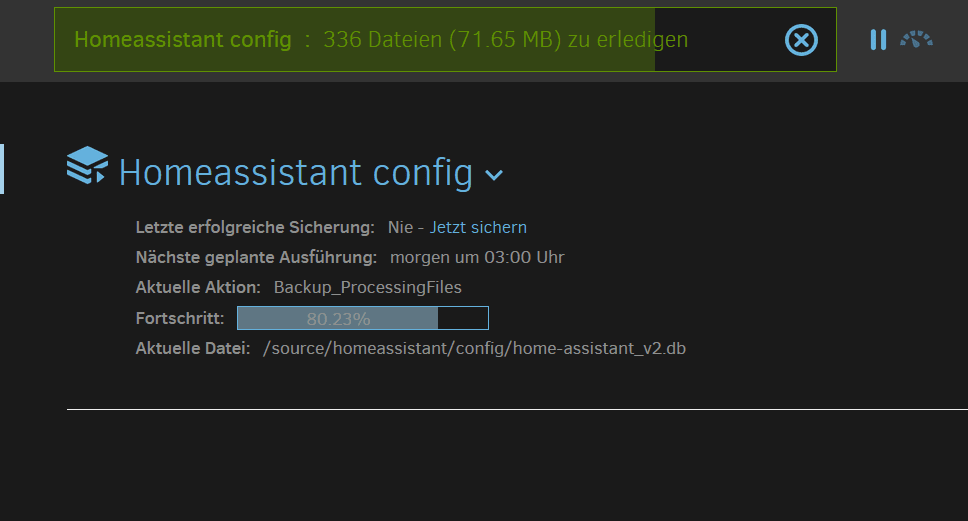
So far the backup process has work flawlessly for me. If you need more information you can always check the protocol (hidden behind the small arrow beside your backup name) to see exactly what happened during a backup run.
Restoring data from Duplicati
Restoring my data in case something fails should be easy. Set up a new Raspberry Pi, install docker-compose and run the files from my Github account to get my containers back. Start Duplicati and point it to my Nextcloud to recover my data.
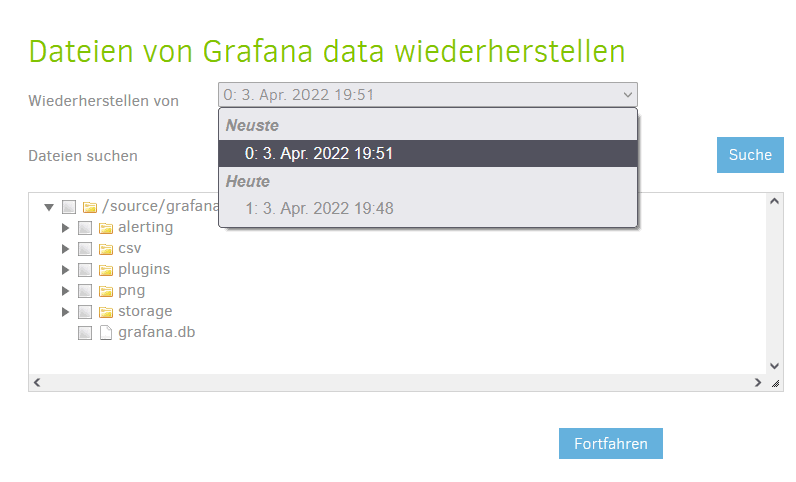
There is a “recover” option in Duplicati which lets you choose for each backup which files and which version (different dates/times) to recover. You can save them to there initial path or chose another one. You can also override existing data and even recreate read/write settings.
While maybe not as simple as the built-in solution in Home Assistant OS Duplicati is even more powerful with many remote targets supported, encryption build in and automatic version management. You can also use the same solution to back up data for any other container.
So far this has worked great for me although I never had to use it yet (fingers crossed!). Let me know how you back up your data!


