How to use Zigbee2MQTT with Home Assistant – A quick start guide
Open source software like Zigbee2MQTT and Home Assistant are a great alternative to (more or less) closed systems like Philips Hue. It can be tricky to get started though. Here is a quick start guide allowing you to use all the advantages like full offline control and the possibility to combine devices from many different manufacturers.
What is Zigbee, what is Zigbee2MQTT?
I try to keep this as short as possible but here is some background information. Smart devices need to communicate with each other and with a gateway connecting them to other networks (like your plain old LAN network). This is needed so that pressing one button can tell other lights to turn on for example.
Consumer devices like smartphones and computers usually communicate via LAN of Wifi. Some smart devices also use Wifi but most do not as it just needs too much energy for devices running 24/7. Instead many, like the Hue smart bulbs, use Zigbee – a similarly wireless communication standard made for low energy consumption. Such devices can last years with one small battery.
Zigbee networks even build a mesh, which means every device with a non-battery power source can extend the range of the network. These devices can not directly talk to your LAN or Wifi networks though so you usually have one “bridge”, “controller” or “gateway” in your network which is able to talk to both networks and translate between them.
While many smart home components speak Zigbee their gateways are often designed to only accept a limited range of devices. You can get around this restriction by using a PC with a small Zigbee USB stick and some open software to control it. There are two popular options: ZHA build into Home Assistant or Zigbee2MQTT. I compared them here.
Both systems are free and open source. This guide will talk you through using Zigbee2MQTT together with the open smart home control software Home Assistant.
The hardware you need
You can run this software on a range of different hardware solutions, the full list can be found on the Zigbee2MQTT manual. I am currently using a Raspberry Pi 4 as a cheap and power efficient server to run Home Asistant, Zigbee2MQTT and more. The easiest installation method is using Docker containers in my opinion. I published all the configurations needed on GitHub but more on this later.
You will also need an adapter so that your computer can talk to the Zigbee network. I am currently using the popular Sonoff Zigbee 3.0 dongle and also the TubesZB coordinator but other devices also work. In this guide I will be using the wireless Sonoff Zbridge connected via Wifi.
For the server:
A Raspberry Pi, preferably the Pi 4 with 2 or 4 GB of RAM
A USB (C for the Pi 4, Micro USB for the older ones) power supply with around 3.0A
A microSD card, 16+GB from a reliable manufacturer, should be fast: class 10/UHS-1
Optional: a case (with cooling) for the Pi or at least heatsinks
Optional: if you don’t have one yet buy a SD card reader/writer
Optional: Network access. Either a LAN cable or if you are not using a newer Pi a seperate Wifi USB dongle.
Alternatively you can get a kit including everything you need
For Zigbee:
Sonoff Zigbee 3.0 dongle plus
+ a USB extension to avoid interference
Sonoff Zbridge Wifi-Zigbe bridge
If you are interested in buying a Raspberry Pi consider doing it via my affiliate links above. It does not change prices for you and allows me to pay for the servers 😉
Installing Home Assistant, MQTT and Zigbee2MQTT
The best method for installing all the software depends on your exact usecase but most of the time I found Docker and docker-compose to be the simplest solution. New software can be added or existing updated with just a couple of commands and you get some additional control like simple port remapping and resource limits.
But first what software do we need?
- Home Assistant: A very powerful open source tool to control all your smart home devices. It integrates with pretty much everything and you can use it to write powerful automations. There are even blueprints to make that easier. This will control your devices via MQTT.
- MQTT broker: MQTT is another smart home protocol that pretty much all tools in this space understand. You need a so called MQTT broker that will store and forward messages from devices. I chose the easy to use and open source broker Mosquitto. Home Assistant will subscribe to this broker to receive updates from the devices and send messages to them via the broker.
- Zigbee2MQTT: This (also open source) software connects your Zigbee network on the one hand (via the Zigbee USB stick) to your MQTT broker on the other hand thus bridging the divide between Zigbee and LAN/Wifi.
First you need to install Docker and docker-compose. This changes depending on the OS you are using. For the Raspberry Pi running Linux you can just type these commands into a terminal:
Click here if you are using an older Pi OS
If you are using an older Pi OS you will need to install docker-compose via pip3. For newer systems docker compose (with a space) comes with the normal Docker installation. Install it via:// now we need pip3 to install docker-compose sudo apt install -y libffi-dev libssl-dev sudo apt install -y python3-dev python3 python3-pip sudo pip3 install docker-compose // check if docker-compose is working docker-compose version
// lets update all the software
sudo apt update
sudo apt upgrade

// needed later to clone the repository
sudo apt install git

// install docker & docker-compose
curl -sSL https://get.docker.com | sh

// allow our default pi user to use docker by adding it to the docker group
sudo usermod -aG docker pi

// check if it worked
docker version
docker compose version
Now we are finally able to run all the software needed. You can use my example compose file from my GitHub. Again you can use the terminal to clone the repository, set up your environment and then start the software via:
git clone https://github.com/OliverHi/smarthomeserver
cd smarthomeserver

// now update the variables in the .env files to your liking via
nano .env

// update your Zigbee2MQTT config and copy it to the right place
cp zigbee2mqtt_configuration.yaml pathOfYourDataFromEnvFile/configuration.yaml

// if you just want the tools mentioned here ignore the hosting.yml file and remove all the logging: ... parts from the smarthome.yml file

// now start the programs
docker compose -f smarthome.yml up -d # use docker-compose command instead for old OS versions
// this will take a long time the first time you run it because it downloads all the images. It will be faster the next time
Once the installation process is done you are now running Mosquitto, Home Assistant and Zigbee2MQTT but also Grafana and InfluxDB if you want to build some nice dashboards later.
Configuring Zigbee2MQTT
The last step before actually adding devices is to configure Zigbee2MQTT. While there are many possible configurations I will describe my setup here. All the configuration lives inside a yaml file in the data folder in your Zigbee2MQTT share (see .env file to find that folder). In most cases you can just copy and adapt the config file from the Github repository.
# example config for usage with the Sonoff Zbridge controller and Home Assistant
homeassistant: true
permit_join: false
mqtt:
  base_topic: zigbee2mqtt
  server: mqtt://192.168.2.4 # your mqtt broker IP
serial:
  port: tcp://192.168.3.6:8888 # IP of your Zigbee bridge
  adapter: ezsp
frontend: true
advanced:
  network_key: GENERATE # generates a new key on first start and automatically replaces this
In this case the most important thing is to update the IP addresses of your MQTT broker and your Zigbee bridge (if you are using a network based one). If you use one connected directly via USB delete the “adapter” line and change the port to the one your are using (like /dev/ttyUSB0 for example).
The rest of the settings tells Zigbee2MQTT to play nice with Home Assistant, to enable the web frontend and to automatically create a new network key (similar to your Wifi password).
Thats it! Restart Zigbee2MQTT with docker-compose -f smarthome.yml restart zigbee2mqtt and you are up and running.
Connect new devices to Zigbee2MQTT
Now the last step is to actually connect devices to Zigbee2MQTT. If you are looking for inspiration I have a list with my devices here and there is an official one here. The first step is to allow new devices to join your network via the web interface. Open ipOfYourServer:6080 (if you are using my setup, might be port 8080 otherwise) and click the “Permit join” button at the top right.
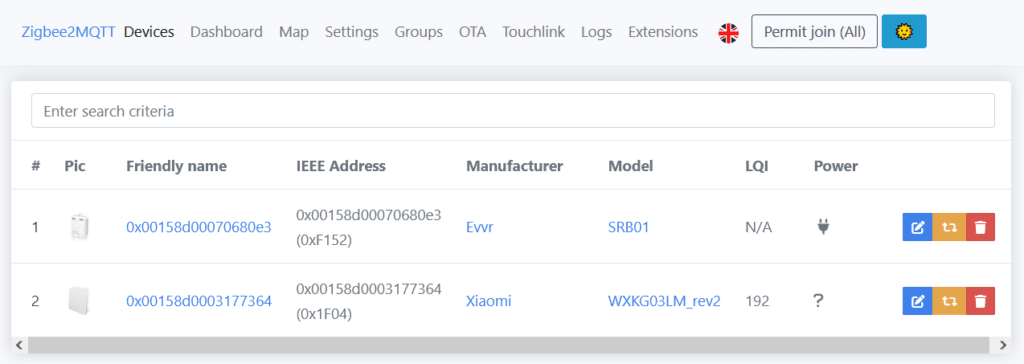
Next you need to tell your device to connect to a new network. How to do that depends on the device and is usually listed in the manual. Most of times you need to press a reset button or long press a normal button. If it works your new devices should show up in the Devices tab and you should see some messages in the Logs tab.
If you are having trouble with the device not showing up try to move closer to the server (but not too right next to it). In case of some battery powered devices, like the Aqara sensors, it might also help to regularly click their button for some time after the reset. This will wake them up.
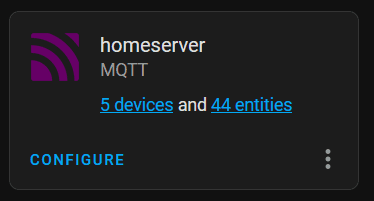
Finally once your device shows up in Zigbee2MQTT you should now also see it in Home Assistant via the MQTT integration. If you have not added that one yet click the “Add integration” button in the integrations menu and select MQTT. Enter the IP address of your MQTT broker and leave the port at default.
That’s it, you can now use pretty much all Zigbee devices from most manufacturers. If you want to know more check out my more in-depth guide for a setup with OpenHab or how to use ZHA as an alternative. If you are looking for new project I have links for each devices that I used in a project on the overview page or you can just read the rest of this blog. Have fun!


