3D printing is awesome – custom battery holders
You often have a lot of small things cluttering up your desk and you wish there were a way to organize everything? A custom battery holder can bring order to your tinkering desk. Get your 3D printer ready and start building custom cases and holders for everything. Here is how I organized my batteries with a set of custom battery holders.
Battery storage needed
I have been building a lot of electronics projects and I own a range of battery powered devices. So naturally over time I have built quite a collection of different batteries. I used to just put them all into one box that way it is hard to find one kind of battery quickly. Then I stumbled upon some awesome custom battery holders on Thingyverse.
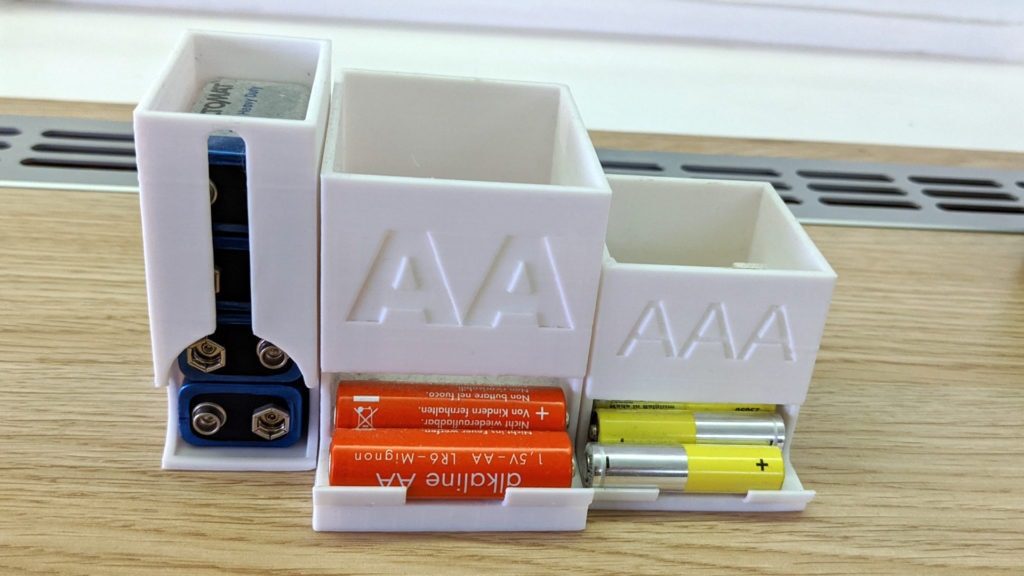
Of course I had to print some of them for myself. The great thing about them: not only do they keep your batteries organized they are also kind of “self-reloading”. When you take out one of the batteries at the bottom the ones above it will slip down to take its place. Great idea!

This only works for the AA and AAA battery holders and those are round. The one for the big 9V block batteries is just a simple tower. If you remove the one at the bottom the rest will fall down, replacing it. Not as graceful but still working just fine.
Unfortunately it has been a long time and I can not find the exact models anymore. Fortunately for anyone reading this there is still a huge variety of models available. For example here is one that combines the AAA and AA battery holders. Here is a version for pegboard and a thin one that can stand up. Here is another very nice looking one that is supposed to be stackable.
3D printing them
I used a Teevo michelangelo printer for these. Fortunately they are very simple geometries as this printer does not have a heated bed. You can go with the standard settings of you preferred slicer. If you are having issues with bed adhesion I would recommend adding a brim to hold the base in place. A warping base would ruin the whole piece.
The infill can be minimal as there wont be huge forces against the walls. The most tedious part here is that with most of the design you will not be able to avoid adding automatic supports on the inside to support the ramps. Make sure to minimize those as it will be exhausting to remove later. I had to file down some of the areas because the support material would leave small bumps on the surface. The surfaces needs to be pretty smooth though to allow the batteries to roll down.
Overall it is still a great project that only takes a couple of minutes of slicing and some hours of printing to clean up your desk. For me it became part of my DIY lab on my desk.

Overall this was another great example for me why 3D printing is awesome. Of course you could probably buy something similar but here you just need some time and a little bit of material to get exactly what you need.
If you are looking for more things to build check out my LED headphone holder or the great wood and epoxy coffee table. You are looking to mix smart home and furniture? Here is my smart wardrobe with automatic animated lights.
If you are looking for more DIY and smart home projects subscribe to my newsletter or follow me on Twitter!