A DIY electronics lab for beginners – cheap but powerful
If you are into smart home technology or just generally like to build things yourself you won’t get around collecting a couple of lab devices. But devices like a lab bench power supply can be very costly and take up too much space to justify for a beginner, right? No! Here is how to build an affordable and space efficient DIY electronics lab right into your desk.
A history of my current work desk
I have always been interested in technology and building stuff myself. A couple of years ago I started building my own electronics projects (the first one was a wordclock actually, but more on that in a future post). You’ll notice pretty early on that just putting everything together on a breadboard will not cut it. More equipment like a soldering iron and a power supply is needed.
Equipment for electronic projects can be very costly and take up a lot of space though. Especially when you are starting out you might not want to invest a lot of space and money into this hobby (yet). I felt the same at the time so I decided to go with cheap and space efficient solutions wherever possible. Why not use the skills I already have? DIY and building custom furnitue. Over time I built my own DIY electronics lab.
It started with a couple of rolling boxes that I could store all my devices and parts in and morphed into a part of my current work desk.

So here is what I consider important for simple DIY project, how to get it for cheap and which tricks I found to store everything efficiently.
What a beginner needs – parts for your DIY electronics lab
Of course this list might differ depending on what you are planning to do but it has served me well over the years. More expensive options are definitely better on many occasions but this will be enough for simpler projects.
Microcontroller & parts
For pretty much any modern electronics project you will have a microcontroller at the hearth. If you are new to this whole thing I definitely advice you to start with an Arduino. They come in many forms and shapes but they all use a relatively simple programming language (or rather dialect) with lots of libraries you can use. Go with Visual Studio Code + PlatformIO as a plugin for a more advanced solution.
On the hardware side Arduino Uno’s are still a great way to start in my opinion. If you want to spend less money but still use Arduinos then buy cheap Pro Minis (usually get the 3.3V) from online shops. You can get them for very cheap off of Aliexpress.
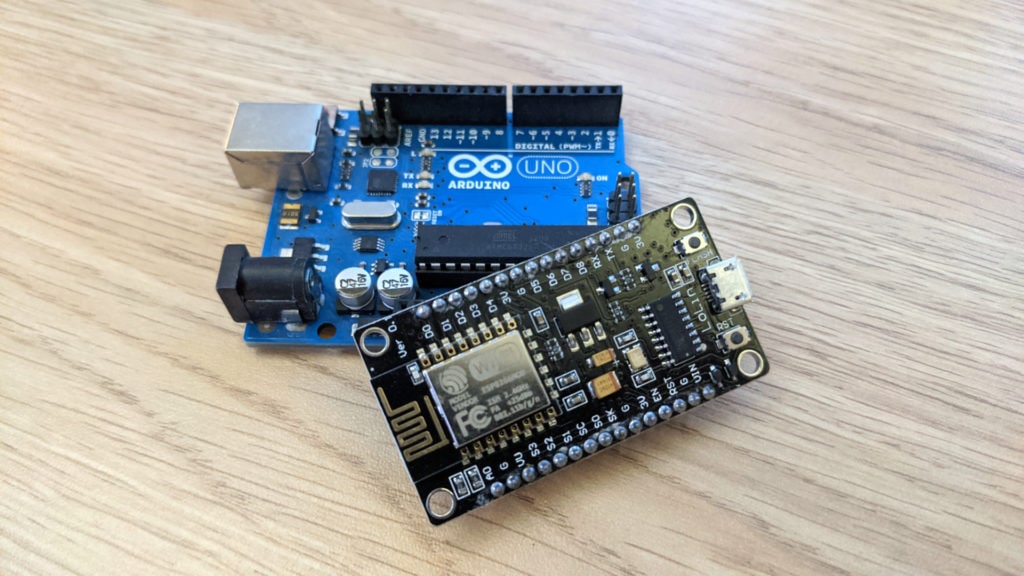
For anything more modern or connected go with the ESP8266 based modules like the NodeMCU. They can still be programmed via the Arduino code but they include Wifi and are even cheaper. There is an even newer and better ESP32 but that might still be harder to program sometimes.
- Arduino Uno or Arduino Pro Mini
- ESP8266 (single part) or NodeMCU (full board)
- ESP32 board (have not tried that one myself)
- Resistors (I can recommend getting 1k, 4.7k, 10k Ohm especially)
- Capacitors (I can recommend getting 22nF, 100nF, 100uF, 47uF but this really depends on your projects)
If you are interested in buying any of those parts consider doing it via my affiliate links above. It does not change prices for you and allows me to pay for the servers 😉
For parts I advice getting a couple of often used resistors and capacitors (usually in through-hole not SMD versions if you are starting out) as well as some voltage regulators. In my experience kits with lots of parts often include too much stuff you won’t need but they might be worth it if you are just starting.
In general my advice is to buy these generic parts for very cheap online. Delivery might take a couple of weeks but its very cheap if you order from China. Everything else you can just buy from local stores (or Amazon) when you actually need. It will be more expensive though.
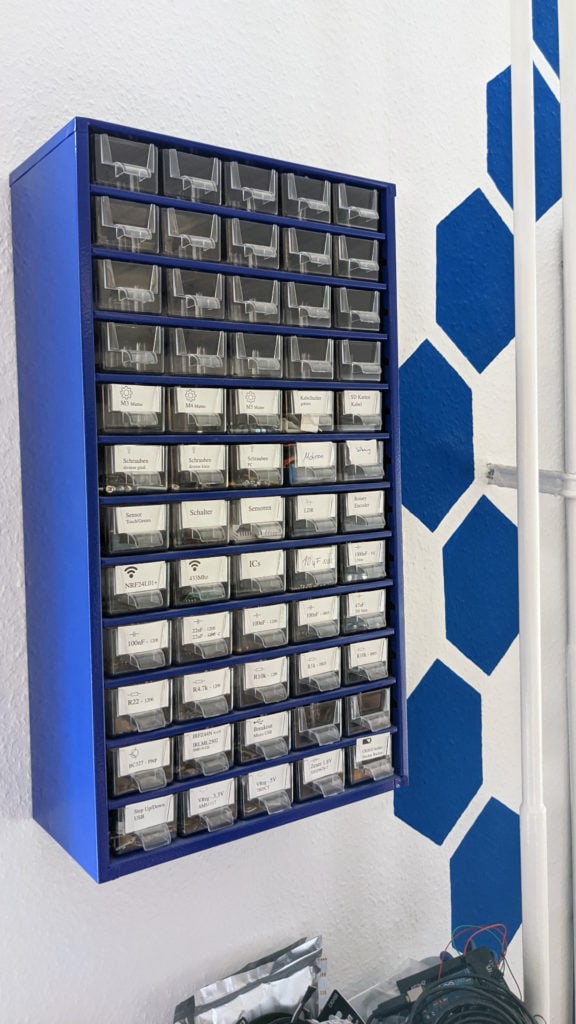
For storage there is a trade-off between space and accessibility. For me the best solution is a drawer on the wall combined with a rolling container under the desk. Both do not take much space. The drawer holds parts I need more often and is easily accessible and the container stores all the rest.
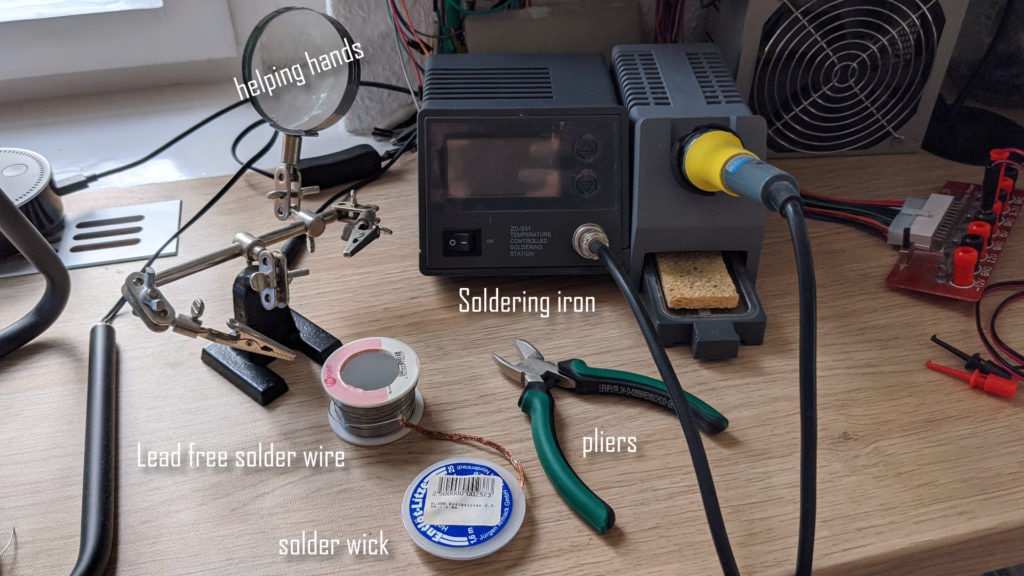
Soldering iron
There is not too much to say about soldering irons, at least for beginners. Get a cheap soldering iron. Avoid battery powered ones and get a couple of different tips (a fine and a flat one for example). Get some lead free solder and you are ready to go. To actually work efficiently there are a couple other things I collected over time.
Get a soldering arm (also called helping hands or third hand) that you can use to position the pieces you are working on. Tweezers for holding filigran pieces and desoldering wick to fix mistakes are less important but can also be very helpful. I also always have a couple of shrink tubes in different sizes on hand to protect the soldered spots.
A device that is not always needed but comes in very handy at times is a desoldering pump. You can get very cheap spring based ones.
I would buy the solder locally to ensure good quality, as it might impact your health (in general try to solder with an open windows nearby if possible). The soldering iron itself too, everything else can be bought for cheap online from China (or wherever available). Investing in a more expensive set of tweezers might be a good idea though, even for a lot of other DIY projects.
Supporting material
There are a couple of additional things you will need. For me those are mainly a couple of different sized breadboards to try out a new circuit quickly as well as some male/female depont cables. You can get away with buying pretty cheap components here but do get some different colors and lengths of cable to make your circuits as clean as possible.
Some cables with alligator clamps can also come in handy if you want to connect some existing components.
What I found to be really important and used quite often is a serial to USB (sometimes called serial to TTL) programmer. It can be used to burn a bootloader onto a new microcontroller or fix the existing one. Most importantly I used it a lot to flash Tasmota onto my Sonoff devices. The adapter is quite cheap. Get a version that allows you to use both 3.3V and 5V if possible. For ease of use I recommend also buying some spring loaded pins and solder them onto a cable that you can connect directly to the holes in the PCB. If you already own an Arduino with a USB interface (like the Uno I described above) you can also use that as a programmer. I still prefer the serial adapters, as they are small, cheap and do not require additional steps.

- Serial to USB 3.3V adapter
- Spring loaded pins (get the right size for your projects)
If you are interested in buying any of those parts consider doing it via my affiliate links above. It does not change prices for you and allows me to pay for the servers 😉
As a bonus: get a proper wire stripper. You can of course strip wires using a knife if you have a very tight budget but using a wire stripper will be much faster and cleaner. When considering which one to buy I can recommend some great videos from Andreas Spiess on Youtube.
Power supply
A good power supply is a must have for everything playing around with electronics. After all they need power to run. There are great bench power supplies out there that allow you to change the output voltage and limit current flow. The problem is their price: they can be really expensive.
Fortunately there are a couple of ways around this. One I have seen quite often is buying a step-up/down voltage converter and build your own power supply. Here is a great one from GreatScott. The problem with this solution is often the available maximum power. I found another solution for this problem. I had an old ATX PC power supply left over which can deliver 12V, 5V and 3.3V. Awesome, that is exactly what I need for my projects.

You can buy an adapter like this one above which breaks out the different voltages to separate terminals. Combine this with a set of matching cables and you have your own very high powered supply. It even includes a fuse. The only problem: you can’t manually change the voltage to anything but those three values and you can limit the current flow. Still worth it for me for a price of around 10€.
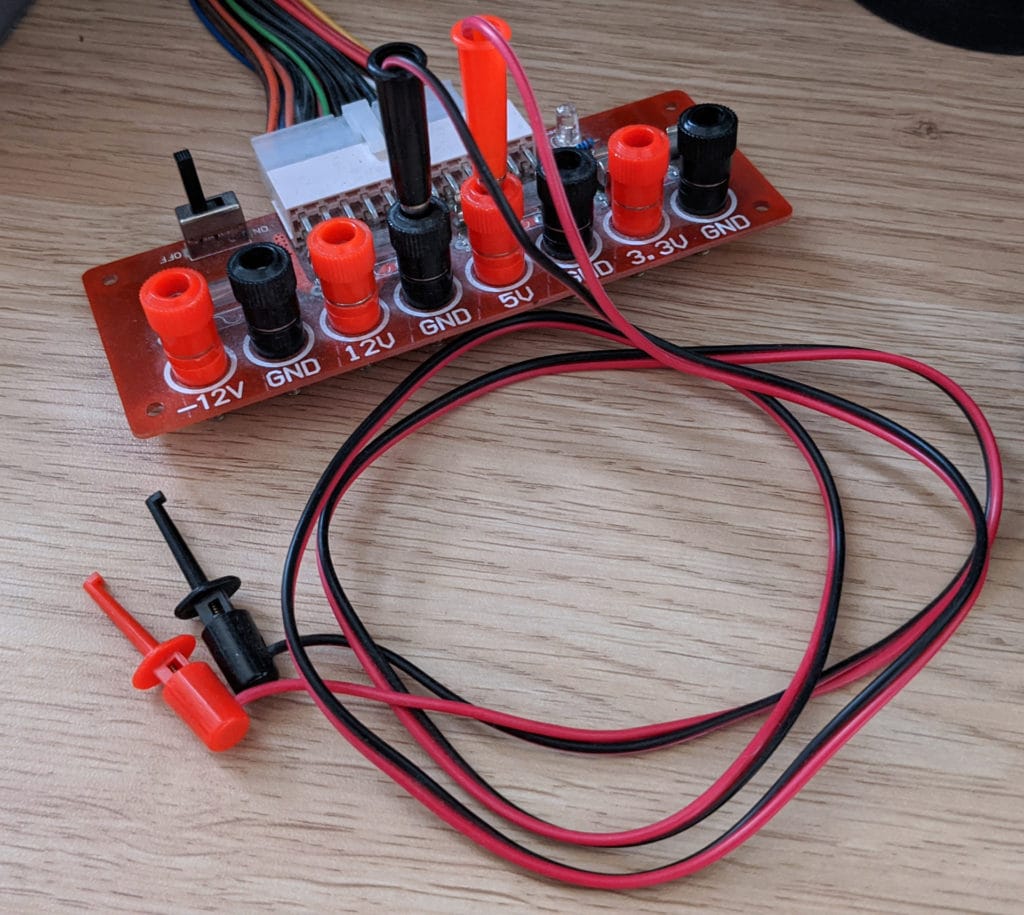
- ATX power supply adapter
- Cables with banana plug and proper connectors as the ones one the adapter were not the best
If you are interested in buying any of those parts consider doing it via my affiliate links above. It does not change prices for you and allows me to pay for the servers 😉
Oscilloscope
An oscilloscope is another really important tool for your DIY electronics lab. It allows you to measure voltage changes over time. There are awesome oscilloscopes out there with a huge variety of features. They are even more expensive than lab bench power supplies though. I think this is really something you can work around though, at least for beginner projects.
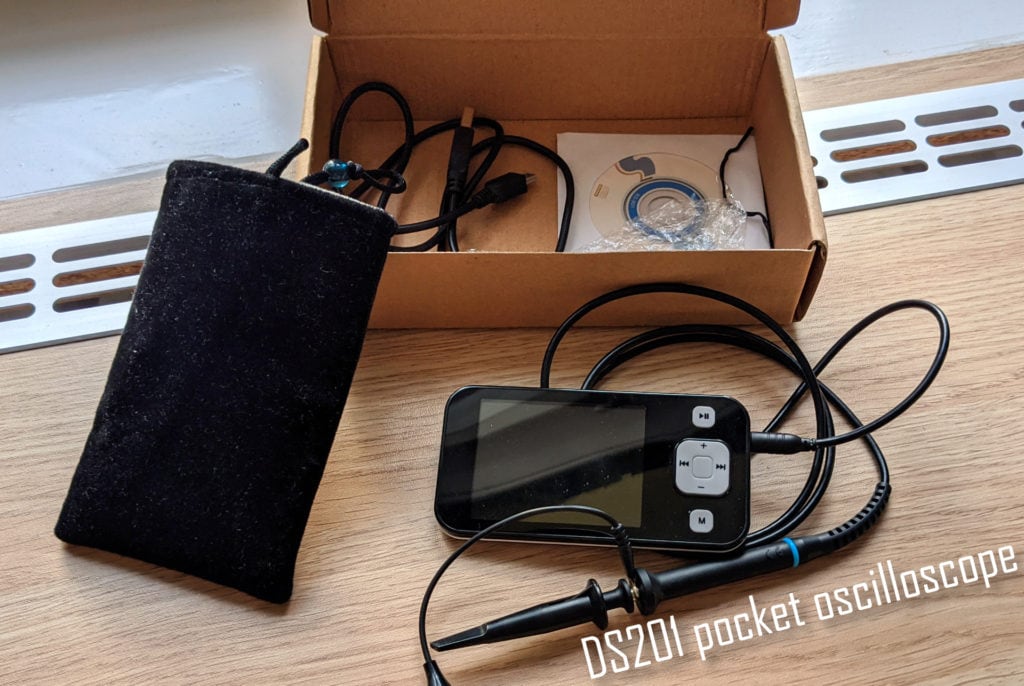
I avoided buying an expensive oscilloscope by using two cheaper devices. One multimeter to measure bigger currents and a cheap portable oscilloscope for everything else. I got the DS0201 digital storage oscilloscope as a gift a couple of years ago and of course (well this is a DIY blog) I flashed the better benF firmware. It has been working pretty well. Sure, big commercial oscilloscopes are way better, but they also cost a lot and they are not portable. Honestly I have never needed a better device for my simple projects though. Overall its a good beginners device (although there might be something even better out there by now).

Batteries
In the furthest corner of the desk there is also a set of different custom battery holders. As many electronic projects will need some I 3D printed some custom cases for them. I will write more about this in another post soon.

Overall I think it is quite possible to get everything you need to get started for 100-200€ if you are willing to take some trade offs and do some work on your own. Of course this may vary drastically (up or downwards) depending on what you are actually planning to do.
How to integrate the lab into your desk
Now that you know what devices I use and how I managed to get everything I need for my DIY electronics lab for as cheap as possible lets discuss some ways to store all of this.
When I moved to my current apartment I knew I wanted a big desk with some extra space for a mini lab. I was constrained by space and looks though as the desk is part of my living room. I solved this by building my desk into a corner of my room. One bigger part is used for my PC and paper work. I added another, less deep, part to the desk for my lab. It utilizes space in front of a window and heating pipes which would have been mostly wasted otherwise.
With a depth of only 40 cm it does not take up much space but it is enough to store my lab devices on top and some boxes with spare parts underneath. This is how it looks like.

On the wall above I added a small cabinet drawer with the most used parts. It looks ok (especially next to the pattern on the wall) and provides a lot of storage. I also added a transparent shelf over the desk to store some more boxes with spare parts and hide the power supply and soldering iron underneath.
There is still some spare space for office utilities like a hole punch. I also added a cable grommet and screwed a power strip into the bottom of the desk to hide most of the wires. Finally there are a couple of rolling boxes underneath the desk that I use to store office supplies and spare parts. They can be quickly moved to the side when that space is needed.

The small space in front of the window is great for working on projects. It is right in the middle of my PC and the “lab” so everything is accessible. I even added a USB hub on the desk. I can also open the window for fresh air when soldering and there is great light for working with small parts. I also have a small desk lamp close by for working during later hours and and Echo to play music or do some quick Internet searches without having to stop working.
Overall it has been a great solution to allow me to build all my projects without taking up too much living room space and wasting too much money.
I used this space to flash all my all my smart home devices, like the automated smart blinds and build more smart furniture like my wardrobe with smart lights. For more projects subscribe to my newsletter of follow me on Twitter.