Simple DIY smart blinds -solutions to automate & motorize your blinds
Do you want to wake up with sunlight on your face? Automated smart blinds are a great addition to your smart home and can make this possible! Unfortunately most solutions are really expensive and often not very usable. For the past years I have been on a quest to find a better DIY solution. Here are my findings.
What are smart blinds?
To be clear: in this article I am talking about indoor blinds. For the heavier outdoor there seem to be a lot of (sometimes cheap) motors available. Not so much for the smaller indoor variant.
There are also several kinds of indoor blinds. Some open by sliding up and down, those are the ones I am using. Others, venetians, open by tilting. They need a different kind of control but ready made solutions for those are available. Building your own DIY solution is also quite easy as not much power is needed to move them.
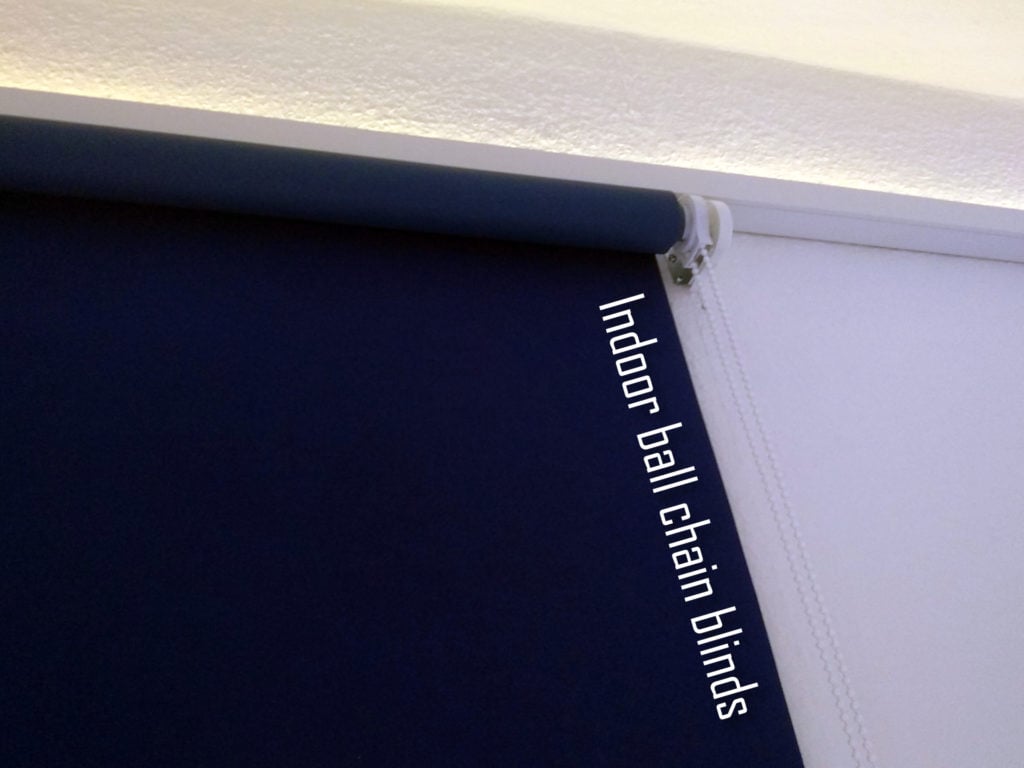
For my smart blinds project I am looking for a way to automatically open and close my blinds, controlled by my smart home control software (currently OpenHab). It should also be possible to partly open them. I was also looking for a clean solution without too many extra parts and wires.
Existing solutions
Several companies offer ready made motorized (more or less) smart blinds. Some of them look pretty good but there are a lot of problems here. Every single one of them is really expensive, most of them were limited to some countries (I was not able to find many that are sold in Germany) and they offered a very limited amount of connectivity. Controlling them via some open source software like OpenHab or HomeAssistant would have been very complicated or even impossible.
As I already have blinds and these solutions were too expensive I started looking for some other way. First I found some cheap 12V motors designed to drive (indoor and outdoor) blinds, mostly from no-name sellers from China. This looked promising but when I checked my blinds the diameter of the pipe that the material is rolled up on is too small for them. Most of them are designed for >=38mm diameters while mine was around 28mm. I found only a couple of very expensive motors for those.
The DIY solution
As I like building things my next idea was to look for DIY solutions. I found a great one on thingiverse. It uses a cheap 28BYJ-48 motor and a ULN2003 driver board, which can be bought for less than 5€, as well as some 3D printed parts to motorize the blinds. An awesome solution which even comes with software.
Luckily I do own a 3D printer (currently a Prusa Mini) which I used to quickly print the parts. They are all well prepared and pretty easy to print. I assembled the parts and the motor and tested them. It works great on my smaller blinds (~50 cm width and 2 m height) and even comes in different version for different ways of mounting. The motor noise is audible but not too loud. It is pretty slow but that is fine for me.
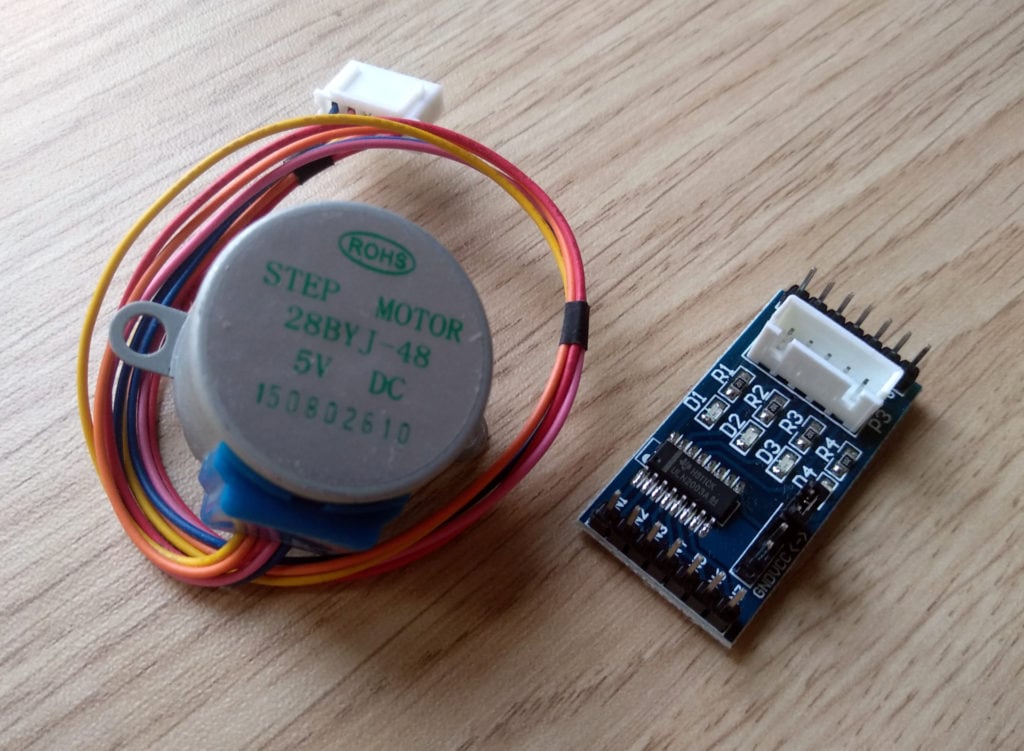
Unfortunately I also discovered pretty quickly that this small motor is just not very powerful. I have some pretty big blinds (~120 cm width and 2 m height) which are simply too heavy for the motor to lift. I was not ready to give up on this DIY solution yet though.

Instead I bought a 12V version of the motor and tried out some other designs with bigger gears. In the end I had to give up though. These small motors are simply not strong enough.
The indirect DIY solution
When I was just about ready to give up and buy one of the more expensive solutions I stumbled upon the awesome youtube videos from the Hook Up who has made a video just about this topic. In this video he tests some premade devices that do not directly move the blinds but instead attach to the bead chains that we poor humans have to use.
This concept is pretty cool as it allows us to control any blinds that come with such chain – converting them to smart blinds. One of the tested devices looks great to me: reasonable price at around 60$ with a really really strong motor, a power supply (so no recharging needed) and a Wifi connection build in, so no additional bridge is needed. So of course I had to buy it!
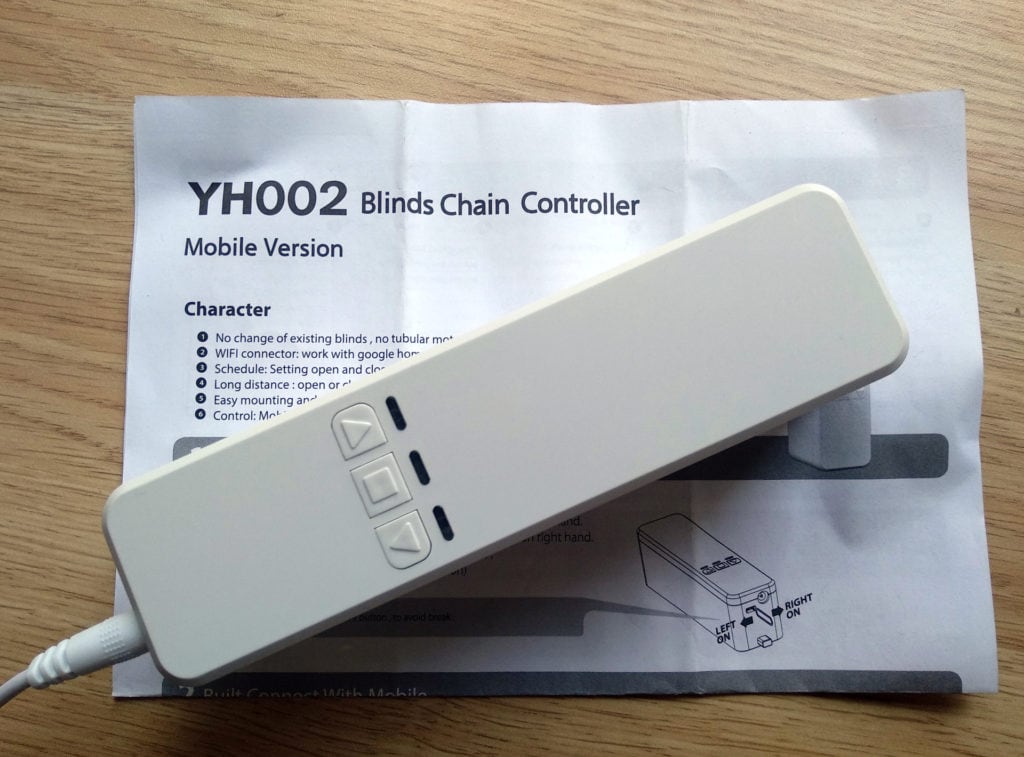
The device I received is called “YH002 blinds chain controller”. It has three buttons for manual control and comes with a wall mount as well as several different gears to connect it to different chains.
Now the the great thing about this device is that it runs on the Tuya firmware. This widely used firmware has severe security issues, which is great for us! Why, you are asking? Well some very smart people figured out how to use these to flash our own software onto the built-in ESP8266 chip. This even works wirelessly and is called tuya-convert.
If you are thinking about automating your blinds consider buying the hardware via my affiliate link(s). It won’t cost you more and pays for my server costs.
Small 5V 28BYJ motors with drivers
12V version of the motors
Zenismart YH002 Blinds chain controller or directly from Aliexpress where I ordered
How to own the device
A custom firmware like Tasmota will allow me to use the blinds controller fully locally, without any cloud, as well as to easily integrate it into my setup via MQTT. So I took a Raspberry Pi 4 that I just bought for another project and started to follow the super simple installation instructions of tuya-convert. You basically clone the repository and run the installation script.
git clone https://github.com/ct-Open-Source/tuya-convert
cd tuya-convert
./install_prereq.sh
Afterwards I pushed the “up” and “stop” buttons on the device for around 6 seconds to put it into pairing mode and started the convert process by typing ./start_flash.sh
The process is described in the console in further detail but be aware that you need another Wifi enabled devices. An Android smartphone works great (apparently iPhones not so much). The process was really simple and I was done after just a couple of minutes.
I decided to flash the default Tasmota firmware. After the conversion process was done I saw a new Wifi created by the blinds controller. You can simply connect to that and, same procedure as with any Tasmota devices, configure it to connect to your home network.
Configuring the device in Tasmota
Now we need to configure Tasmota to work well with this chain controller. All needed information can be found in the documentation. Basically you need to set the device to a template you can copy from the documentation first.

Afterwards it is very important to finish the set up process of the controller first. Otherwise none of the following steps will work. The process is described in the manual that comes with the device and is quite simple. Use the “up” key to drive the roller blinds to their upper limit. Now press the “stop” button for 5 seconds until it flashes red. Then press the “down” button to move it to the lower limit and again use “stop” to confirm.
Now you need to run two commands and create a rule to remap some pin IDs for Tasmota to properly work with the blinds. All of this can be done from the web console of Tasmota. Basically you need to go the console from the main menu and run these commands
TuyaMCU 11,7
TuyaMCU 21,2
Rule1 ON TuyaReceived#DpType2Id3 DO Dimmer %value% ENDON
Rule1 1
Afterwards you will see a slider in the main menu that you can use to control the blinds position.

Afterwards I recommend setting up MQTT via the Configuration tab to include the blinds into your smart home controller. More information and detailed configs for HomeAssistant can be found here.
Automations
Right now I am still experimenting with this solution but so far it seems to be working well. So far being able to raise and lower blinds with the click of a button (or Alexa) seems great already. In the future I want to actually automate this process though.
Fortunately I already have everything I need here. In my Zigbee2MQTT post I described my motion sensors already which also include a light/brightness sensor. Weather and time of the day is also available in OpenHab and lights are automated already. Using this information I could automatically lower blinds when my room gets too much light or gets too hot in the summer. This might help out my smart fan.
I am also planning to link the blinds to my automatic alarm and include it in my smart home theater scene. I will definitely write more about this later.
PS – the IKEA blinds
In all of this I have been ignoring one solution: the automated blinds IKEA is offering. This is mostly because I already have working blinds and when I started this project the IKEA Tradfri blinds were not available yet. They do look like an interesting alternative though. They are battery powered Zigbee devices that should work well with Zigbee2MQTT.
Update: I bought some Fyrtur blinds and connected them to Home Assistant via ZHA. While they are more expensive than a DIY solution they are also much easier to use and work fully wireless.


