Surprisingly simple way to start your smart home theater with OpenHab
You bought a Denon receiver for your home theater? You have a smart home? Why not combine both to a smart home theater? Imagine lights out, receiver on with one click! Like in the cinema…
My home theater setup
Here is an overview of my current (smart) home cinema setup. If you are just here for the “smart” part then just continue with the next part.
While I do enjoy watching a movie on the big screen in the cinema, occasionally it is nicer to have your own setup at home. Influenced by friends and family as well as my own urge to try out everything “techy” I did build a small home theater setup over the years.
It consist of a full HD Epson projector, the EH-TW7200, a projector screen, a Denon AVR-X2500H receiver and a set of 5.1 Teufel speakers. A Samsung UHD Blue Ray player and my PC are connected to the receiver to provide the video material. While this is not a high-end setup it works really well, is super versatile, is less obvious than a big TV (huge “screen” and the projector is out of the way) and has a nice money to performance ration.

If you are thinking about getting a some home theater devices too consider buying it them my affiliate link(s). It won’t cost you more and pays for my server costs.
Epson EH-TW7200 projector
Denon AVR-X2500H receiver
Teufel Concept E 150 speakers
For the projector I chose to go with a Full HD one, as the higher resolution models are still really expensive. I also decided to not just get the cheapest model, but one with good enough optics and the possibility to adjust the position of the projected image by a lot (horizontal and vertical lens shift. This allowed me to store it away on a shelf high up on the wall while still having a high quality picture on the opposite wall. Most cheaper models can only move the picture slightly, or loose image quality while doing that.
The projector screen is a very cheap model I bought on the Internet. I chose one that can slide into an unobtrusive white housing that you don’t really see on the wall. After installing it I noticed that it is quite a bit smaller than the image my projector can produce at that distance though. So I am rarely using it as the image on the white wall looks good enough (I know, I know… one day I will build a proper home theater).
To connect all my devices I am using a Denon AVR-X2500H receiver and I have to say it is quite a nice piece of technology. It supports up to seven 150W speakers (although I am only using a 5.1 system right now) and supports common codecs such as DTS and Dolby Atmos. It has 8 HDMI inputs and 2 outputs with HDCP 2.2 allowing me to connect pretty much any device I want to my home theater. It includes a microphone setup for calibrating your speakers and produces great sound with my speakers.
Honestly the fact why I love the Denon receiver for my setup is the amount of connection/smart features though. It is connected to my home network via Wifi (LAN is also supported) and can be connected to my phone via Bluetooth. This means I can play music directly via Bluetooth, or via Spotify Connect, Airplay (2) or Denons HEOS software. All these connections make it the cornerstone of not only my smart home theater but also my multi room audio setup.
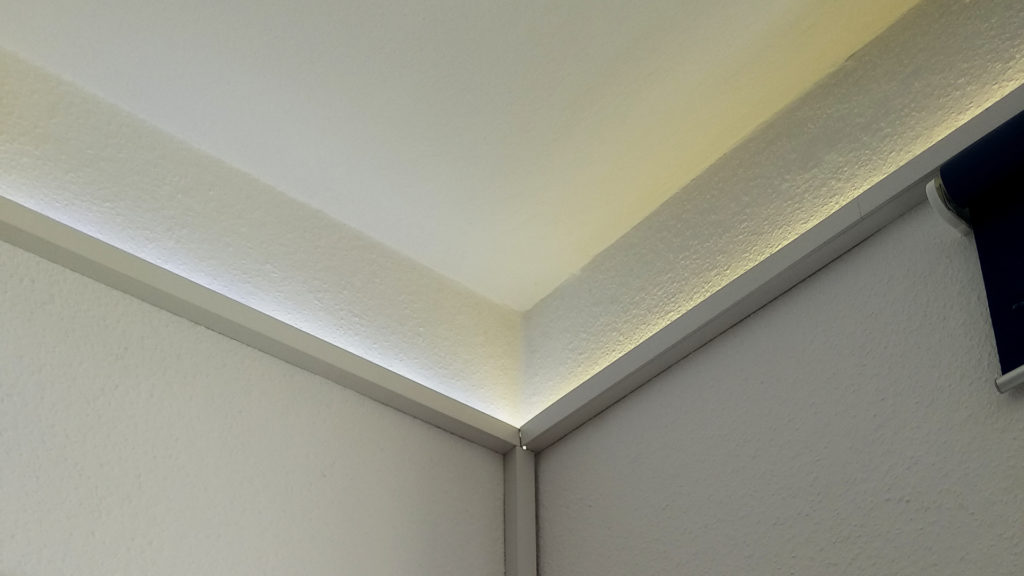
For about the last ten years I have been using the Teufel concept e 150 speakers. They are pretty small yet sound great. They have also survived all this time, including moving without any problems. I am always planning to build my own set of speakers but in my current setup there is just not enough space for bigger ones. The cables for my speakers are actually running through cable ducts I described in my smart light setup article. The same cable ducts are used to hide the LEDs used for indirect lighting.
How I integrate my smart home theater devices with OpenHab
The idea of having my own home theater is older than my smart home. Nevertheless once I started my journey towards that smart home I instantly saw the potential for a home theater. After-all there is quite some amount of automation used in regular cinemas. Smart home components are also regularly used to play music (more on this in a future article), so the step from home theater to smart home theater was a relatively small one.
The focus of my smart home in its current state is definitely the lighting. Fortunately the lights (or lack of them) is also a very important part of a home theater. That is why I was ready to automate as much as possible once I got my AVR-X2500H receiver. This is my vision for the smart home theater:
There should be one (virtual) button that starts the show. It will turn off the lights, block out the daylight and start all the needed devices (receiver, projector, BlueRay player). While I have not implemented everything, the core of this setup is already working. Let’s see how. The first step is to control as many parts of the setup as possible from OpenHab.
Integrate the Denon AVR-X2500H receiver
If you own the right receiver smart home integration into OpenHab is quite easy. An HomeAssistant integration seems to also be available but I am using OpenHab. With that installed you simply need to add the Denon binding, which can be done via the PaperUI. I am still using version 1 but there is also a newer version 2 with proper Thing support.
When using the version 1 binding, like I do, the first step after installation is to open a file in the services folder of your OpenHab installation called denon.cfg and add your own configuration.
x2500h.host=192.168.2.131
x2500h.update=telnet
x2500h.refresh=5000
The configuration is pretty minimalistic. I chose x2500h as the name because that is the model I am using. For the host value you need to provide the IP address of the receiver in your network (which of course needs to be reachable from your OpenHab instance).
It makes sense to first let the device search for new firmware if this is the first time you are using the receiver. In my case it found an update with several changes to its web interface (might be important) and Airplay 2 support.
The binding can use HTTP or telnet to communicate with the receiver. HTTP supports multiple connections, but the H models with HEOS seem to only support telnet, so I chose that. The refresh time in milliseconds is the default value but you can always update it yourself.
Once the configuration has been done, and you see no errors in the logs, create a new items file which will contain all items connected to the receiver. Mine looks like this:
Switch DenonPower                           {denon="x2500h#PW"}
Dimmer DenonVolume		"Volume [%.1f]"		{denon="x2500h#MV"}
Switch DenonMute		"Mute"			    {denon="x2500h#MU"}

String DenonInput		    "Input [%s]"	{denon="x2500h#INPUT"}
Switch DenonInputSpotify	"Input Spotify"	{denon="x2500h#SISPOTIFY"}
Switch DenonInputGame		"Input PC"	    {denon="x2500h#SIGAME"}
Switch DenonInputBlueray	"Input Blueray"	{denon="x2500h#SIGBD"}

String DenonCurrentTrack    "Song"          {denon="x2500h#TRACK"}
String DenonCurrentArtist   "Künstler"      {denon="x2500h#ARTIST"}
String DenonCurrentAlbum    "Album"         {denon="x2500h#ALBUM"}
These items will allow use control over power, volume and input settings for the receiver and get us information about the same values as well as the currently playing track. The detailed list of possible properties can be found in the documentation, the “x2500h” is the name from the configuration above. Now we can use those items to display a nice control panel in our Basic UI. I added this code to my sitemap.
Frame label="Denon Receiver" {
        Switch item=DenonPower
        Slider item=DenonVolume icon=soundvolume
        Setpoint item=DenonVolume minValue=0 maxValue=100 step=0.5 icon=soundvolume
        Switch item=DenonMute icon=soundvolume_mute

        Text item=DenonInput icon=receiver
        Selection label="Choose input" item=DenonInput mappings=[CD="CD", TUNER="Tuner", DVD="DVD", BD="Bluray", TV="TV", "SAT/CBL"="SAT/CBL", MPLAY="Mediaplayer", GAME="Game", AUX1="Aux1"]
    }
In this example I have a slider, up/down buttons and mute all for the volume. Of course you don’t need all of them. I am mostly using the Setpoint item.
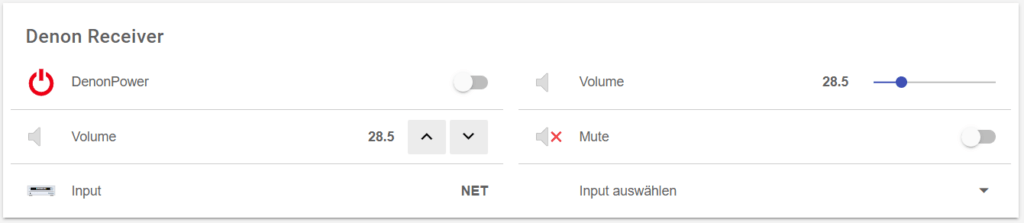
More detailed control over the different zones the receiver supports are also possible but I am mainly using it to turn the power on/off, update the volume and select a different source.
How to integrate lights
My lights in the living room are already integrated into OpenHab. There are indirect LED lights controlled by Tasmota, some Tradfri lightbulbs controlled via Zigbee2MQTT and a reading light controlling by a smart plug also running Tasmota.
All my lights are already controlled by OpenHab, most of them triggered by my Aqara motion sensors. They are also already combined to logical groups so everything is ready to be automated.
Everything is connected to one single source now, which is already more comfortable to use. Having a real smart home means leveraging automation for tasks like this though. Why go through all of this trouble just to still have to click a dozen buttons? Instead I started experimenting with rules and scenes. This is what I ended up with for now.
MotionSensorsActivated.sendCommand(OFF)
grLight.sendCommand(OFF)
DenonPower.sendCommand(ON)
// DenonInput.sendCommand("Bluray") // optional
This is a very simple script file I build on top of my scenes setup for OpenHab. This looks simple but it does a couple of things in the background: first all motion sensors (with the exception of the one in the bathroom for obvious reasons ;)) are turned off. Then all lights are turned off. Leaving the motion sensors activated might work in some cases, but in my case whenever I moved on the sofa I turned the lights back on – not optimal.
Once the light is turned off the receiver will be turned on and its input set to the BluRay player. Unfortunately I can not control the player itself and the projector yet, so those have to be activated manually.
Still while this may not look like much having this one click setup is pretty awesome. I might also add a dimming of the light first and maybe some color change of the LEDs too at some point. It could look like this
grDimmerWZ.sendCommand(25)The projector also requires a pretty dark environment, so I have to close the roller blinds. I am currently looking into options for automation here but finding a cheap and reliable method seems to be a problem. Expect another post about this in a couple of weeks though.
Future improvements
Beside the possibilities with the lighting and the roller blinds I am also looking for a way to automate the other devices needed. The projector provides a couple of interesting possibilities here. First of it has a 12V trigger output which activates when the device is turned on. I could put a sensor there and use it to automatically start the whole automation. It is also controlled by infrared with known commands (my phone can control it). I could get a connected infrared sender and control it from OpenHab that way. I am not sure if it is worth the work though.
The Samsung UHD Bluray player has a LAN connection and supports CEC via HDMI. One of those options might be usable to turn on the device. As I am not always using that but instead sometimes use my PC to play videos I have not investigated further.
So the journey is not over. I quite like the current setup already but I will definitely try to add more devices and build some more automations around it.