Brighten up your day! How to build an affordable and reliable smart light system – part 1
Are you looking to start building your own smart home and don’t know where to start? Or are you growing tired of the heavy burden of pressing light switches? Fear not! In this multi-part article I will show you how to build a cheap and reliable smart lighting system. The first part will explain some basics you need to get going.
But why?
I have written before about the most and least interesting applications of smart home technology. During my journey to my personal perfect smart home setup I discovered quite a lot of them. I noticed pretty early on that the perfect area to concentrate on when starting is smart lighting.
Smart light(bulbs) are pretty old already in terms of smart devices, they are easy to install (well if you don’t know how to install a light bulb maybe you should start by reading some other tutorials) and relatively cheap. They are constantly used in everyone’s daily lives and have so much more potential than plain old light bulbs.
So why not start here?
But… my old lights are working just fine!
Pressing a switch is surely not too much work, right? Are you sure about that? I have seen quite a lot of rooms that are only very dimly lit, use the wrong “white” color or are missing light sources in important places (for example at the reading spot).
Yet once you start using 3+ lights in a room to fix this it also gets very tedious to switch on and off all of them. Especially if you are tired or in a hurry. Still not convinced? How about lights that are slowly waking you up in the morning? That are dimming down to comfortable brightness during the night automatically? That you can switch off with one switch in the whole apartment… or by just saying the magical words… or on their own once you leave.
All of this is possible with smart lights and a nice setup. Relieving us of repetitive manual work is what technology is made for after all. Oh ok ok, I also admit that it is just a very nice and fun thing to play with 🙂
So here comes some theory. I know this may sound boring but it really helps!
Ok I got it! But how?
The first step to building a smart lighting system is to figure out what kind of lights are needed where. My strategy was to start with one room first and then quickly spread out to other rooms once everything is working like I want it to.
If you are interested there is a nice article from the New York Times on how to light a room properly but here is my quick rundown:
- Use a bigger main light or a set of smaller spotlights in a central position in your room (e.g. in the middle of the room or over the kitchen table). You can simply add smart bulbs to most existing lights at any point, so no need to buy a new one.
- Use indirect light on the walls or in the corners to generate some ambient and relaxing “base brightness”. Down- or upward oriented led strips are perfect for this. There are certainly nice looking ready made solutions out there but I prefer to use plain “hidden” lights for this. We will use smart led controllers to control those lights later. They work with pretty much any analogue LEDs so just buy what looks good to you. Just make sure to buy matching (white) LEDs, sometimes they differ very much in light color if you buy cheap ones (believe me, I know…).
- Alternatively or in addition use spot lights to highlight certain parts of your room, like artworks, if needed. For control we can use smart light bulbs again or smart plugs if the lights don’t use light bulbs.
- Add lights for special tasks. This could be a reading light or bright illumination of your kitchen counter tops or your work desk.
A combination of all of those makes for a really nice and adjustable light setup for every occasion. Following these general guidelines will improve your rooms, smart control of the lights is not necessarily needed. Meaning the smart part could also be added at a later point.
Make sure to also think about what kind of light you actually prefer. It might be tempting to buy RGB lights for everything but in my experience colorful lights are rarely used. Instead it might be more worthwhile to find the right shade of white (color temperature) or buy lights that can fade between different whites.
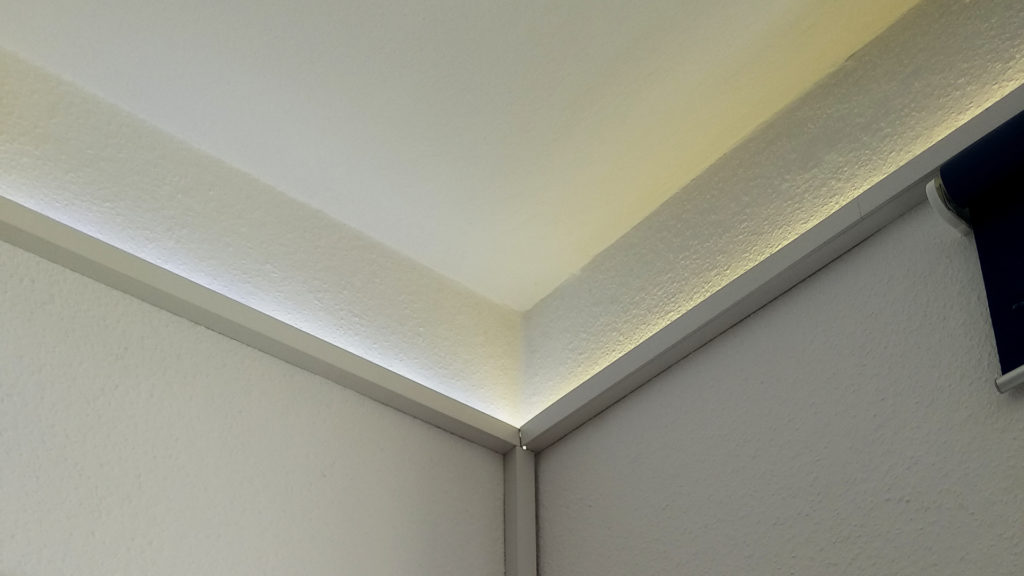
Indirect lighting
Indirect light is waaay underused in most peoples home in my experience. Only having a single overhead source of light is just not very comfortable. If instead you, like me, prefer a smoother spread out source of light, think about adding indirect light sources to your room. That means adding light sources that are not pointed directly into to room but instead reflect light via the walls or ceiling.
A great way of doing this is by adding special profiles to your wall that hold hidden LED strips which reflect light into the room. There are very nice and elegant looking kinds of these profiles out there but they tend to be on the more expensive side of things.
If you prefer to spend less money (and maybe also need to run some cables) here is a nice alternative: get some cable ducts from the hardware store. They are really cheap, allow you to hide away cables *duh* and often come in a nice white color that makes them really unobtrusive on white walls. They can also be painted to hide them even better.
I installed a continuous line of those cable ducts on 3 of 4 walls in a room. On top of those ducts I placed long strips of RGBW LEDs while hiding the power cables in the ducts themselves. The ducts are placed about half a meter below the ceiling allowing the LEDs, which are usually way too bright for direct illumination to spread their light evenly through the room.
If for one reason or another you cannot install anything that big on the walls there are also other solutions: lights can be wall mounted or put onto tripods to illuminate walls and the ceiling.
Direct lighting
Direct lighting is pretty much what is considered standard and should be available already in most rooms. A bigger lamp hanging from or directly screwed into the ceiling. There is not much to be said here.
Something that is not as common though, which might also fall into this category, is adding spot lights. When done in a subtle way additional lights which highlight interesting parts of the room are a great addition.
Direct light is especially needed in place where work should be done. That means mainly desks and the kitchen counter. Especially in the kitchen it is often quite easy to add those lights. Directly above the work surface there is usually another wall unit which can be a source of nicely hidden but still direct illumination of the work surface. Just put some LEDs on there. If you are looking for a long term solution maybe also add some kind of casing.

Stay tuned!
Find part 2 here, where I talk about the technology and software needed to make this awesome light setup smart(er).