Privacy, Control & all the Features: Self-Hosting Firefox Sync is the Way to Go
Firefox Sync is a powerful tool that allows you to synchronize your bookmarks, browsing history, and other data across multiple devices. While the default option is to use Mozilla’s own servers to store this information, self-hosting gives you greater control over your data and privacy, while still offering a seamless syncing experience. In this article, we’ll explore the benefits of self-hosting Firefox Sync, and I will show you step-by-step how to do it.
What is Firefox Sync?
Firefox Sync is a feature provided by Mozilla that allows users to synchronize their browsing data across multiple devices. This includes bookmarks, history, passwords, open tabs, and even add-ons and preferences. It uses end-to-end encryption to protect your data but you still have to rely on outside services.
Fortunately when using Firefox Sync, you have the option to store your data either on Mozilla’s servers or to self-host the syncing component yourself. Self-hosting Firefox Sync gives you greater control over the data, as as you are not reliant on a third-party service to store it.
To use Firefox Sync, you’ll need to sign up for a Firefox account. This is a free account that you can use to sync your browsing data across devices, as well as to access other Mozilla services such as Firefox Monitor and Firefox Lockwise (or you just host that yourself using Bitwarden). You could even self-host the account software but in my opinion that is not really needed. The data is the critical part.
Create a Firefox account
Here you either set up your own servers for authentication or you just head over Mozillas website and sign up for an account there. Alternatively, if you are using the Firefox browser already, you can click the menu button (three horizontal lines) in the upper-right corner of the window and click on “Sign in to Firefox” to open the sign-in page. Here you will also get the option to create a new account.
Once you’ve created your account, you can use it to sign in to Firefox on any device and start syncing your browsing data. I would wait a moment with this though as by default all your data will get synced to the Firefox servers. Instead lets set up our own first.
How to self-host Firefox Sync with Docker Compose
I would recommend to host the sync server using Docker and some docker-compose files. I have found this to be the simplest way for my own setup. You can find all the files for my full ZFS based home server here on my Github page as well as on my blog starting here. The installation process is nearly fully automated here using Ansible.
If you want to set up Docker & docker-compose only or are looking to run a simpler system only for your smart home then have a look at my smarthome server configs over here. The needed installation steps can be found in this article.
Now lets get to the part about hosting Firefox Sync. I decided to use the official mozilla/syncserver images altough there is also a version from linuxserver.io which has great images too. This is the docker-compose yaml file I came up with.
version: '3.7'

networks:
  traefik_proxy:
    external:
      name: traefik_proxy
  ffsync_network:
    driver: bridge

services:
    ffsync:
        container_name: firefox_syncserver
        image: mozilla/syncserver:latest
        volumes:
            - ${DATADIR}/ffsync/data:/data
        ports:
            - 5000:5000
        environment:
            SYNCSERVER_PUBLIC_URL: 'https://firefoxsync.${DOMAINNAME}'
            SYNCSERVER_SECRET: '${FFSYNC_SECRET}'
            SYNCSERVER_SQLURI: 'postgresql://${FFSYNC_DATABASE_USER}:${FFSYNC_DB_PASSWORD}@ffsync_db/${FFSYNC_DATABASE_DB}'
            SYNCSERVER_BATCH_UPLOAD_ENABLED: 'true'
            SYNCSERVER_FORCE_WSGI_ENVIRON: 'true'
            PORT: '5000'
        depends_on:
            - ffsync_db
        labels:
            - "traefik.enable=true"
            - "traefik.backend=ffsync"
            - "traefik.frontend.rule=Host:firefoxsync.${DOMAINNAME}"
            - "traefik.port=5000"
            - "traefik.docker.network=traefik_proxy"
        restart: unless-stopped
        networks:
            - default
            - traefik_proxy
            - ffsync_network

    ffsync_db:
        image: postgres:alpine
        container_name: ffsync_db
        restart: unless-stopped
        networks:
            - ffsync_network
        environment:
          POSTGRES_DB: ${FFSYNC_DATABASE_DB}
          POSTGRES_USER: ${FFSYNC_DATABASE_USER}
          POSTGRES_PASSWORD: ${FFSYNC_DB_PASSWORD}
All the labels with traefik are here to expose this server securely via HTTPS to the Internet using the Traefik reverse proxy as described here and assumes that the traefik_proxy network is already available. Be careful with this! To disable Internet access set traefik.enable=false.
The file defines two services, “ffsync” and “ffsync_db”, both of which are placed on a separate bridge network called “ffsync_network” to be able to talk to each other (and not to other services). The “ffsync” service is the Firefox Sync Server itself, while the “ffsync_db” service is a PostgreSQL database used to store user data. It is possible to use a simple SQLite DB instead but its easy to add a full database and this should make it more stable, especially with multiple users.
The volumes are set up to permanently store the containers’ data somewhere. Otherwise it would all be lost upon the next restart!
I am using multiple environment variables, some of them in file, some of them that are expected to be in a .env file in the same directory.
- SYNCSERVER_PUBLIC_URL: This is the public URL for the Firefox Sync Server instance. In this case, it is set to “https://firefoxsync.${DOMAINNAME}”. This is again using the domain name defined in the .env and results in something like https://firefoxsync.mydomain.com
- SYNCSERVER_SECRET: This is a secret key used to encrypt user data. It is defined as “${FFSYNC_SECRET}”, which should be set in the .env file
- SYNCSERVER_SQLURI: This is pointing the servie to its PostgreSQL database. It is using another set of variables form the .env file to get the right database name, user name & password
- SYNCSERVER_BATCH_UPLOAD_ENABLED: This enables batch uploads, which can improve performance when syncing large amounts of data.
- SYNCSERVER_FORCE_WSGI_ENVIRON: This is set to “true” to force the use of the WSGI environment, which is required for running the server behind a reverse proxy.
- PORT: This is set to “5000”, which is the port that the Firefox Sync Server listens on. I expose this port via the ports section on the host but that is only for testing. For real use the Traefik proxy will call your container directly on the port (set up via the label), no need to expose it.
The “ffsync_db” service is defined with the “postgres:alpine” Docker image, which is an official image of PostgreSQL and reuses the same variables to create a database table and a user/password combination for access.
Here is a more minimal version without any reverse proxy or extra database if you just want to test:
version: '3.7'

services:
    ffsync:
        container_name: firefox_syncserver
        image: mozilla/syncserver:latest
        volumes:
            - ./ffsync/data:/data
        ports:
            - 5000:5000
        environment:
            SYNCSERVER_PUBLIC_URL: 'https://firefoxsync.example.com'
            SYNCSERVER_SECRET: 'supersecret'
            SYNCSERVER_SQLURI: 'sqlite:////data/syncserver.db'
            SYNCSERVER_BATCH_UPLOAD_ENABLED: 'true'
            SYNCSERVER_FORCE_WSGI_ENVIRON: 'true'
            PORT: '5000'
        restart: unless-stopped
Testing your setup
Now that everything is set up a simple docker-compose -f firefox-sync.yaml up -d will download the images and start your containers. Run docker-compose -f firefox-sync.yaml logs to see if there are any errors. You might need to make sure that the user used inside your docker container (root by default) has access to the directories shared to store the data.
Once everything is started you can visit https://firefoxsync.${DOMAINNAME} in your browser and should see a simple “it works!” message. If you see that everything is working well, otherwise have a look at the logs and fix any issues you see there.
Configure the Desktop Firefox browser to use you self hosted sync instance
Now that you have your own instance of the Firefox sync tool running we need to teach the browser to use that instead of the official servers. Type about:config in your browser bar, accept the warning and search for identity.sync.tokenserver.uri. The value for this should be something like https://token.services.mozilla.com/1.0/sync/1.5. Change this to https://firefoxsync.example.com/token/1.0/sync/1.5 while of course using your own domain.
Now use the menu button (three horizontal lines) in the upper-right corner of the window and click on “Sign in to Firefox”. Then you configure what to sync and click the sync now button to test it. If it takes a couple of seconds the first time then everything worked. If it finishes right away then most likely something is wrong.
Head over to about:sync-log to see logs with more information. The first time I tried this I saw some errors about the authentication process with my server failing. Making sure to use the correct SYNCSERVER_PUBLIC_URL variable including the HTTPS part fixed this. Now everything should start working! Let’s sync more devices.
Configure the Android Firefox browser to use your self hosted sync instance
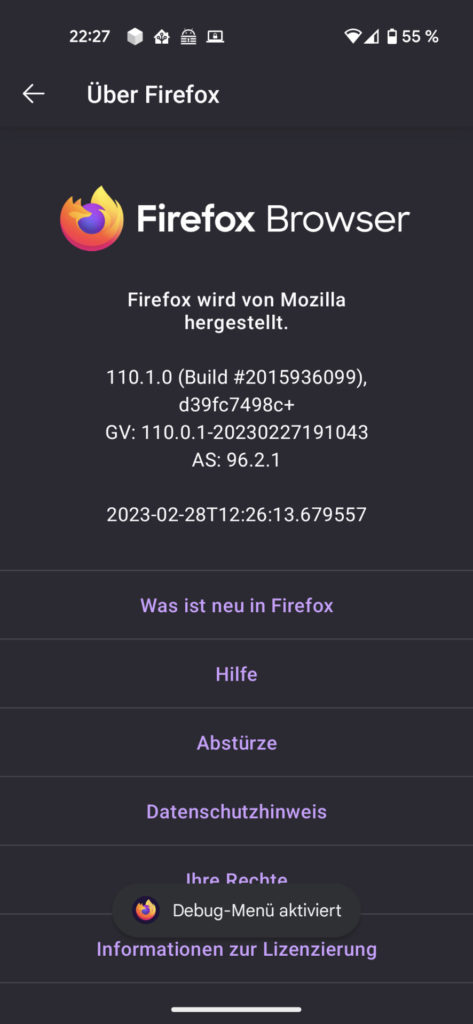
On Android the setup was slightly different for me. Open the app and go to the settings menu (click the 3 dots in the corner). Scroll down to “about Firefox” and click on that. On the next screen you should see a Firefox logo on top. Click on that five times until you see a small popup about enabling debug mode.

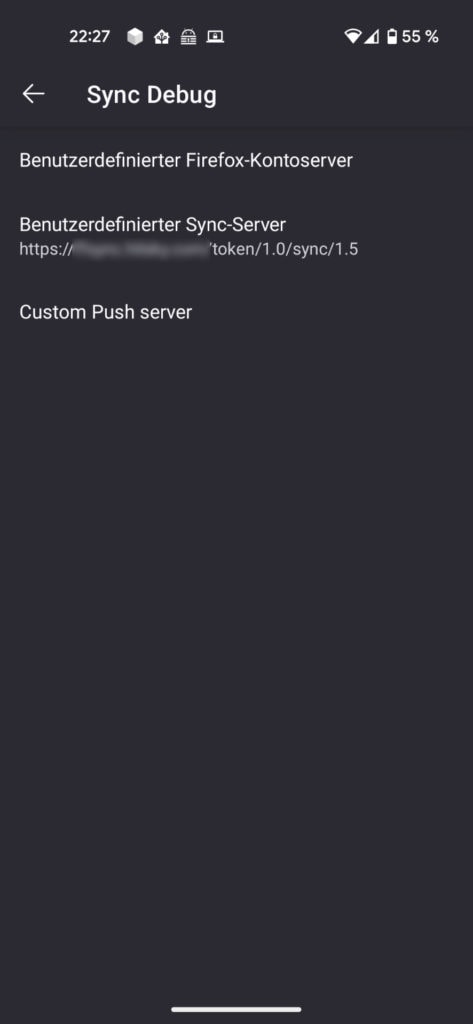
Now go back to the main menu and scroll up. You should see a new menu entry “Sync debug”. Click that and change the custom sync server URL in the second field to your own server like https://firefoxsync.example.com/token/1.0/sync/1.5.
Then go back to the main menu again and log in to your Firefox account at the top. Now you device should start syncing to your server and you will see tabs from your other devices.
Configure the iOS Firefox browser to use your self hosted sync instance
To use your self hosted sync instance with iOS on an iPhone or iPad install Firefox and then go to the settings menu. At the bottom of the menu you will see a “About” section. A couple quick clicks on the “Firefox 113.1 (30885)” (or any newer version number) field will show you a lot of new options in the control menu.
Now scroll up to the top and find the Firefox account section. A new “Advanced Sync Settings” entry should be available here now. Click it and toggle the “Use Custom Sync Token Server” switch. Then add your own servers URL below like https://firefoxsync.example.com/token/. iOS needs a special treatment here so make sure to not include the 1.0/sync/1.5 part that is needed on other operating systems (see the discussion here). You might also need to toggle the switch for custom FxA login server and set it to https://accounts.firefox.com.
After a quick restart of the app & in my case the whole iPad I was able to log in with my Firefox account and started seeing my synced tabs.