Building a full home server – creating users and samba shares
Building a home server includes taking care of user management and (network) file shares. This can be a tedious task and chmod and samba shares’ configurations can be tricky to create. I created an Ansible script, including everything I learned about this, to fully automate these tasks. Here is how to use it.
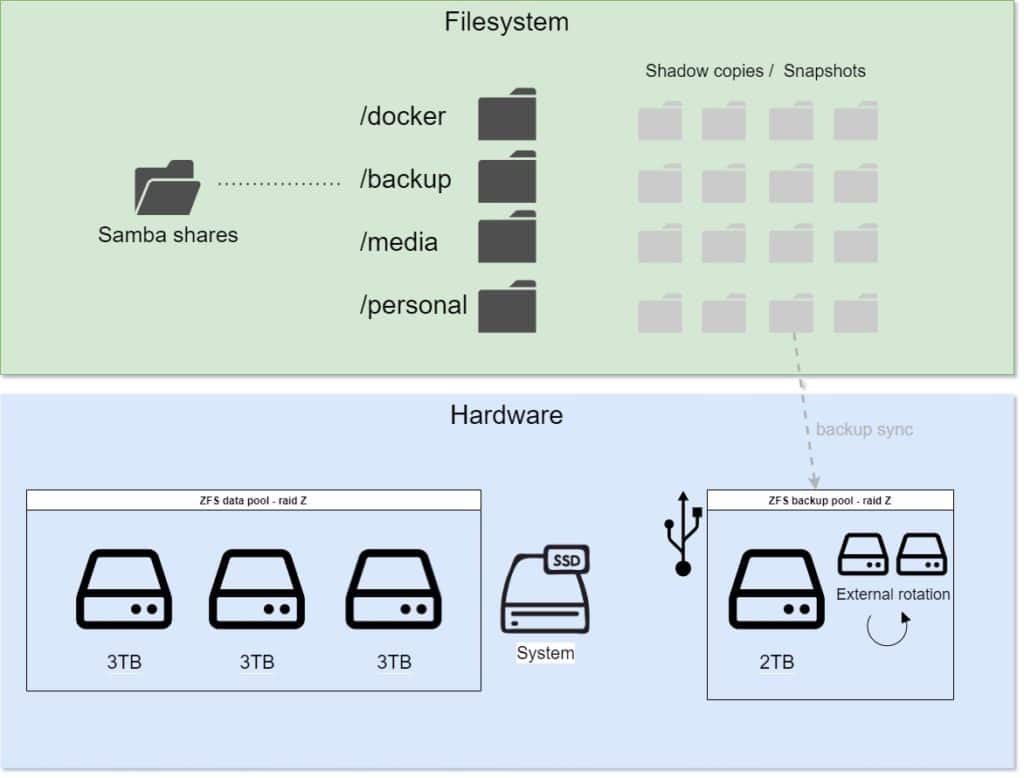
This setup is based on my custom home server setup with all the basics described here. You can also read about how to set up a robust ZFS filesystem with build in backups in the same series. As always all the code can be found on GitHub.
If you are just looking to run the automated user and share creation follow just follow these steps:
sudo apt install git ansible
git clone https://github.com/OliverHi/zfs-homeserver.git
cd zfs-homeserver/ansible
// update ./vars/main_vars.yml to your liking
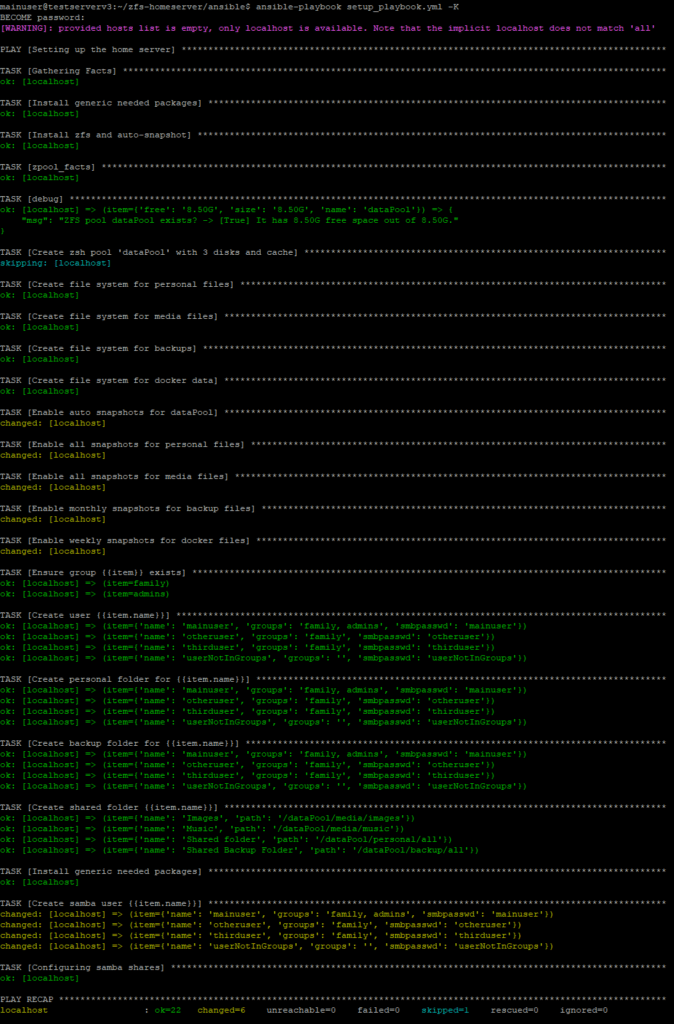
ansible-playbook setup_playbook.yml -KThis should result in an output somewhat similar to the screenshot below and the creation of a bunch of new user accounts and network shares. You can always change the variables and just rerun the script to apply updates. Now lets get into why and how this is working.
Creating users and user groups
If you store data on your server not just for yourself but also other people you need to think about how to properly separate it. Access to data on a Linux system is usually controlled via three permissions: read, write and execute. They can be given to the owner (user U) of the file/folder, the group he belongs to (group G) or everyone else (others O).
This is a pretty simple system that you can use to control access to data. For example you could make your file readable, writable and executable for yourself, allow your group only read access and fully shield it from anyone else by using u=rwx g=r. This is often written in a 3 times 3 character series like: rwxr----- which would be the same thing as the example given before. Rights are written read,write,execute in the order of user,group,others with the minus meaning that this right for that user is missing.
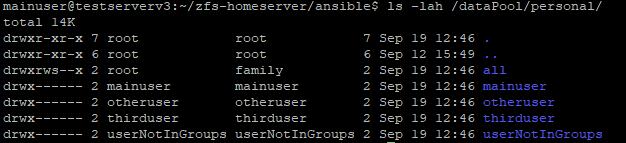
You can check the current settings for any file or folder by using ls -lah. You could directly use the chmod command to manipulate these rights but as this can get quite tricky and time consuming I decided to automate this process with Ansible.
In the first step in the setupUsersTask I am creating a set of user groups and a couple of users that are assigned to these groups. You can control this by updating the variables in the main vars file.
usergroups:
  - family
  - admins

users:
  - {name: 'mainuser', groups: 'family, admins', smbpasswd: 'mainuser'}
  - {name: 'otheruser', groups: 'family', smbpasswd: 'otheruser'}
  - {name: 'thirduser', groups: 'family', smbpasswd: 'thirduser'}
  - {name: 'userNotInGroups', groups: '', smbpasswd: 'userNotInGroups'}
Just add any group you want to use to the list. I decided to go with a family group that every user from my familiy will be added to and a bunch of users. Each gets a name can one be part of zero to x groups. Only use groups here that you have added to the usergroups variable before though. The smb password will be used later.
Just running the Ansible playbook will create those groups and users. If you run the script again later it will detect the already existing users and ignore them unless you changed anything about them.
Creating folders
Users are just the basis though, on a storage server each of these users needs some place to put their files. Then we can use the the users to control access to those folders and files. Some might be only for the user some might be shared between a group.
I decided to create a personal folder, which can only be accessed by that one user, for each user. I also added a personal backup folder. All this data is stored in the ZFS pool we created earlier for proper backups.
Beside the personal folders for each user I also decided to go with a list of shared folders that allow access for everyone in the same group. The group is defined via the shared_folders_group variable and the folders can all be added to the shared_folders list. Just do not reuse a path from an existing personal folder here.
All the shared folders are created by Ansible with read, write and execute rights for both the owner of the file and the full group. Other users are not allowed though. I ran into a problem though where some files created by one user in the shared folder only belonged to that user and others were not able to delete it for example. I was able to fix this by setting the so called Setgid, another file access property, that leads to newly created documents belonging to the group instead of the user. This way all shared files can be fully used.
All those folders we created have one problem: they are only reachable for users on the server. Usually people or not working directly on the server but instead want to access their data from other computers on the same network. This is what network shares are used for.
As the other devices on the network are running different operating systems we need a protocol that pretty much all of them understand. That protocol is samba or SMB. I again automated the setup process for this via the setupSambaTask.
What this task is doing is installing the needed packages, starting the service that runs on the server and create new users. Unfortunately samba uses a different set of users, not the built in Linux users. Therefore I created a samba user for each Linux user with the same name and the password from smbpasswd from the main vars file. As the administrator can see these passwords and they are saved as plain text in the vars file they should be updated by the users as soon as possible. They can be changed by running the smbpasswd -U userName command.
The actual configuration that controls which folders are provided via samba is written as a configuration file and stored in /etc/samba/smb.conf Upon running the Ansible playbook it will take the homeserver_smb.conf template and fill it with data from the var file.
The generated samba configuration will provide one share for each users private and backup folders that is only accessible for this user. It will also provide shares for all shared folders which will be accessible for the users in the shared_folders_group. Finally the user marked as adminuser in the vars file will have another share for /home/{{adminuser}}/homeserver_config that can be used to access admin files. I tweaked this to point to the folder which contains all the Ansible files to be able to change those remotely.
Afterwards Windows clients can start using these shares by just typing \\ip.of.the.server into the Windows explorer and providing the name and password of the samba (not Linux!) user to access their data.
Sharing the snapshots with Windows
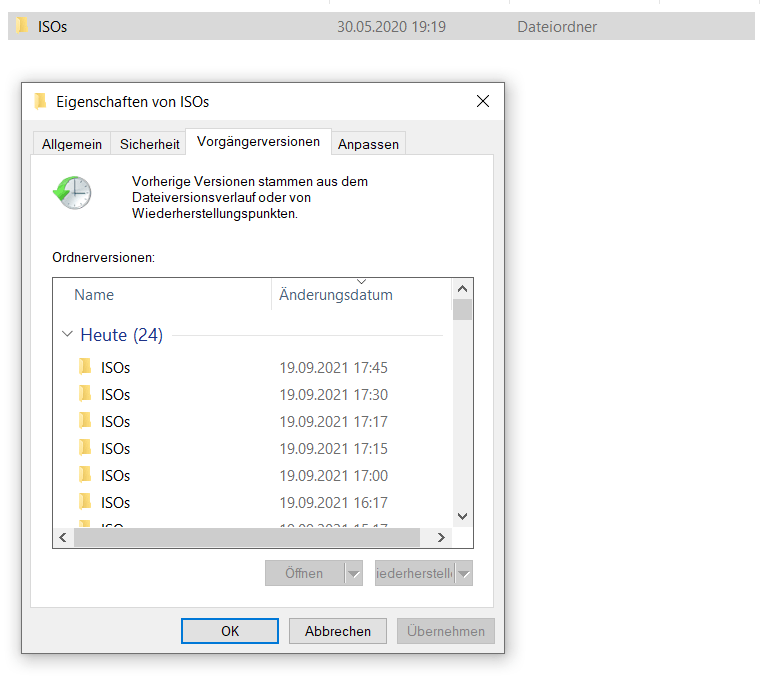
Finally there is a cool feature for Windows clients that we can enable for the samba shares: versioning. In Windows if you right click on a network share you will see a tab for old versions. These can easily be viewed or even used to reset the data to that point in time with a couple of clicks. Very convenient! This is provided by Windows via so called shadow copies.
If you remember my article about the ZFS filesystem you will know we have a similar feature available here: snapshots. And bingo: there is a pretty simple way of using snapshots for this version history. First step is installing the samba-vfs-modules package, which is done by the Ansible task.
The second step is to use the right configuration in the samba .conf file. The magical settings I already added to the file are:
   shadow: snapdir = .zfs/snapshot
   shadow: sort = desc
   # Specify snapshot name: frequent, hourly, daily... as desired
   # shadow: format = zfs-auto-snap_frequent-%Y-%m-%d-%H%M

   # all snapshots
   shadow: format = -%Y-%m-%d-%H%M
   shadow: snapprefix = ^zfs-auto-snap_\(frequent\)\{0,1\}\(hourly\)\{0,1\}\(daily\)\{0,1\}\(monthly\)\{0,1\}
   shadow: delimiter = -20
This tells samba to use the ZFS snapshots for the versioning feature and describes their name (source). As we used auto snapshot before to create them, the naming schema will always be similar. If you use anything else to create the snapshots or want to name them differently you need to update the format/snapprefix variables here. For anyone using the same solution: no need to change anything here.
Using this configuration makes it very simple for clients to view or restore old versions of their files if they, for example, change something by accident. The best part about it: it is pretty much “for free” as we already use these snapshots for our backup system.