Storing sun glasses in the coolest way – using 3D printing
I have a couple of sun glasses scattered around my apartment. Storing sun glasses to keep them in one place and have them at hand when leaving was my latest challenge – I printed some cool looking glasses holders for them.
Storing sun glasses
I have two different sun glasses but no proper storage for them. I bought them without a case and I usually don’t need one either. I either wear them or clip them to the front of my shirt. Unfortunately this also means that there is no proper place to store them at home.
Until now they were just moving around the apartment usually lying around in some place in the hallway close to the apartment door to have them at hand when I leave and need one. Admittedly that is not very often right now during the winter.
Annoyed by the chaos and sometimes not finding my glasses when needed I finally decided to do something about it and create a proper storage solution for them. Of course it has to be something special though…
The model
I though about building some wooden holder for my glasses but had no great idea. I only knew I wanted something special, so I decided to take a look around the Prusa library of 3D models over at printables.com.
The community around 3D printing is awesome and I have already used many nice free models in the past. Again I quickly found a great model, this time from Kostka3D. The “Sir Nigel Squintsworth Glasses Holder” (what a great name), is made to store glasses standing upright.
I wanted something stuck to the wall so I downloaded the model .stl file and loaded it into PrusaSlicer. Then I used the negative volume functionality to created two new boxes taking away material from the model.

These boxes can be scaled and moved like any other model in the slicer. I created two of them to remove the bottom platform and some layers in the back to have a flat surface.

Everything inside these boxes will be removed during slicing. Be careful though to position the model in a way that the bottom actually touches the printer bed surface after the material is removed.
Printing & assembly
After slicing I used my Octoprint setup to send the gcode file directly from PrusaSlicer to Octoprint and my printer. Then I waited for some time for two of these to print on my Prusa Mini and collected the printed models. No problems there.
The print settings are pretty standard. I used white Prusament PLA and the standard 0.2mm Quality setting in the slicer. No supports are needed to print this model and the infill percentage is up to you. I used 20% but I think you could even get away without any at all as this is not really load bearing.

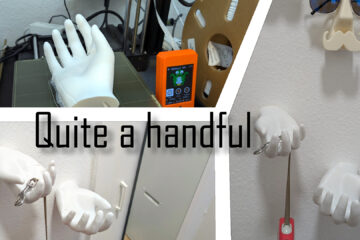
After some tests with the sun glasses I mounted both “Sir Nigels” to the wall using some removable glue pads. I though about using screws but then I would have needed to update the model in some way to hide the screw holes, this is just the simpler solution. And glasses are really not that heavy…
I really love the result. The holders are great to look at, I have to laugh a little every time I see them. They are mounted to a wall right next to my apartments door so the glasses are now always in reach when I leave.
Great result for now! I am time and again amazed at how futuristic 3D printing feels. You find some files online, click a couple of times and suddenly you have them in your hands made from plastic directly in your home.