Upgrading a pull-up bar -Why 3D printing is awesome
I recently bought a pull-up bar to stay fit during the Corona times. It is a pretty simple black device that looks relatively good – until you see all the silber screw heads. So I went ahead and fixed that with my 3D printer.
The pull-up bar
A pull-up bar can offer some nice training at home. It helps build upper body strength and if you get one that can be mounted on the wall it is always ready and out of your way if you don’t use it.

I bought a really simple and it won’t win any design prices. Still it looks good and unobtrusive enough. I had two major problems with it though. First the grip: the bar comes without any soft materials, it is just a pure metal bar. While it is pretty sturdy the problem here is that your hands will start to hurt pretty quickly. Some kind of cover is needed to make it more pleasant on the hand and to give a better grip.

The second problem is one of aesthetics. The bar looks pretty ok with the dark black but the silver screws used to mount it definitely catch the eye. And not really in a good way.
Fixing the grip
The pure metal bar is really uncomfortable to hold on to and also a little bit to small for me. The simple fix for this was buying some adhesive tape usually used for bike handles.

This tape seems to be pretty sturdy and feels much nicer. It offers a way better grip. I simply wound it around the bar and secured it with some additional black tape. The adhesive on the tape itself is not enough to securely hold it.
The black tape is also pretty much “invisible” on the black bar so there is no compromise in regards to looks either.
- If you are looking to buy something similar consider using these affiliate links to support the blog:
- Tape (usually for bike handles)
- Smaller tape to secure the sides
- Pull-up bar
- Black 1.75mm PLA for the prints
Fixing the screw heads
First I though about painting the screws to hide them better. That would have taken some time though, a color that actually stick to the metal and you would risk damaging the color every time you actually need to tighten or loosen the screw.
Instead I came up with another idea: simply hide the screws behind some black covers. Instead of looking for some perfectly fitting covers I decided to build them myself.
Using a caliper I quickly measured the two different screw heads and then started modelling them in my 3D modelling program. I came up with a quick design, exported it as an STL file and loaded it into PrusaSlicer. A moment later my Prusa Mini 3D printer started printing and 5 minutes later I had my first screw cover in hand.

This is where the full strength of 3D printing comes into play: rapid prototyping. The PLA material is really cheap and such small pieces don’t take a lot of time. This was really fortunate as in my case I had to update both models.

For the smaller cover I had to add a ring on the bottom to also cover the washers and for the bigger one I made a couple of mistakes with the first try result in something totally wrong. Fixing this just took a couple of minutes to update the model and start printing again.
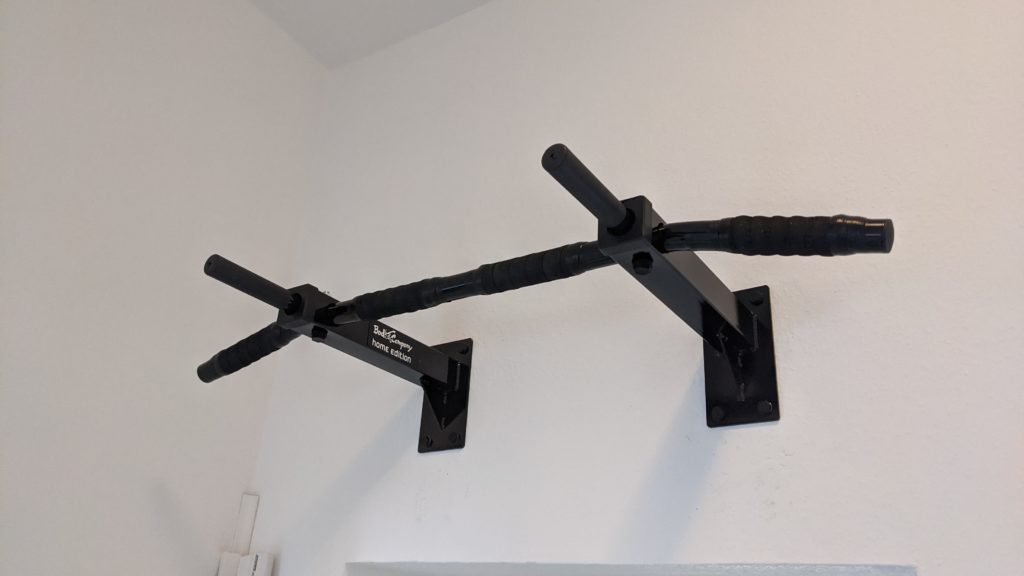
Overall it took me around 30 minutes to measure and model and maybe 45 minutes to print all the covers. Now the pull-up bar looks so much better. And I if I every break any covers or need more I can simply print another one in 5 minutes. Sometimes technology is truly awesome even if used just for the small things 🙂
If you are looking for more 3D printing topics you can find them here. Stay tuned for more about 3D printing, home automation and custom furniture on this blog.