Tasmota Hue emulation -Adding voice control to Tasmota can be super simple
Adding voice control to your Tasmota device can be super simple. Tasmota Hue emulation allows you to add voice control for any Tasmota device with just a couple of clicks. Here is how to do it.
Hue emulation
The easiest way of adding voice control via Alexa for generic smart home devices is by hiding their details and instead emulate devices that are well supported. Usually this mean emulation Hue light bulbs and gateways.
Emulation with smart home controllers
If you are running a smart home controller software like OpenHab or HomeAssistant together with your Tasmota devices there are several well integrated ways of adding Alexa/Google Home support.
You can enable Hue emulation inside of OpenHab to integrate every OpenHab device, including the Tasmota ones. If that does not work there is also a more generic way: an external software called HA bridge which can also emulate all your devices as Hue devices.
Emulation directly with Tasmota
But what if you do not have or want an additional smart home controller running all the time? I was in this situation when I installed a Tasmota controlled smart outlet for my sister. She was looking to control it via an Echo Dot but is not running a full smart home controller system. Fortunately Tasmota itself is able to emulate a different device. No additional hard- or software needed. Let’s see how it is done.
Enabling Tasmota Hue emulation on any Tasmota device
Enabling Emulation mode in Tasmota is pretty straight forward. Find the IP address of your Tasmota device and use it to open the web interface first. You should see a main menu looking similar to this one. The actual version does not really matter but a version of at least 6.5.0.9 would be great. Otherwise maybe update your Tasmota installation.
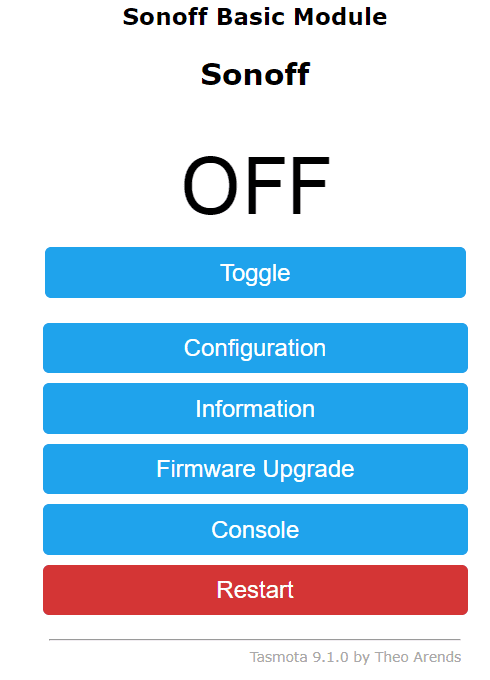
Tasmota main menu 

Configuration menu
In the menu go ahead and select “Configuration”. Once there click the “Configure Other” button to get to the advanced settings. The last two blocks are interesting for us.
First you should choose a “Friendly Name 1”. This will be shown in the main menu of Tasmota and more important: it will be the name of the emulated device that Alexa/Google Home will see. Adding a $ at the start will hide the device from Alexa, anything else will be shown. Be careful with special signs in your language though. I had some problems with German Umlaute (Ä, Ö, Ü) not being displayed properly sometimes.
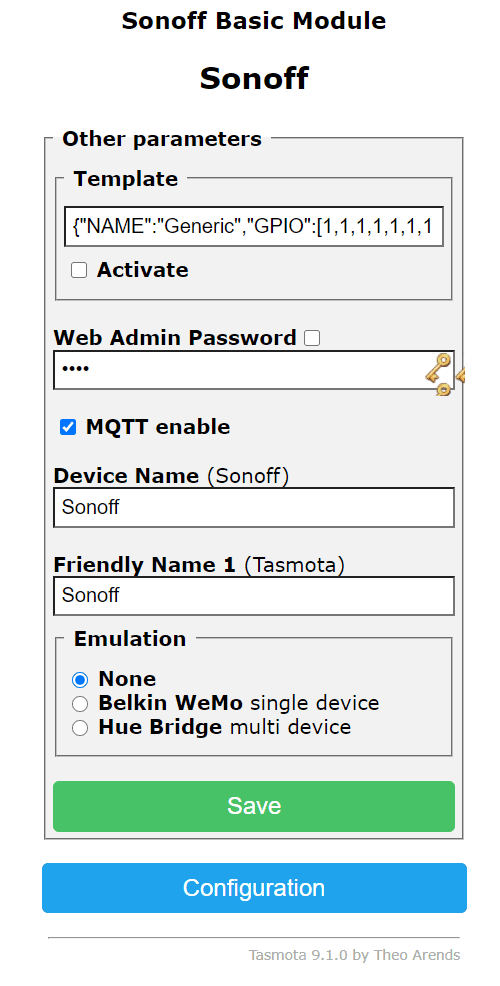
Next you select one of two emulation modes. Either a Belkin Wemo switch used for a single switch item like the Sonoff basic relay or a Hue bridge if you need more. The Hue bridge can support multiple values. Beside on/off there is also support for dimming and colors (since Tasmota version 6.5.0.9). Very handy for something like the H801 LED controller.
If you are looking to buy some devices that support Tasmota consider buying it via these affiliate links. No additional costs for you and I get to pay the servers.
- The H801 LED controller (don’t forget to flash Tasmota)
- Sonoff S20 smart plug (or S26 for the US)
- 1 channel relays (Sonoff Basic R2) which can be build into lamps for example
- 2 channel relays (Sonoff Dual R2) which can control 2 devices or something like a motor
For more details you can check the official documentation. To finish the setup just click “Save” and your device will restart. Now you are ready.
Discovering the devices from Alexa
Either ask your Echo (or other Alexa device) to search for new devices or use the App to do the same. You need to have at least one physical Alexa device for this to work. After searching for some time it should just find your newly emulated device under the name you decided on earlier.
Go ahead and control your Tasmota devices via voice! Very handy.